
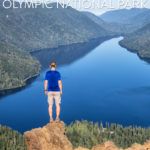
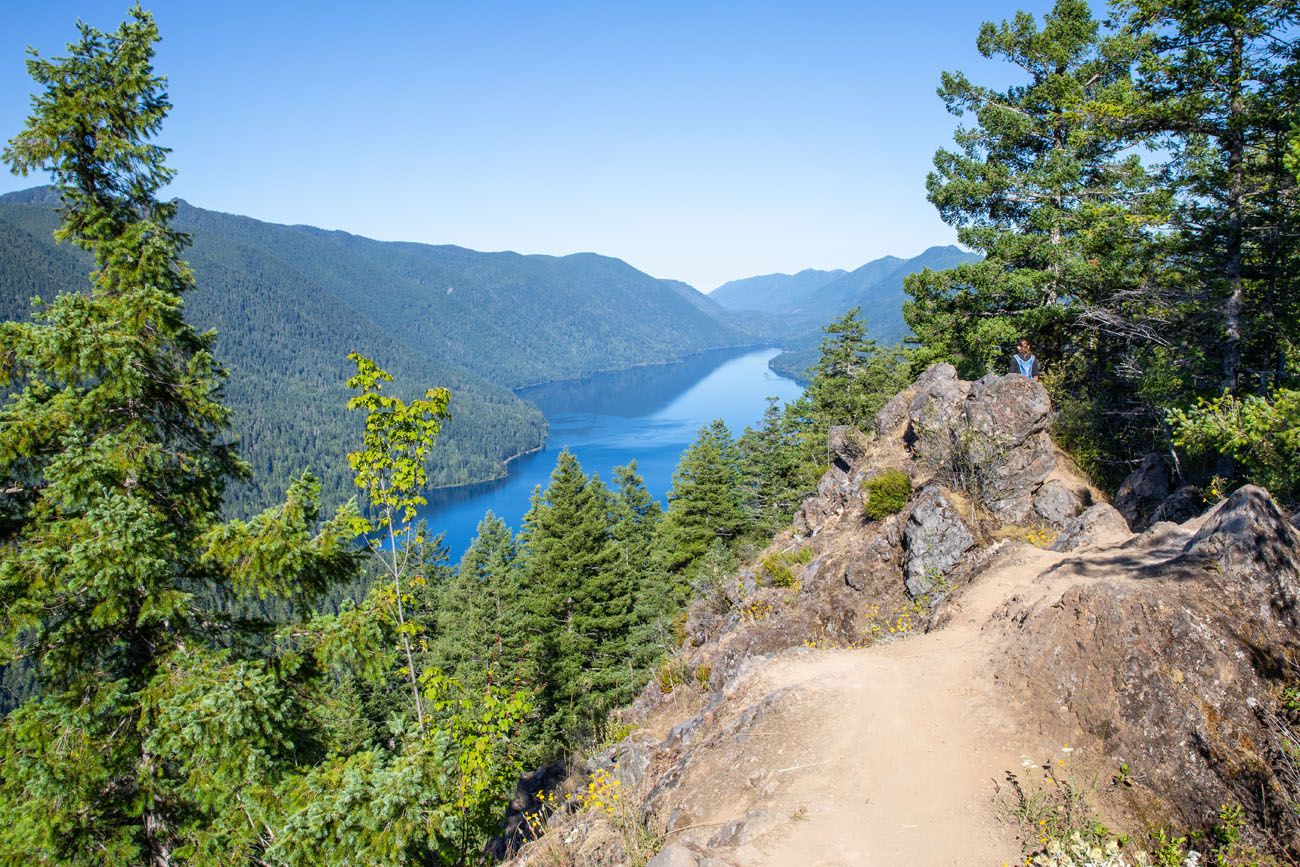
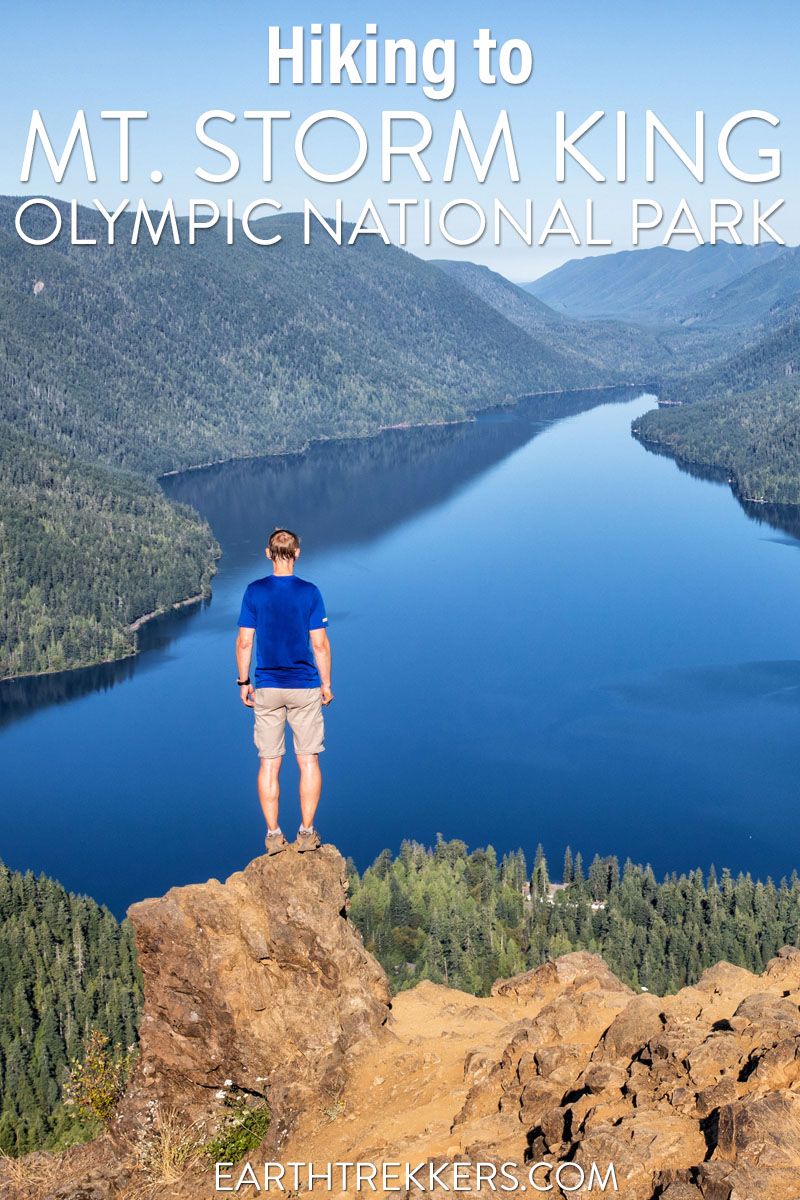
Mount Storm King earns its dramatic name. This short but relentlessly steep trail in Olympic National Park climbs over 2,000 feet in just over two miles, ending with a rope-assisted scramble to a rocky outcropping with sweeping views over the impossibly blue waters of Lake Crescent.
We hiked this in July on a clear summer morning, and came away with mixed feelings that we think are worth sharing. The hike is genuinely tough for its length, and most of the climb is through dense forest with very little to look at until you near the top. But the final section, the exposed trail, the ropes, and the scramble to the summit, is unlike anything else in Olympic National Park, and the view of Lake Crescent from the top is spectacular.
If you like the idea of a challenging hike with a memorable, adventure-style finish and a beautiful reward at the top, Mount Storm King delivers. Here’s everything you need to know before you go.
March 2026 Update: Added new photos of the rope sections, added frequently asked questions and additional details to the trail guide section.
Mount Storm King Hiking Stats
Distance: 4.6 miles (7.4 km) round trip
Difficulty: Hard
Total Elevation Gain: 2100 feet (640 m)
Starting Elevation: 700 feet (215 m)
Highest Elevation (Mt. Storm King): 2,700 feet (825 m)
Length of Time: 2 to 4 hours
When to Go: May through October
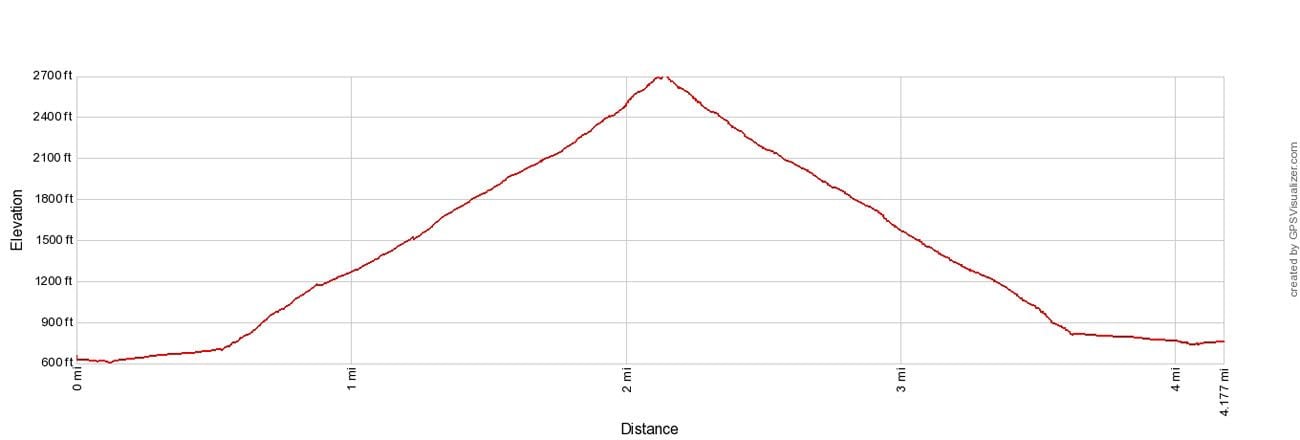
Mount Storm King elevation profile
Please practice the seven principles of Leave No Trace: plan ahead, stay on the trail, pack out what you bring to the hiking trail, leave areas as you found them, minimize campfire impacts, be considerate of other hikers, and do not approach or feed wildlife.
Getting to the Trailhead & Parking
The Mount Storm King hike begins near Lake Crescent in Olympic National Park. The trailhead is located at the Storm King Ranger Station, just off Highway 101 on the south shore of the lake.
To get here, turn onto Lake Crescent Road and follow the signs for the Storm King Ranger Station. There is a parking lot next to the ranger station, which also serves hikers visiting Marymere Falls.
The trail begins on the east side of the parking area, passes behind the ranger station, and then crosses under Highway 101 before heading toward Marymere Falls and the Mount Storm King junction.
Parking can fill up quickly on summer mornings, since this lot serves multiple popular trails. If you are visiting between June and September, try to arrive early in the morning or later in the afternoon to find a space.
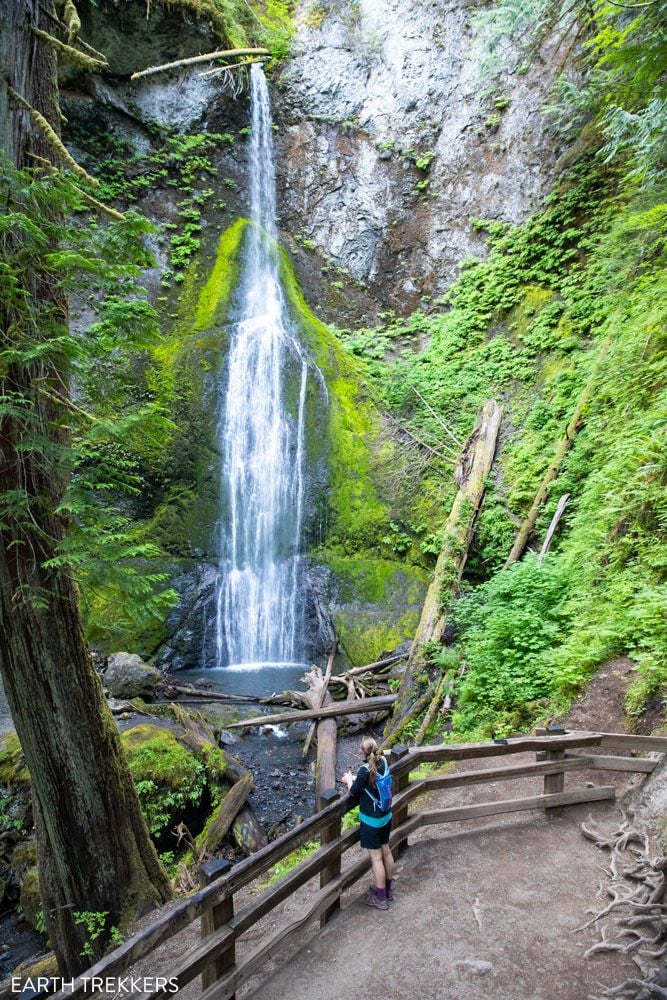
PRO TRAVEL TIP: If you plan to add Marymere Falls to your hike, you’ll start on the same trail before branching off toward Mount Storm King.
Mount Storm King Step-By-Step Trail Guide
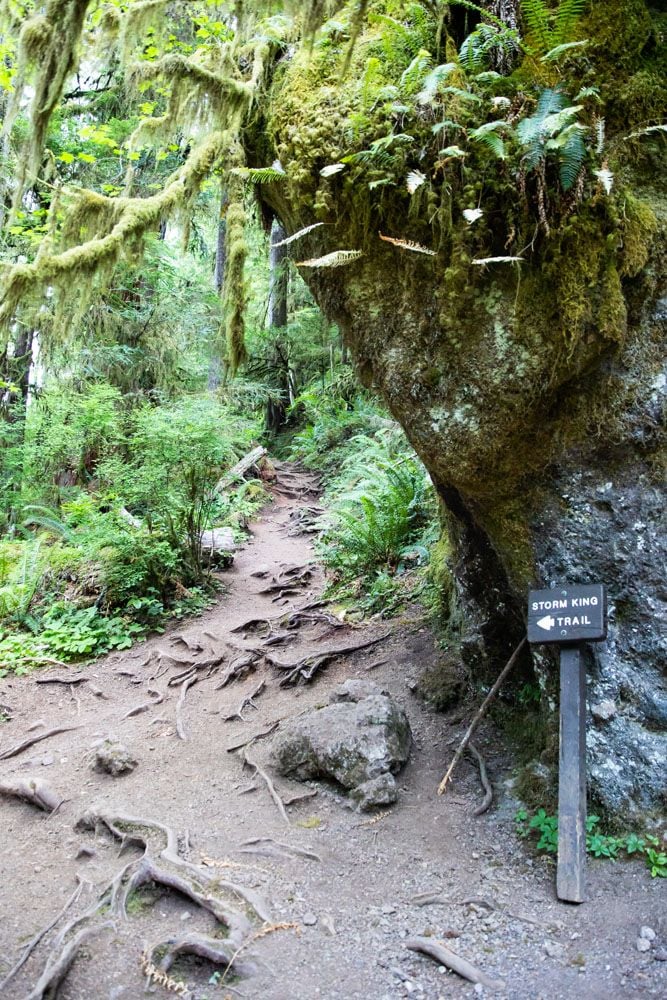
Trailhead to Mount Storm King Junction
0.0 to 0.5 miles | 10–15 minutes
The hike begins on a flat forest trail shared with the Marymere Falls hike. It’s flat, it’s beautiful, and it smells wonderful. This first section passes through a lush forest before reaching the junction where the Mount Storm King trail branches off to the left.
Enjoy this part of the trail. Hiking conditions are about to change dramatically.
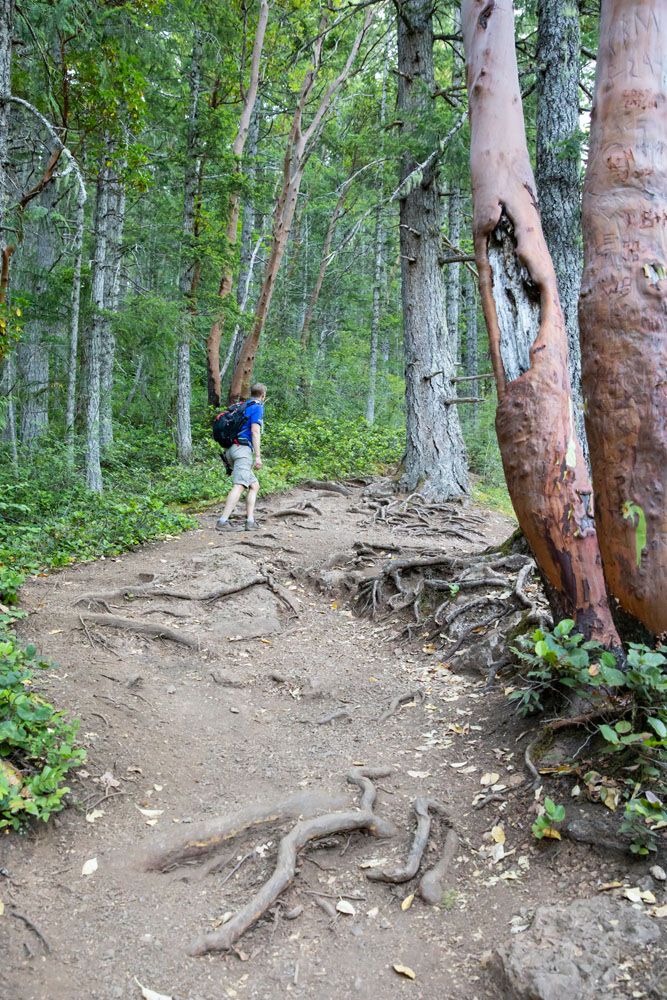
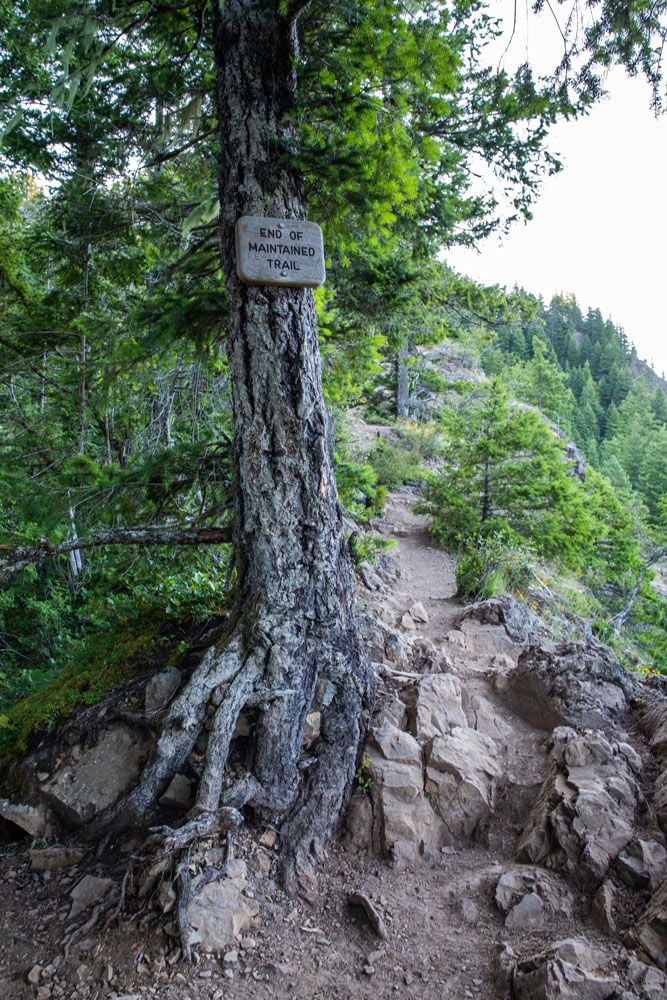
The Steep Forest Climb
0.5 to 1.6 miles | 45–60 minutes
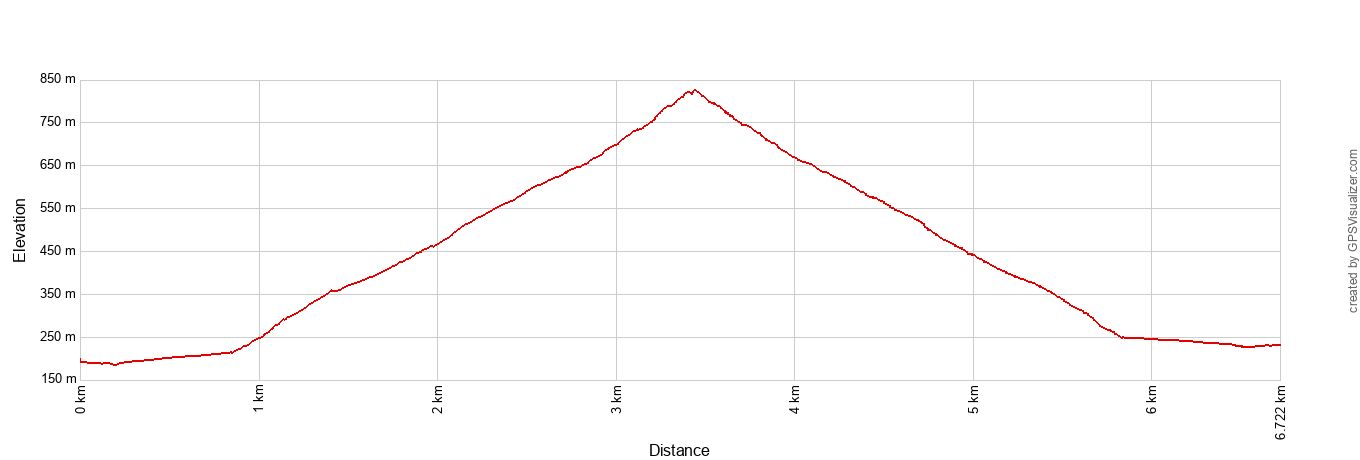
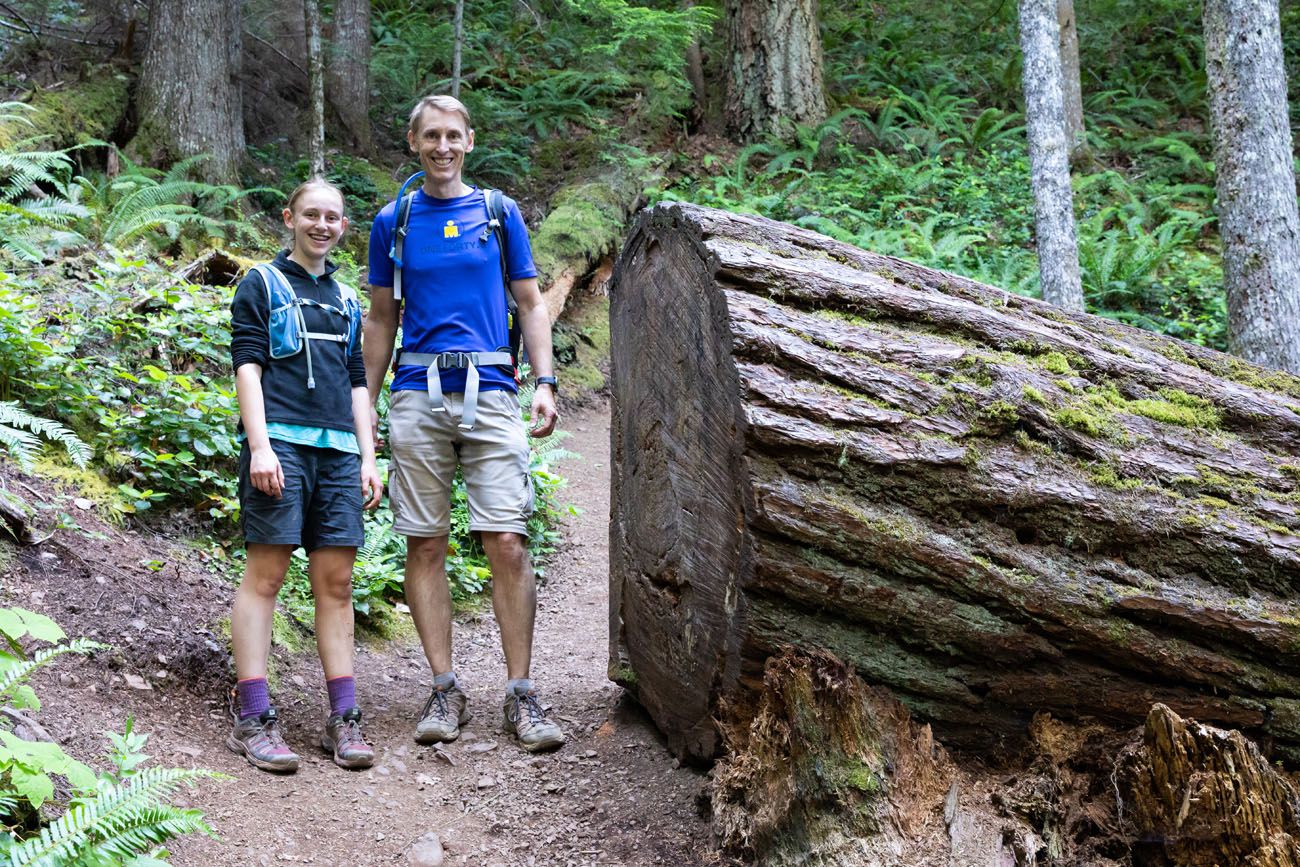
A half-mile into the hike, you say goodbye to the flat trail and begin the steep climb up Mount Storm King. The trail switchbacks up through dense forest and it is the longest and most strenuous section of the hike, gaining most of the elevation on the way to the summit.
The trail junction and the start of the climb up Mount Storm King
The climb is steep, unrelenting, and almost entirely through dense forest with very little to break up the effort. Don’t expect to stop and admire the view on the way up. For most of this section, the trees are your only scenery, and the trail doesn’t let you forget how hard it’s working you.
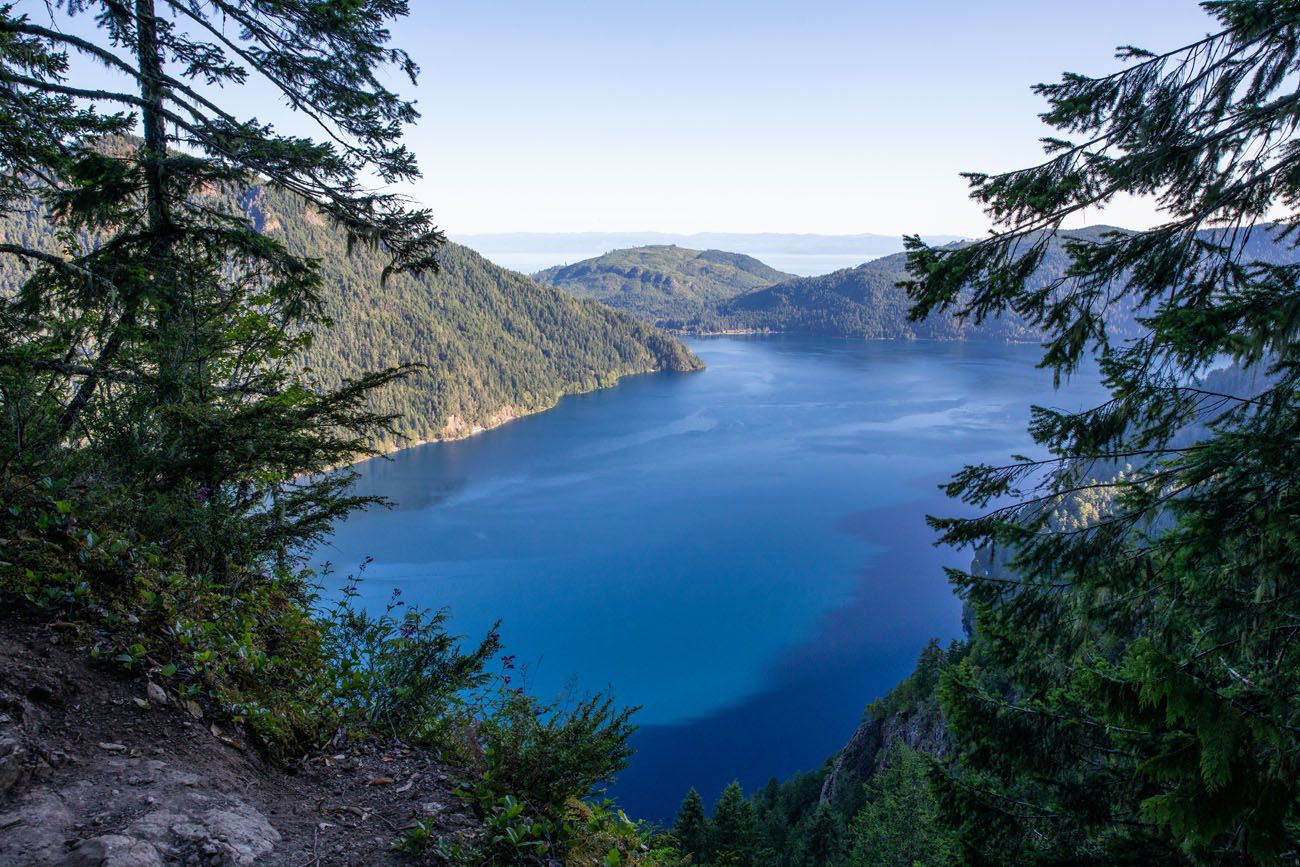
First Views over Lake Crescent
1.6 to 1.8 miles | 10 – 15 minutes
About 1.6 miles into the hike, you reach a small clearing with your first view over Lake Crescent, a deep blue lake surrounded by forested mountains.
It’s a great spot to take a break before tackling the final climb.
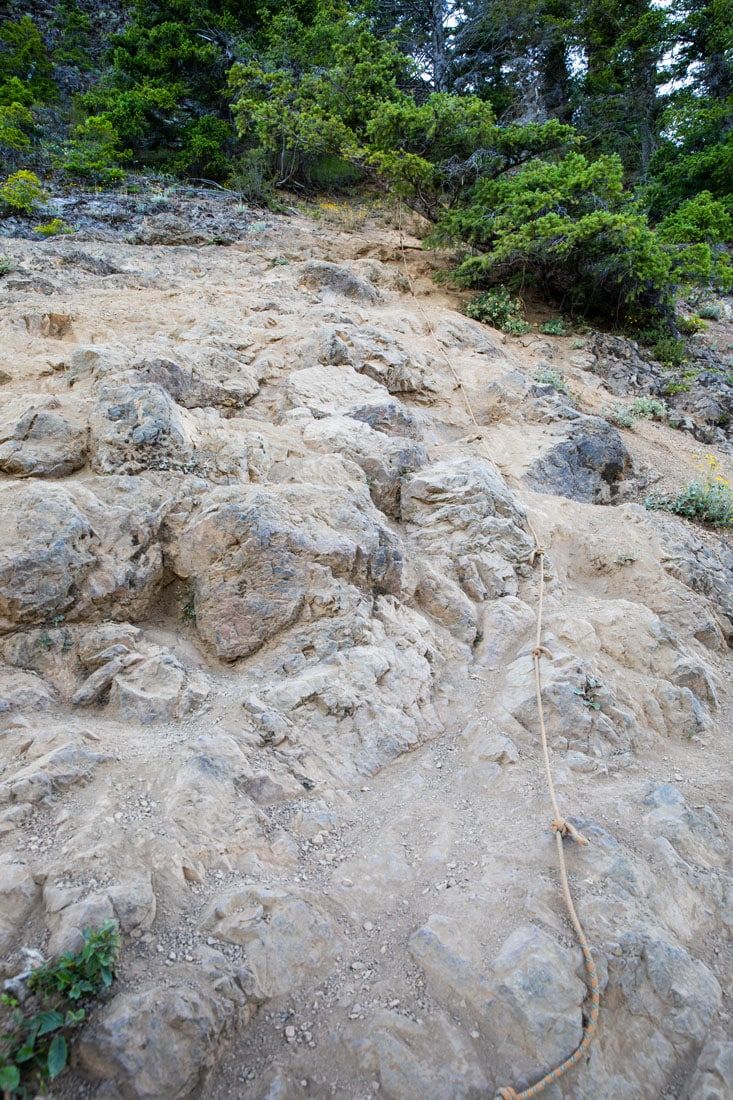
The Rope Section
1.8 to 2.1 miles | 30 minutes
The rope section is where Mount Storm King earns its reputation.
Just before the maintained trail ends, the path steepens sharply and the footing turns loose, dry, and dusty.
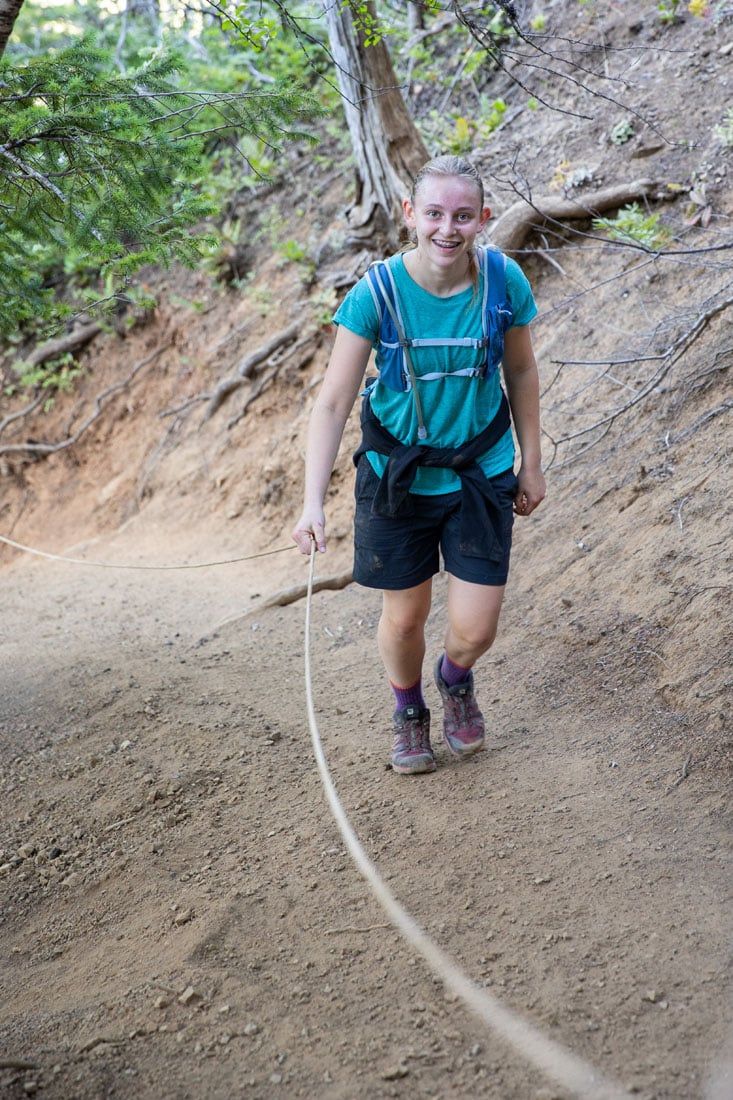
When we hiked it in July the trail up here was bone dry, which made the dirt surface slippery underfoot despite the lack of rain. A series of ropes are anchored into the hillside to help you pull yourself up the steepest pitches.

One of the first ropes on the trail. We found it easier to hike up this section, but the rope was much more helpful on the way back down, to help keep our balance.
Some of the rope sections are quite easy, like this one.
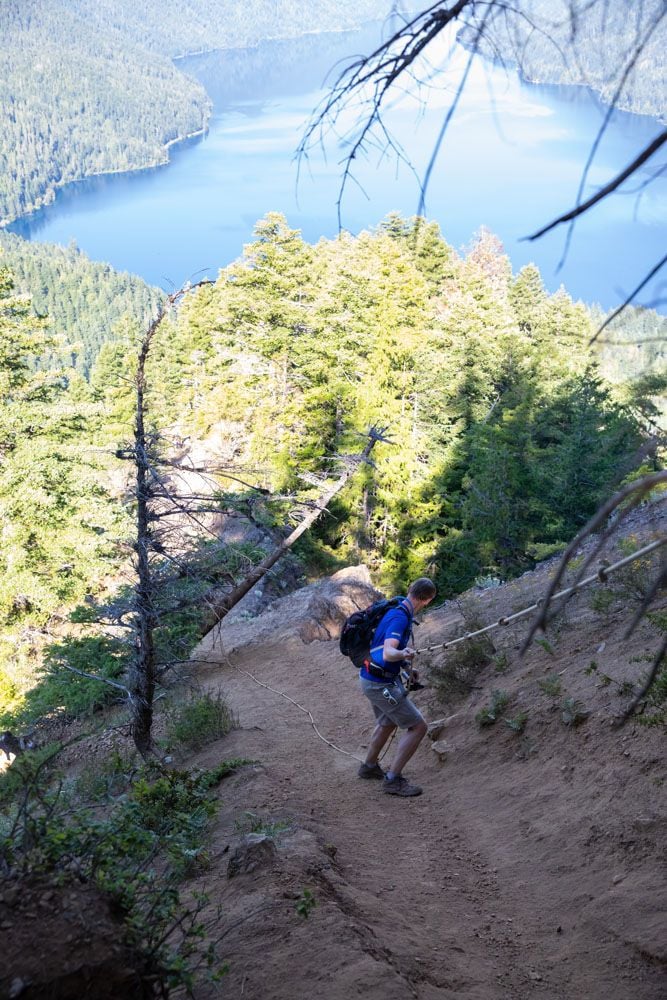
I took this photo on the hike down Mount Storm King, but it gives you an idea of the steepness of the trail, and the views you have of Crescent Lake.
Overall, we found it fun. We moved through the rope section quickly and without much difficulty, and the descent was equally straightforward. It’s the kind of physical challenge that makes you feel like you earned the summit rather than just walked to it.
That said, we want to be transparent: we have extensive hiking experience across hundreds of trails in the national parks. Reading other accounts online, it’s clear that less experienced hikers find this section significantly more challenging and the descent in particular catches people off guard.
If you’re uncomfortable with exposure or lose your nerve on steep terrain, this is the moment to turn around, and there’s no shame in that. The view from just below the rope section is still worth the climb.
The view from the top of the ropes, just before the summit
Final Scramble to the Summit
2.1 to 2.3 miles | 10 to 15 minutes
After the rope section, the trail turns left and leads to a short rock scramble onto the summit viewpoint. Lake Crescent appears below you, impossibly blue and completely worth everything the trail just put you through.
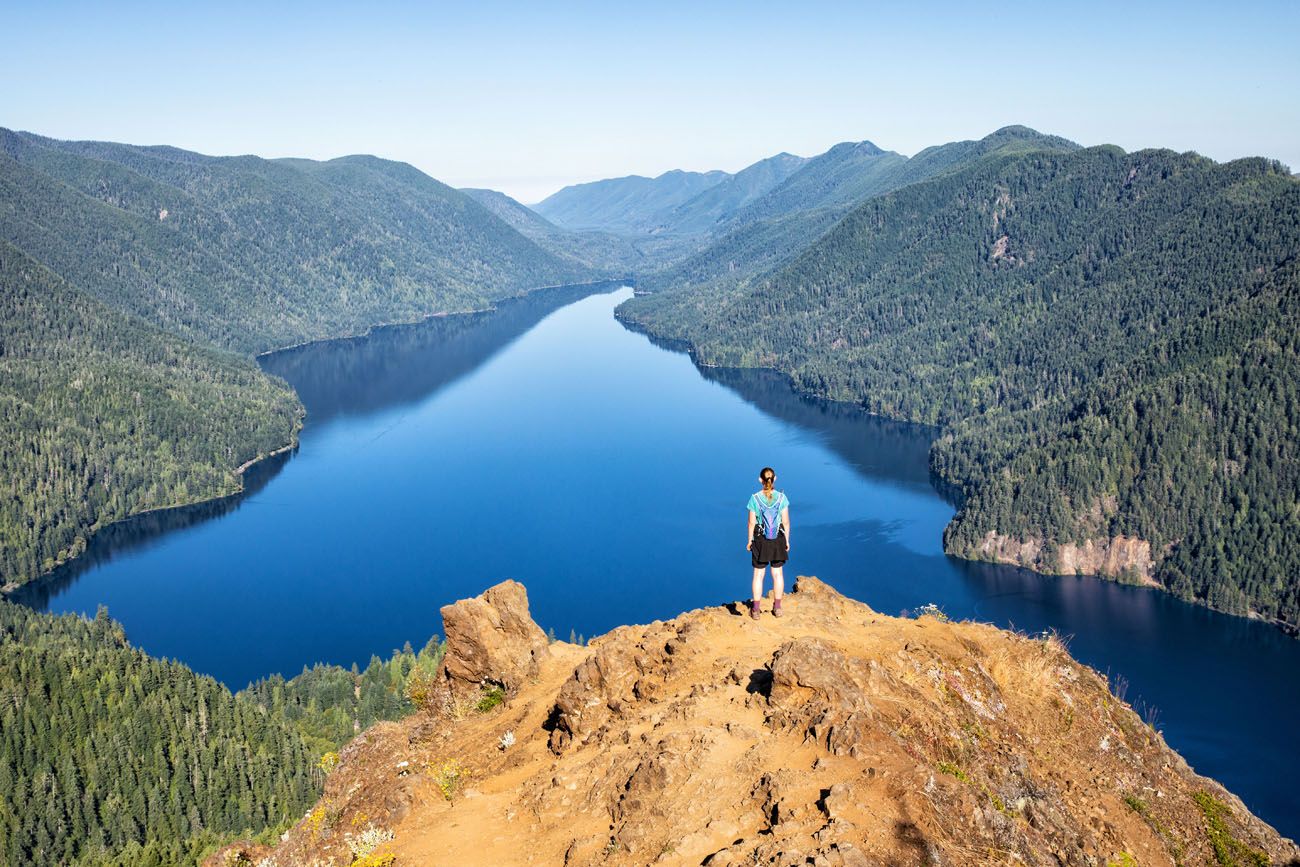
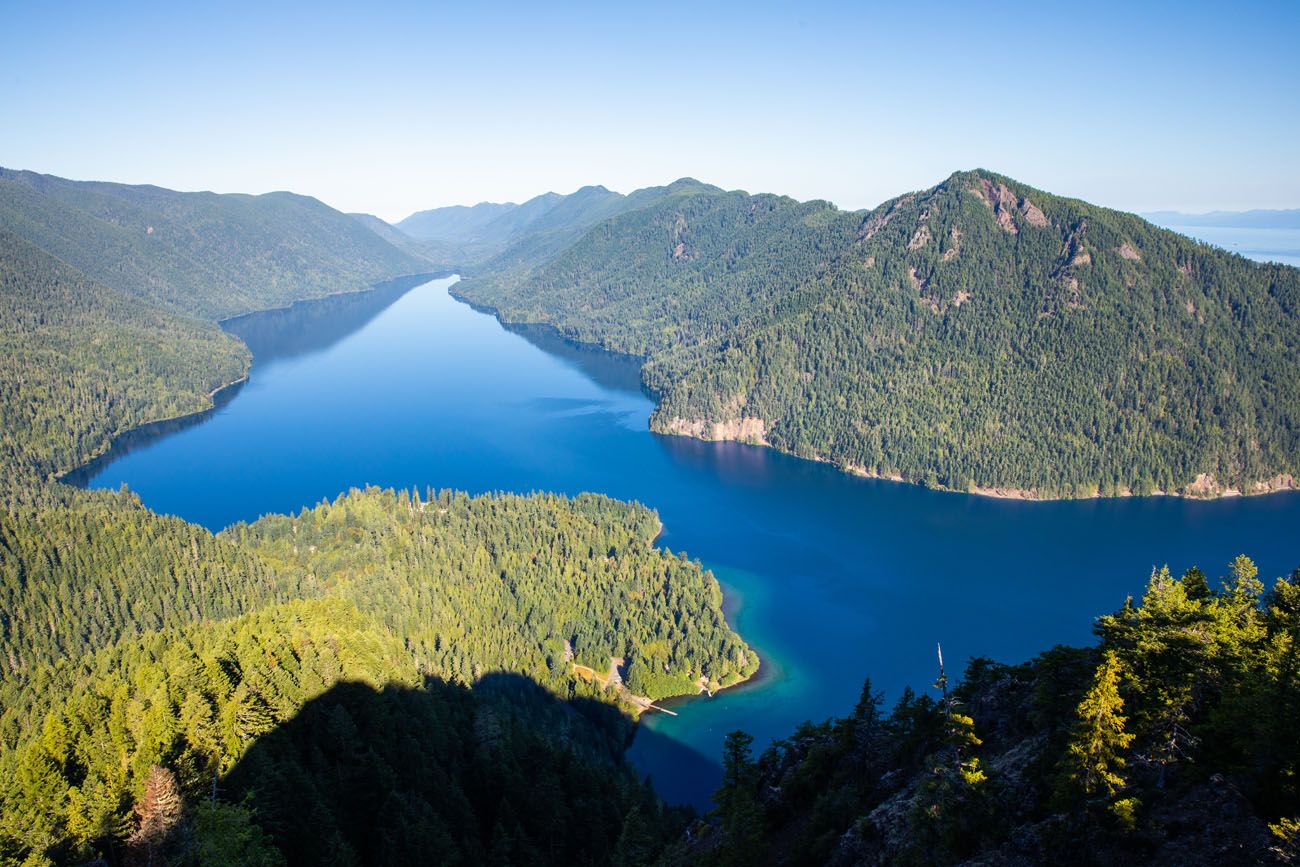
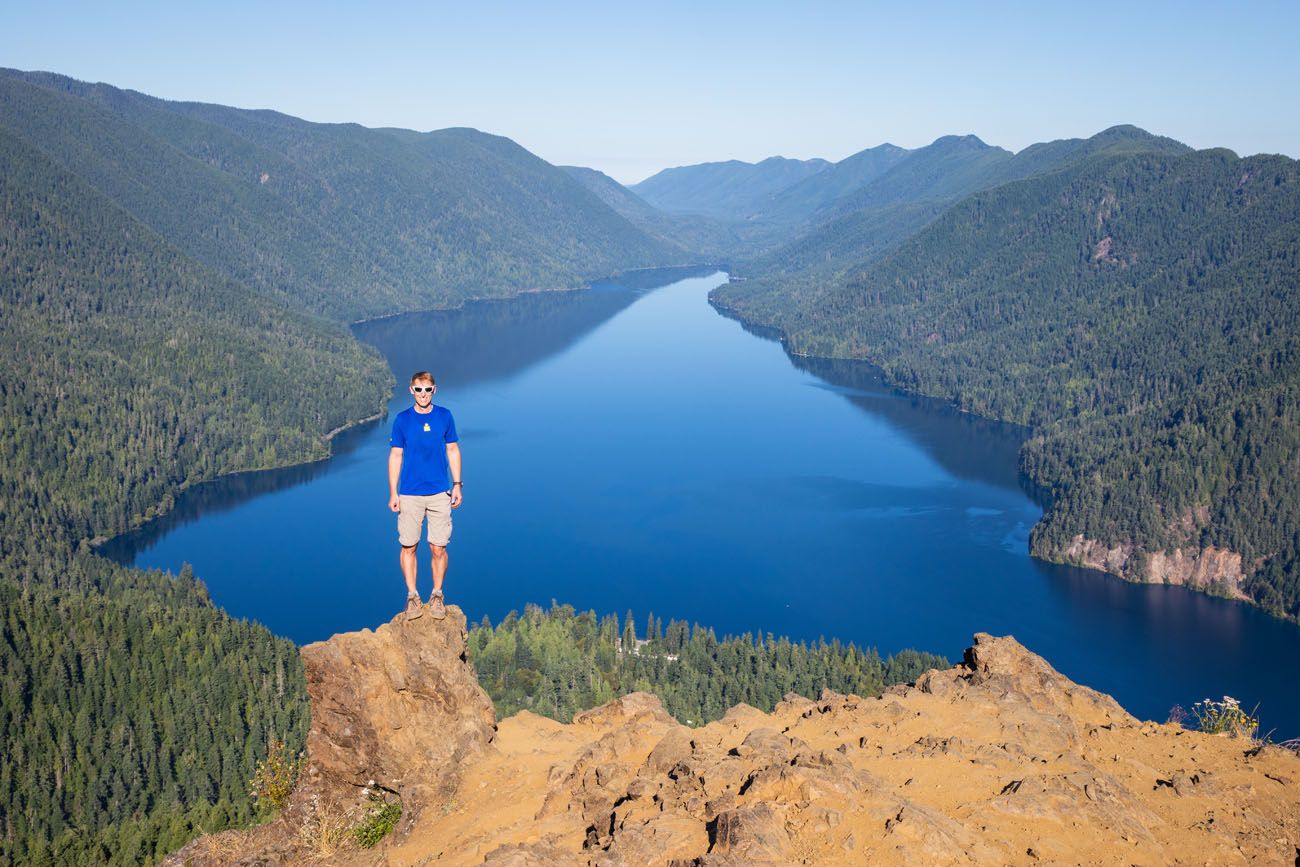
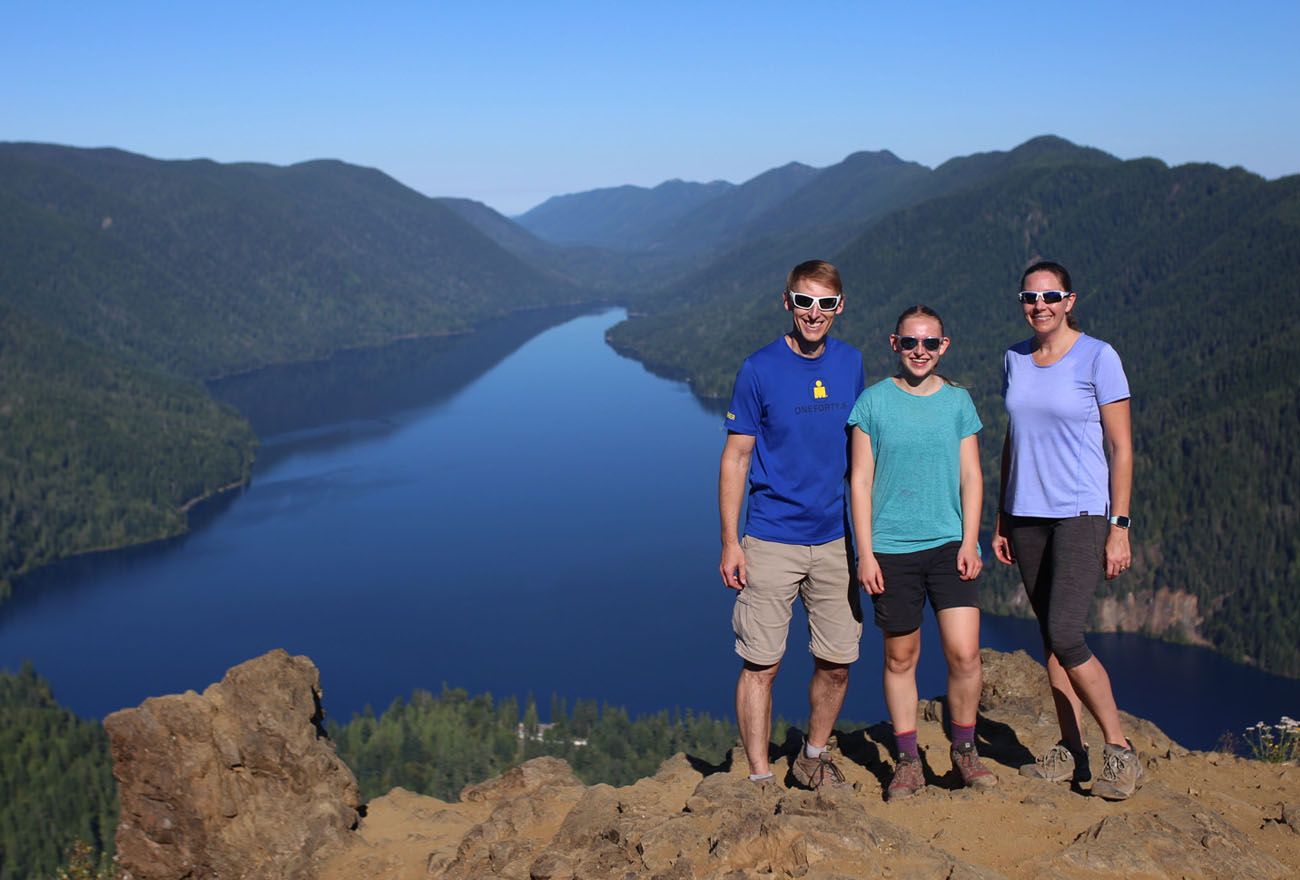
Photo credit: Ashley and Will. Thanks!!
The Descent
Coming down Mount Storm King is a different challenge entirely from going up, and in some ways the harder of the two.
Once you leave the summit and return to the rope section, slow down and be deliberate. We found it easier to turn around, face the slope, and walk backwards down the mountain, using the ropes as we did on the way up. It feels more slippery in this direction, so resist the temptation to move quickly.
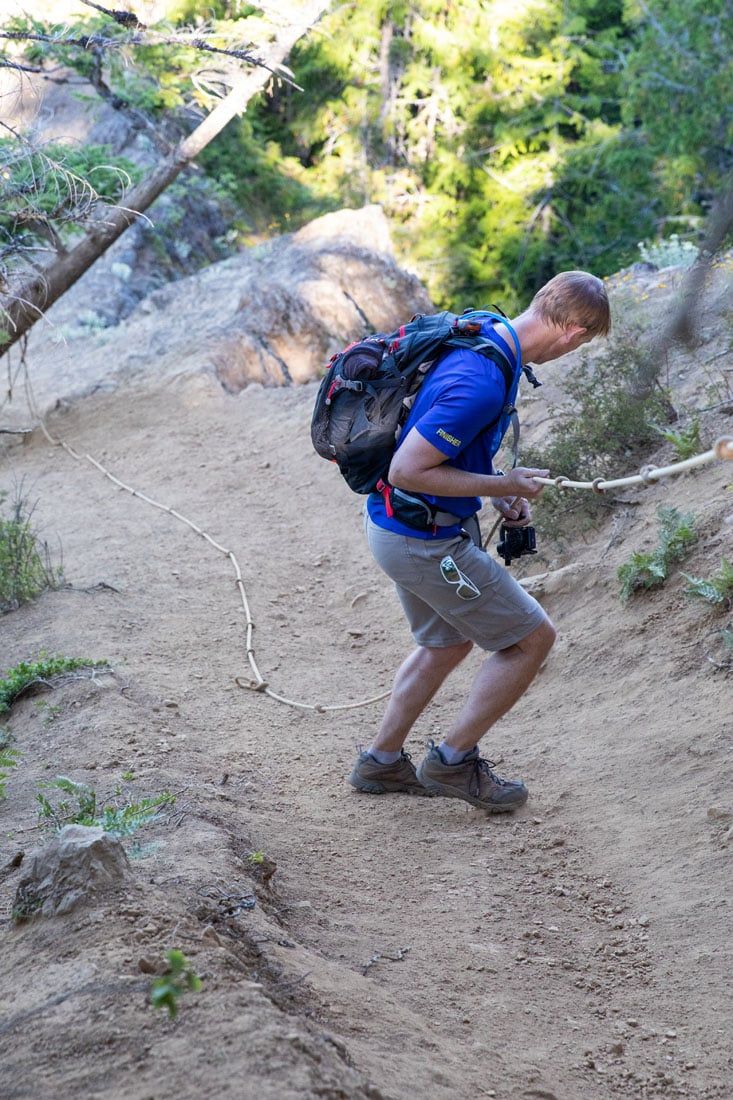
Tim hiking down one of the rope sections.
Below the rope section, the trail eases back into the long, steady forest descent. The constant downhill walk does take a toll on your legs, making knees and muscles sore. This is the kind of hike where trekking poles earn their place, taking the stress off your knees on the long downhill stretch back to the trailhead.
The good news is that the descent goes faster than the climb. What felt like a relentless uphill slog on the way up passes more quickly on the return.
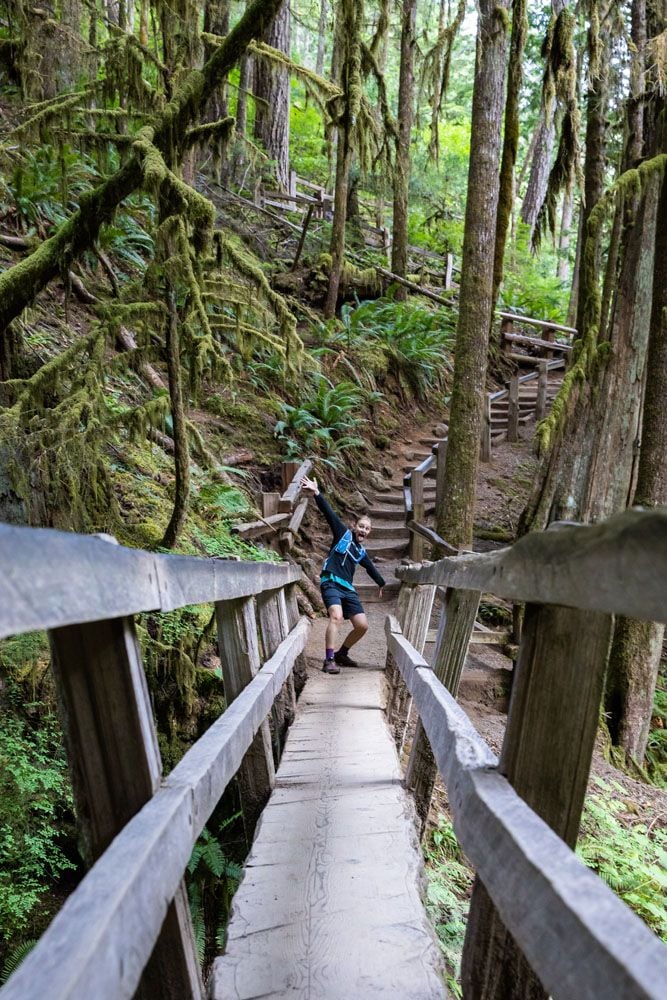
Adding on Marymere Falls to Your Hike
Marymere Falls makes a great addition to this hike. It’s a short, flat trail with a section of steps to get to the viewpoint. If you add it on to the end of the hike, it will feel like a breeze compared with Mount Storm King. But if you are here early in the morning, it might be worth it to go to the waterfall first, because you just might have it all to yourself.
Hiking Stats: Mount Storm King + Marymere Falls
Distance: 6 miles (9.7 km)
Total Elevation Gain: 2,330 feet (710 m)
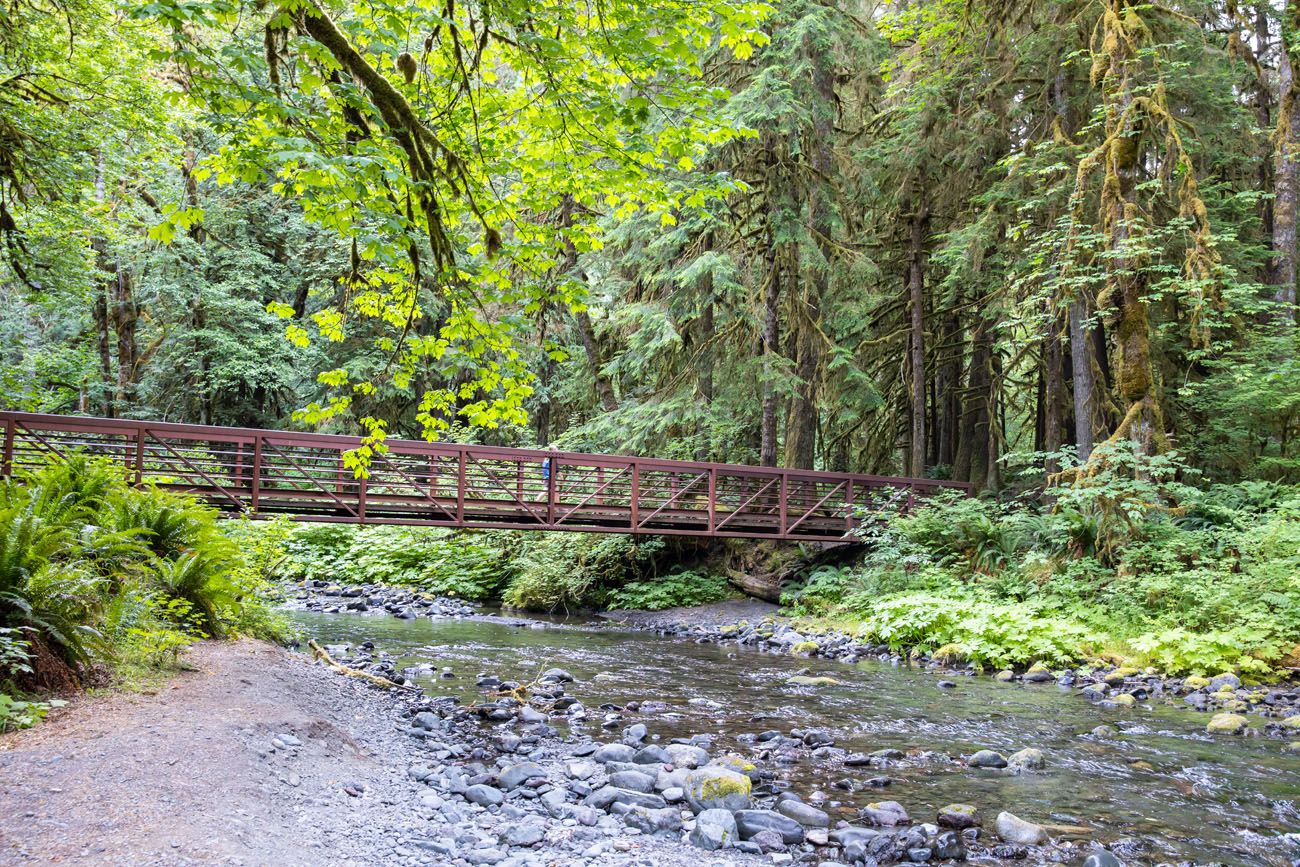
Once you pass the trail to Mount Storm King, continue down the wide trail until you reach a fork in the trail. Stay right to continue to Marymere Falls.
You will cross two bridges, a metal bridge followed by a single log bridge with railings. Then, you reach the loop trail which you can take in either direction. A series of staircases takes you up to the viewpoint for Marymere Falls.

Is Mount Storm King Worth It?
The short answer: yes — if you know what you’re signing up for.
We hiked this in and came away genuinely glad we did it, even though it didn’t crack our list of favorite hikes in Washington. Here’s the honest breakdown.
The challenge is real. This is a short hike by distance, but it earns its “hard” rating. The climb is relentless, most of it through dense forest with limited views, and the final rope section demands both physical effort and a degree of comfort with exposed, slippery terrain. Don’t underestimate it based on the mileage alone.
But the payoff is also real. The view of Lake Crescent from the summit is genuinely spectacular. That deep, brilliant blue surrounded by forested ridgelines is one of the prettier views in Olympic National Park. And the rope section, which sounds alarming on paper, is actually the most memorable and fun part of the hike. It’s the kind of physical challenge that makes you feel like you earned the summit in a way that a straightforward trail doesn’t.
Who this hike is best for: hikers who enjoy a physical challenge, anyone who finds the rope section appealing rather than alarming, and people visiting Olympic who want something more adventurous than a nature walk. If that’s you, absolutely do this hike.
Who might prefer something else: if you’re primarily chasing panoramic views and want to be rewarded with scenery throughout rather than just at the summit, we’d point you toward the Klahhane Ridge Trail to Mount Angeles instead. It’s another tough hike, but the views open up early and stay with you the entire way — in our opinion, it’s the better hike for pure scenery. That said, if you have time for both during your visit to Olympic, do both. They offer completely different experiences and both are worth it.
For a full list of hikes in the park, see our guide to the best hikes in Olympic National Park.
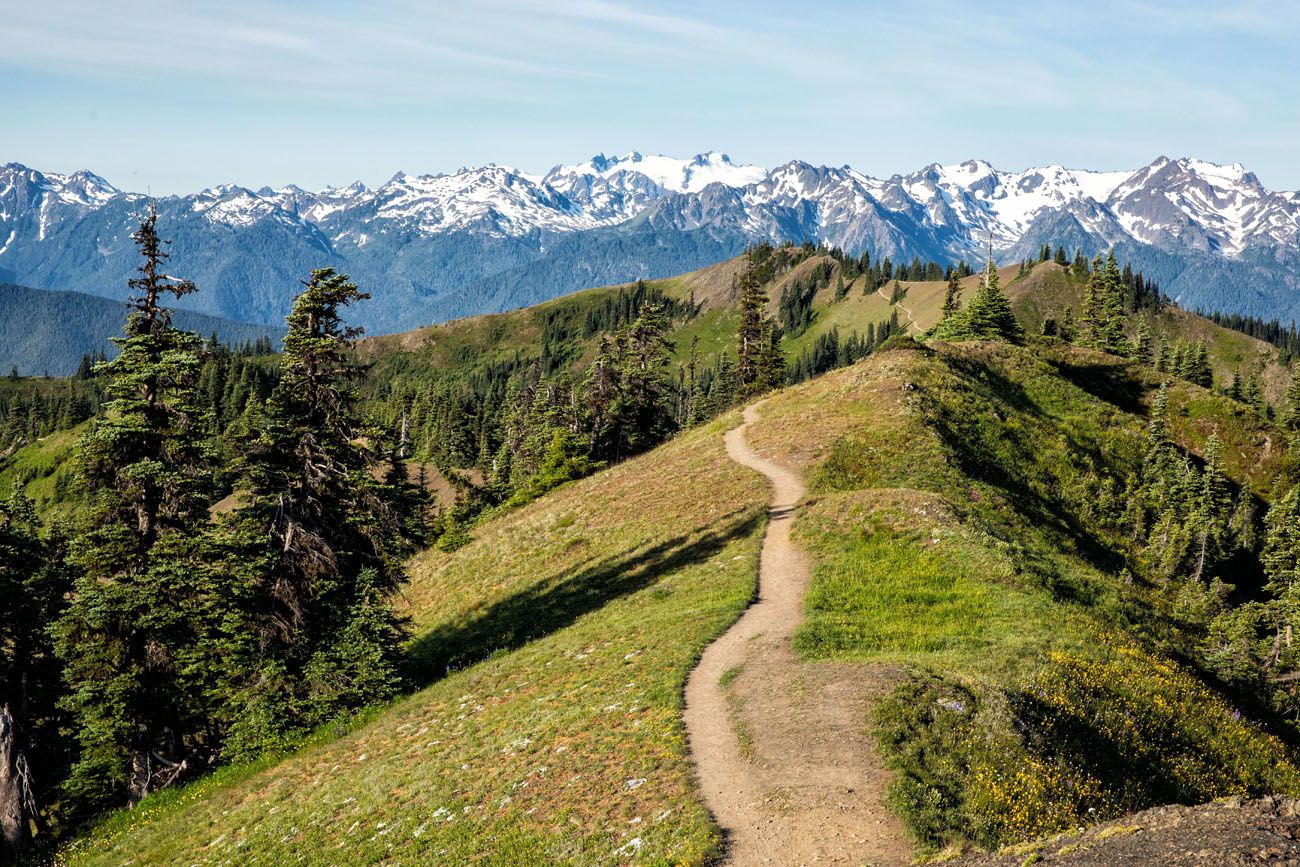
Klahhane Ridge Trail
Tips to Have the Best Experience
This hike is best done on a clear day. If it’s cloudy, you won’t get to see the amazing views that you worked so hard for. Check the weather forecast before you go and if you will be in Olympic National Park for multiple days, consider hiking this trail on the clearest weather day.
Arrive early. The parking lot at the Storm King Ranger Station is small and fills quickly in summer, particularly on weekends. Aim to arrive before 9am in July and August. An early start also means you’ll hit the rope section before the heat of the day, which matters on a climb this steep.
Take your time on the descent. The rope section and the loose, dusty trail below it are significantly more dangerous on the way down than on the way up. Face the slope, use the ropes actively, and resist the urge to move quickly. More hikers get into trouble on the descent than the ascent on this trail.
This hike is not suitable for young children. The rope section requires upper body strength, comfort with steep exposure, and careful footwork. It’s not appropriate for young or inexperienced hikers.
Check conditions before you go. Trail conditions on the upper section can change significantly after rain. What is already a slippery, dusty trail in dry conditions becomes considerably more dangerous when wet. Check current trail conditions on the Olympic National Park website before your visit.
What to Bring on the Hike
Hiking shoes. Don’t do this hike in anything other than hiking shoes or hiking boots. The final trail up to Mount Storm King is very slippery, even with the aid of the ropes. You will also need shoes with good traction for the final section of this hike.
Hiking poles. Hiking poles take the stress off of your legs and help to ease leg pain and fatigue.
Gloves. Not necessary but they will help protect your hands on the ropes.
Water and snacks. At least 2 liters of water in the summer.
Rain jacket or fleece. It can be chilly on top of Mount Storm King, even in the summer. Be prepared for all weather conditions.
Essential Hiking Gear: What Should You Bring on a Day Hike?
If you are new to hiking or are curious about what you should bring on a hike, check out our Hiking Gear Guide. Find out what we carry in our day packs and what we wear on the trails.Frequently Asked Questions: Mount Storm King
How hard is the Mount Storm King hike?
Very hard for its length. The trail climbs over 2,000 feet in just over two miles. It’s a relentless, steep ascent with almost no flat sections to recover on. The difficulty rating of “hard” is accurate and should be taken seriously. That said, fit and experienced hikers will find it challenging but manageable. The rope section sounds intimidating but is straightforward if you have solid hiking experience and good footwear.
Is the rope section dangerous?
It depends heavily on your experience level and the conditions. We found it fun and moved through it quickly and easily, but we have extensive hiking experience across dozens of trails. Less experienced hikers consistently report finding it significantly more challenging, particularly on the descent. If steep, exposed terrain makes you uncomfortable, approach the rope section with caution and turn around if you have any doubt. Coming down is harder than going up.
How long does the Mount Storm King hike take?
Most hikers complete the round trip in 2.5 to 3.5 hours. Fit, experienced hikers may finish closer to 2 hours. Allow extra time if you plan to linger at the summit or add on Marymere Falls, which adds approximately 45 minutes to an hour.
Is Mount Storm King worth it?
Yes, if you go in with the right expectations. The rope section is genuinely memorable and the view of Lake Crescent from the summit is one of the prettiest in Olympic National Park. Just don’t expect scenic views on the climb up since most of the ascent is through dense forest and the payoff comes almost entirely at the top. If panoramic views throughout the hike are what you’re after, the Klahhane Ridge Trail to Mount Angeles is a better choice.
Can kids hike Mount Storm King?
Not recommended for young children. The rope section requires upper body strength, comfort with steep and exposed terrain, and careful, deliberate footwork. Older kids teenagers with solid hiking experience should be fine. If you’re visiting with young children and want a challenging but family-friendly hike in Olympic, the Hurricane Ridge trails are a better option.
Are dogs allowed on Mount Storm King?
Dogs are permitted on the Mount Storm King trail but must be kept on a leash at all times. Be aware that the rope section may be challenging to navigate with a dog.
What is the best time of year to hike Mount Storm King?
The trail is generally accessible from May through October. July and August offer the most reliable weather and the best chance of clear views from the summit. Avoid hiking after heavy rain because the loose trail surface becomes significantly more slippery and the rope section more dangerous in wet conditions. Always check current trail conditions on the Olympic National Park website before your visit.
Plan Your Visit to Olympic National Park
Use these guides to plan the rest of your time in Olympic National Park and Washington state:
- Olympic National Park Travel Guide – See all of our articles on Olympic National Park.
- Best Things to Do in Olympic National Park — The complete guide to Olympic’s highlights, from Hurricane Ridge to the Hoh Rainforest and the Pacific Coast beaches.
- 17 Best Hikes in Olympic National Park — Every major trail in the park ranked and described, with photos and trail stats to help you choose the right hikes for your trip.
- Klahhane Ridge Trail to Mount Angeles — Our top hike recommendation in Olympic National Park. If you loved the challenge of Storm King, this one delivers panoramic views for the entire hike.
- Washington Road Trip Itinerary: 7 to 14 Days — Planning a broader Washington trip? This itinerary covers all three national parks plus Leavenworth, Lake Chelan, and the Enchantments.
If you have any questions about hiking to Mt. Storm King in Olympic National Park, let us know in the comment section below.
Explore More of Washington State
Are you planning a trip through the United States? Visit our United States Travel Guide and Washington Travel Guide for more travel ideas and inspiration.
Olympic National Park Itinerary: How to Spend 2 to 3 Days in the Park
Olympic National Park is one of the most diverse and logistically complex national parks in the United States and figuring out how to structure your time here can feel overwhelming. This Olympic National Park itinerary combines the best of the park into one easy-to-plan trip, and we’re sharing it from experience. We spent four days […]
20 Epic Hikes in the US National Parks
With 63 national parks and thousands of miles of hiking trails, your options are endless for exploring the American national parks. We narrowed down the list for you to 20 of the best hikes in the US national parks, 20 amazing ways to explore this beautiful country. Hike to the tallest peaks, through massive canyons, […]
Best Hikes in Olympic National Park: Ranked by Area and Difficulty
Olympic National Park offers some of the most diverse hiking in the United States. Where else can you hike through a moss-covered temperate rainforest in the morning, walk along a wild Pacific coastline in the afternoon, and look out over glacier-capped mountain peaks from an alpine ridge? We spent four days in Olympic National Park, […]
Staircase Rapids Loop: A Hidden Gem Hike in Olympic National Park
The Staircase Rapids Loop is an underrated trail in Olympic National Park. On this short, easy hike, you will walk along the North Fork of the Skokomish River, through a temperate rainforest, with views of waterfalls and rapids. Just under 3 miles long, this trail loops up and around Staircase Rapids. With waterfalls, dense forests, […]
Washington Road Trip Itinerary: Olympic, Rainier & North Cascades (7–14 Days)
Washington state is one of the great road trip destinations in the United States, and this itinerary is the one we wish we’d had before our own trip. We spent several weeks exploring Washington’s three national parks—Olympic, Mount Rainier, and North Cascades—as well as Leavenworth, Lake Chelan, and the Enchantments. We then combined our top […]
Best Things to Do in Olympic National Park (2026 Guide)
Discover the best things to do in Olympic National Park, from Hurricane Ridge to the amazing Hoh Rainforest to the wild and rugged Pacific coast. Olympic National Park might be the most diverse national park in the United States. In a single visit, you can stand on a windswept alpine ridge looking out over snowcapped […]
12 Best Hikes in North Cascades National Park (Ranked by Difficulty & Area)
North Cascades National Park is not a place that easily reveals itself. Sure, the drive along Highway 20 is lovely. And the viewpoints over the lakes and mountain passes are gorgeous. But to really see this park, you are going to have to invest some time on the hiking trails. We spent three weeks hiking […]
The Perfect Mount Rainier National Park Itinerary (2 to 6 Days)
Planning a trip to Mount Rainier National Park and not sure how to structure your time? We’ve got you covered, and we’re speaking from experience. We’ve visited Mount Rainier twice: once on a six-day trip where we hiked extensively through every corner of the park, from Paradise and Sunrise to the quieter trails of the […]
Maple Pass Loop Hiking Guide 2026 | North Cascades, WA
The Maple Pass Loop, also known as the Heather-Maple Pass Loop, is one of the best day hikes in the North Cascades, and one that’s surprisingly accessible for the views it delivers. In early August, Tim, Kara, and I completed this hike and came away genuinely impressed. It’s not our favorite hike in the area […]
Skyline Trail Loop: A Step-by-Step Guide to Rainier’s Most Iconic Views
The Skyline Trail Loop is the most iconic hike in Mount Rainier National Park, and we’ve hiked it twice in both directions to figure out exactly which way is better. Here’s everything you need to know, from snow crossings and trail conditions to the best direction for views of Mount Rainier. For jaw-dropping alpine scenery, […]
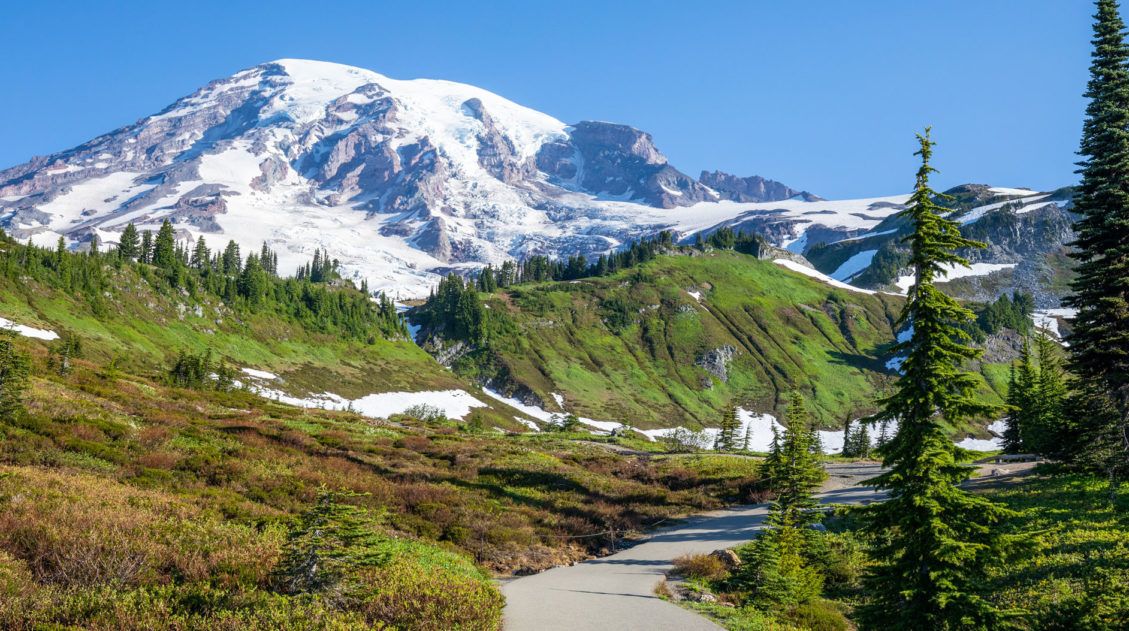
15 Best US National Parks to Visit in July 2026
Which are the best national parks to visit in July? In this guide, we list 15 great parks to visit in the USA. Go hiking in Mount Rainier and Glacier National Parks, go whale watching in the Channel Islands, and venture into Alaska for some amazing adventures. About this National Park Series This article is […]
Ultimate US National Parks List for 2026 (+ Printable Checklist)
The US national parks are one of this country’s best ideas…land set aside for the preservation of the natural world and the enjoyment of the people. Every few years, another park gets added and the US national parks list grows a little longer. Over the past 150 years, 63 national parks have been created in […]
The Ultimate Guide to the 63 US National Parks
Stretching from the South Pacific, across the United States to the Caribbean, are 63 national parks. These national treasures preserve iconic landscapes, majestic mountains, primordial forests, arid deserts, misty coastlines, immense canyons, wildlife, and historic landmarks. The opportunities for adventure are endless. Hiking, rock climbing, rafting, mountain biking, sand boarding, horseback riding, mountaineering, canyoneering, and […]

Comments 10