
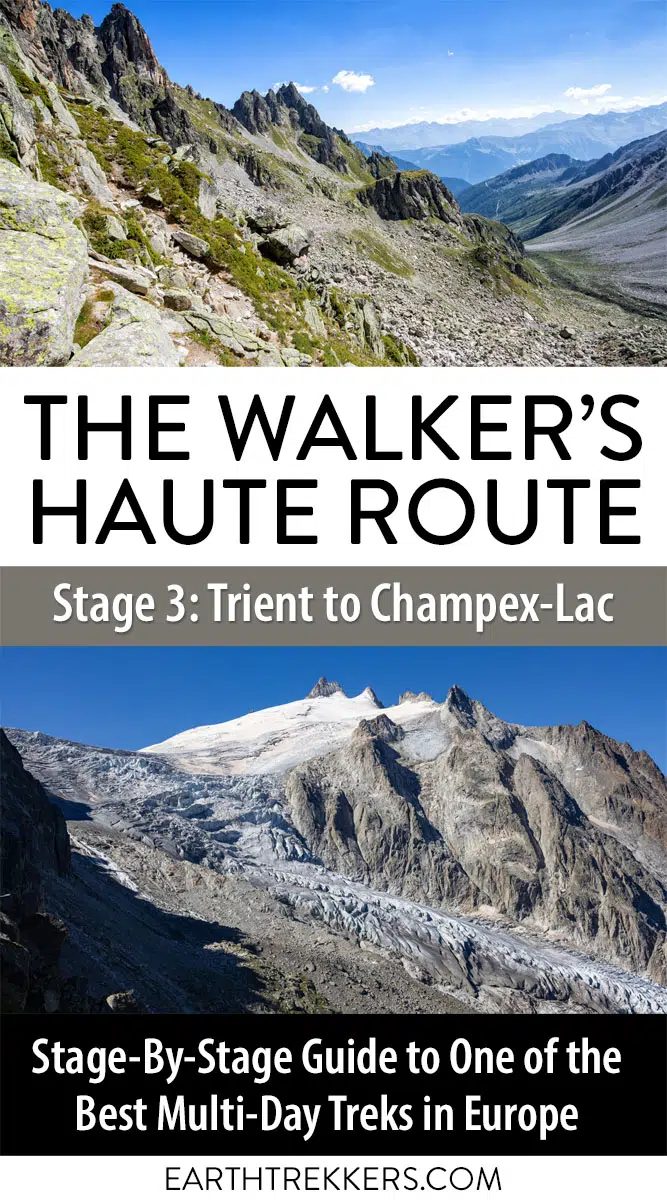
Stage 3 of the Walker’s Haute Route is the most challenging stage yet, but also one of the most rewarding.
A massive, steep climb takes you up to the top of a mountain pass, Fenêtre d’Arpette, and along the way, you will have fantastic views of the Trient Glacier. It is a hard hike, and one of the toughest climbs on the Haute Route, but along the way you have beautiful views over the valley below.
The second half of the hike is a rocky descent down the opposite of the mountain to Champex-Lac.
This stage is slow going, because of the steep climb and descent. It took us roughly the same amount of time to complete Stage 3 as both Stage 1 and 2 combined.
ALTERNATE ROUTE: There are two ways to hike stage 3 of the Haute Route. Crossing over Fenêtre d’Arpette is the more challenging option but it is also more rewarding, with unbeatable views of the Trient Glacier. If hiking over Fenêtre d’Arpette sounds too challenging, or if storms are in the forecast, you can take the optional, easier route via Col de la Forclaz which is described in The Walker’s Haute Route by Kev Reynolds.
COOL FACT: This stage is also one of the stages on the Tour du Mont Blanc. Those hiking the Tour du Mont Blanc in the “classic direction” will be doing this hike in the opposite direction, starting in Champex-Lac and ending in Trient. This is the toughest stage of the TMB (and it’s easier doing it from Champex-Lac to Trient), which gives you an indication on how much more challenging the Haute Route is. On the Haute Route, you are just getting started and there are several longer, steeper days that will really test your legs.
Walker’s Haute Route Stage 3 Hiking Stats
Distance: 15.3 km (9.5 miles)
Difficulty: Very strenuous
Total Ascent: 1,370 m (4,500 feet)
Total Descent: 1,190 m (3,900 feet)
Lowest Elevation (Trient): 1,310 m (4,300 feet)
Highest Elevation (Fenetre d’Arpette): 2,667 m (8,750 feet)
Elevation in Trient: 1,310 m (4,300 feet)
Elevation in Champex: 1,485 m (4,870 feet)
Average Time: 7 hours; our time was 7.5 hours (including stops)
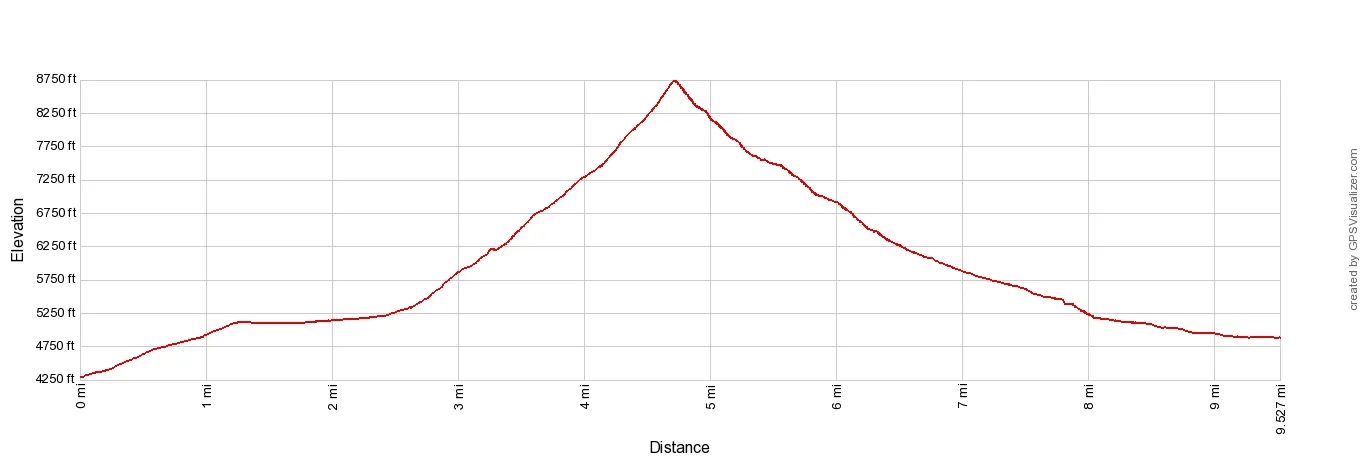
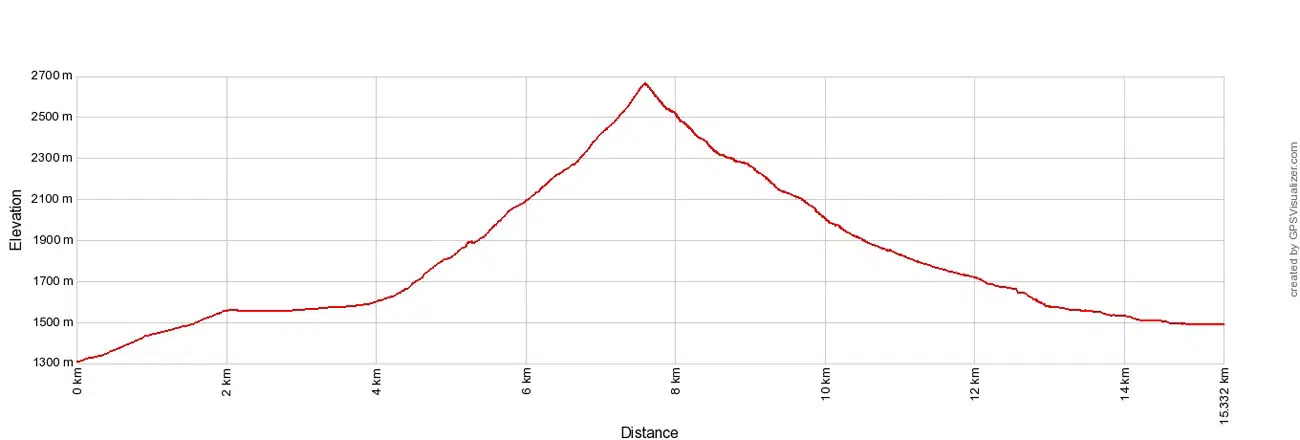
Walker’s Haute Route Stage 3 Elevation Profile
Please practice the seven principles of Leave No Trace: plan ahead, stay on the trail, pack out what you bring to the hiking trail, leave areas as you found them, minimize campfire impacts, be considerate of other hikers, and do not approach or feed wildlife.
Walker’s Haute Route Stage 3 Maps
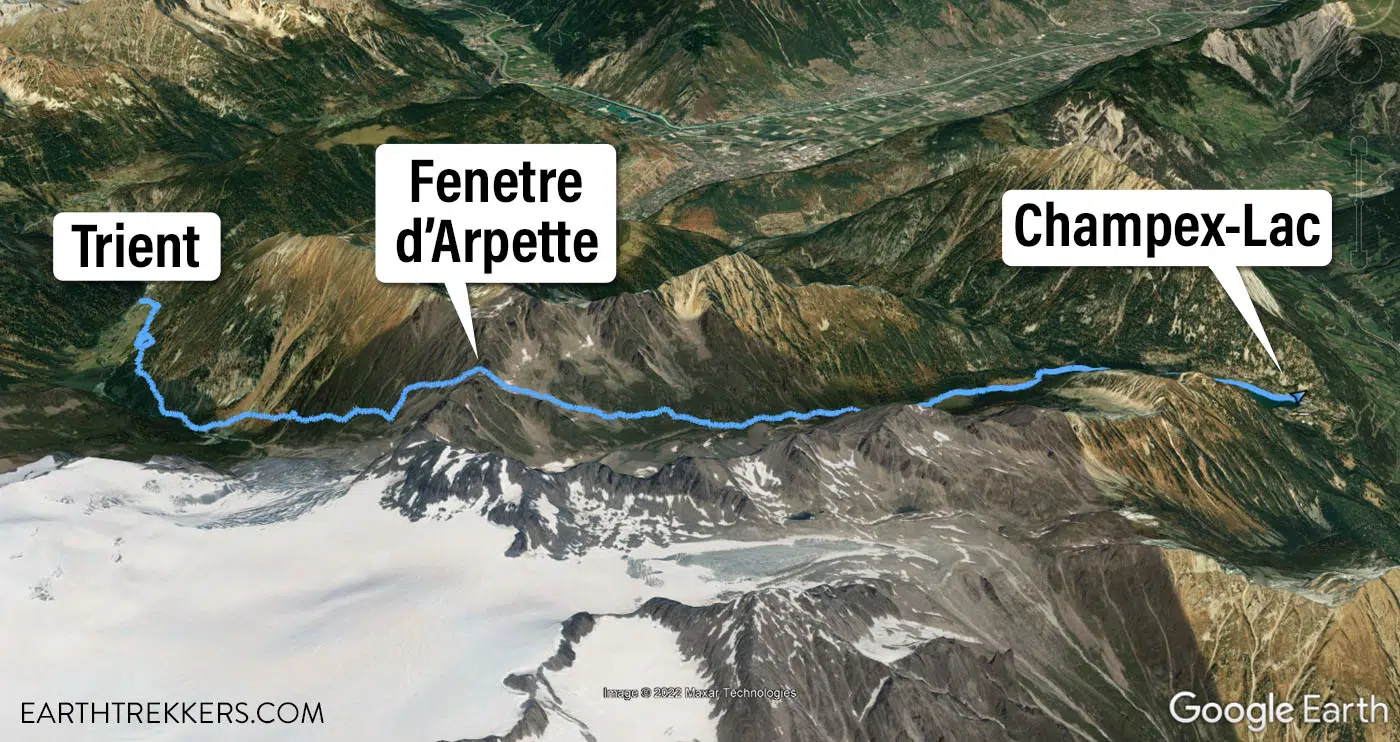
This is a map of Stage 3 on Google Earth.
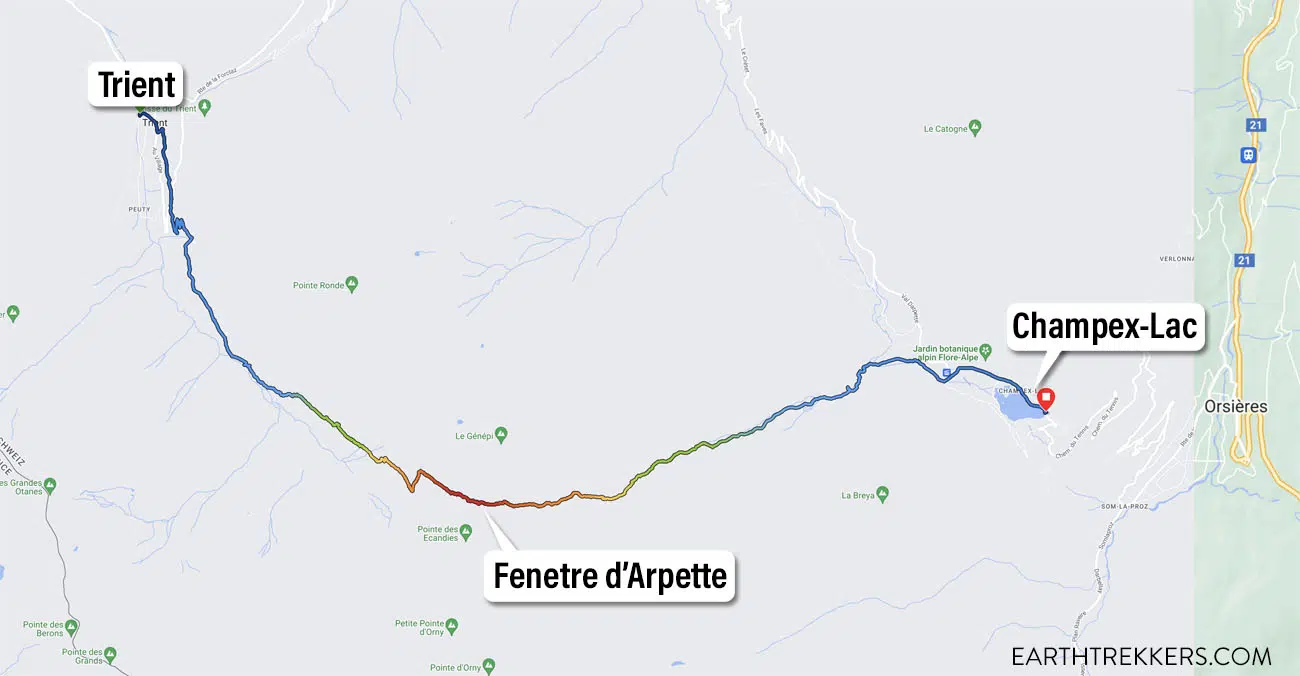
And this is a map generated from my Garmin Fenix watch. The blue color is the lowest elevation and the red is the highest elevation.
Overview of the Trail
To hike the Haute Route, we highly recommend following the trail descriptions in the book Trekking Chamonix to Zermatt, The Classic Walker’s Haute Route by Kev Reynolds. Below we list an overview of the day, so you know what to expect along the way. We also provide advice on where to eat and where to stay. Later in this guide, we list a few tips and trail clarifications to be used with the Trekking Chamonix to Zermatt book.
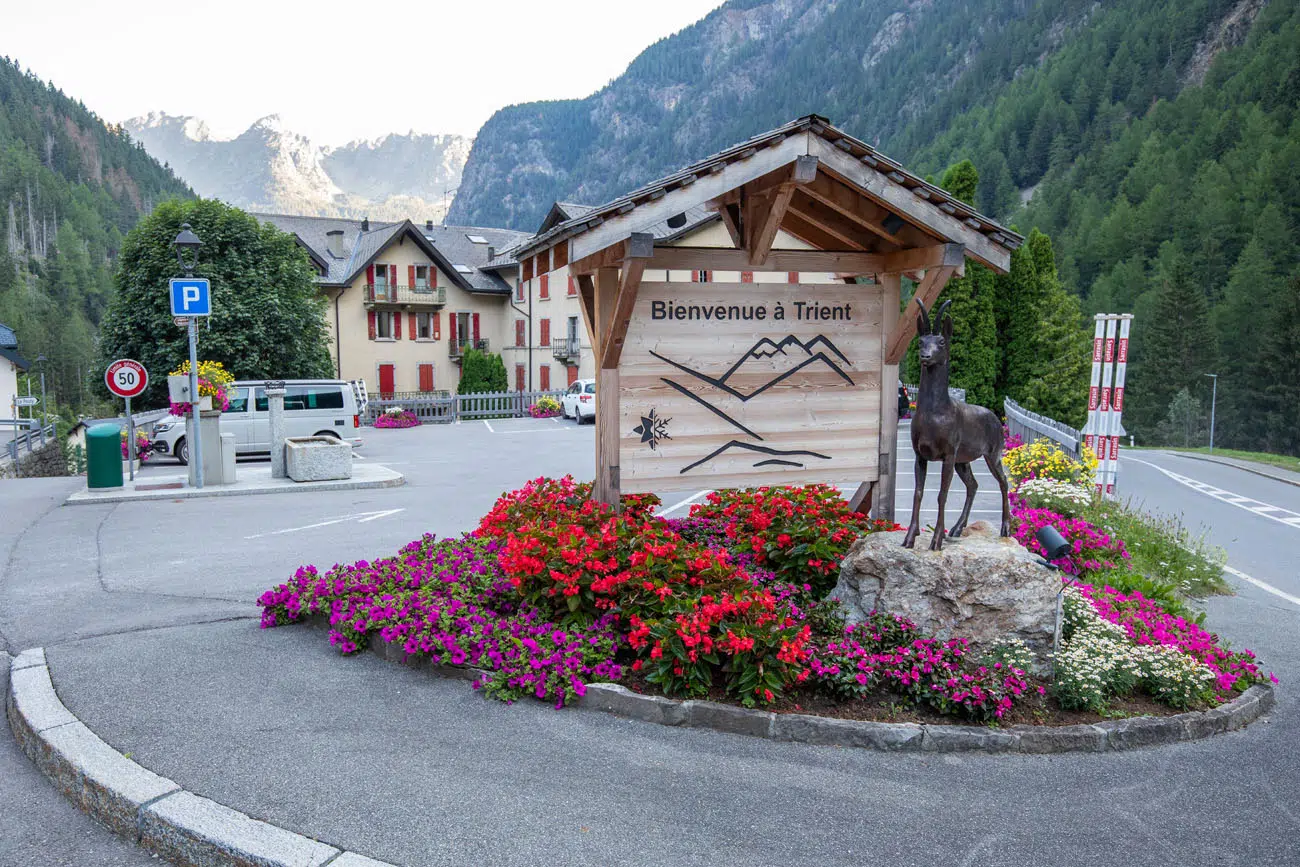
Trient to Chalet du Glacier
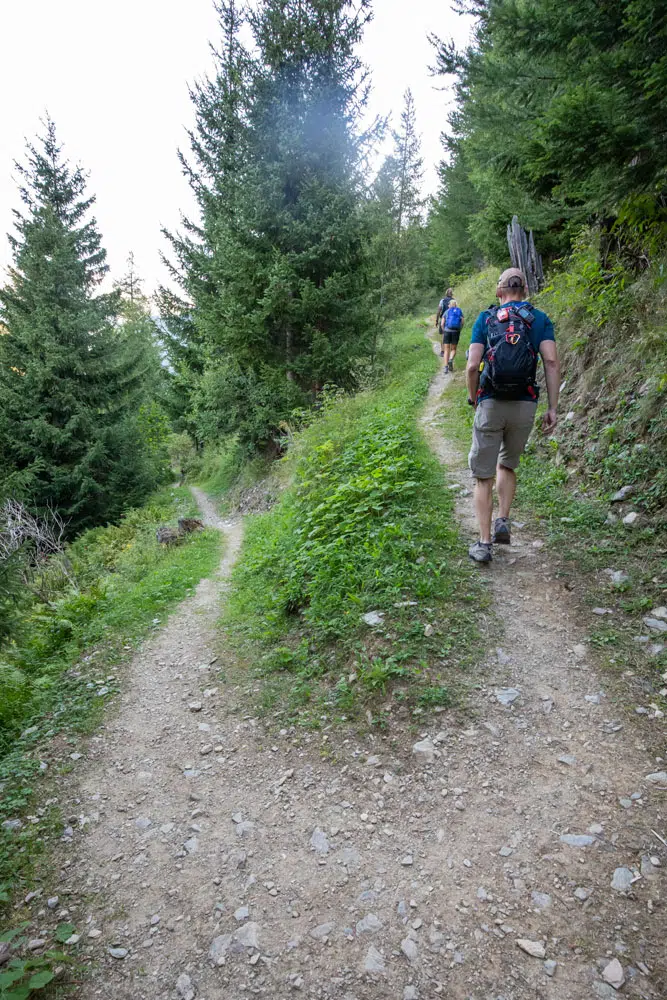
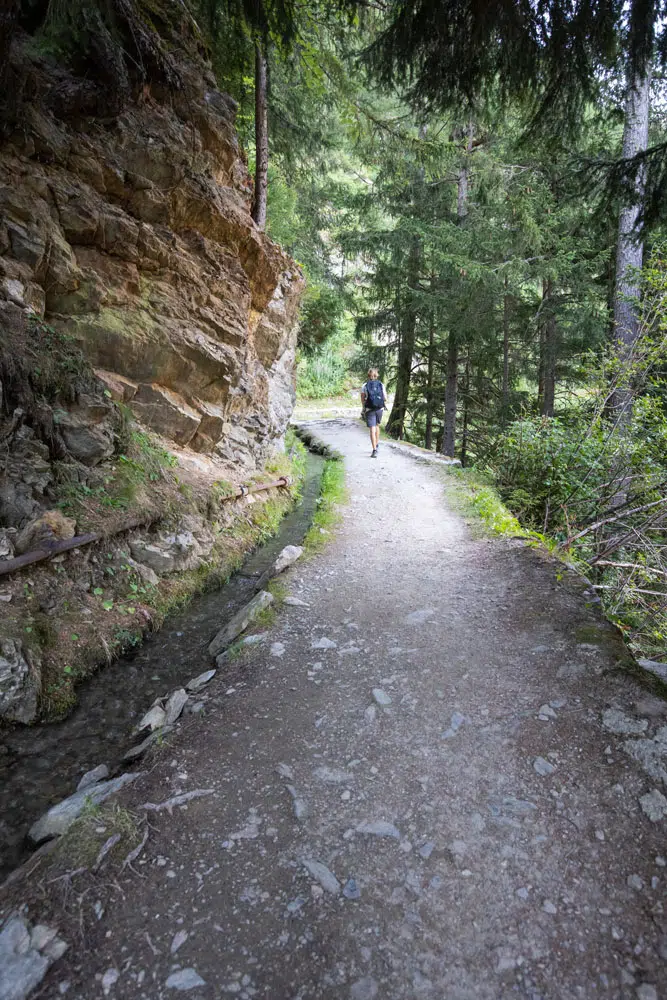
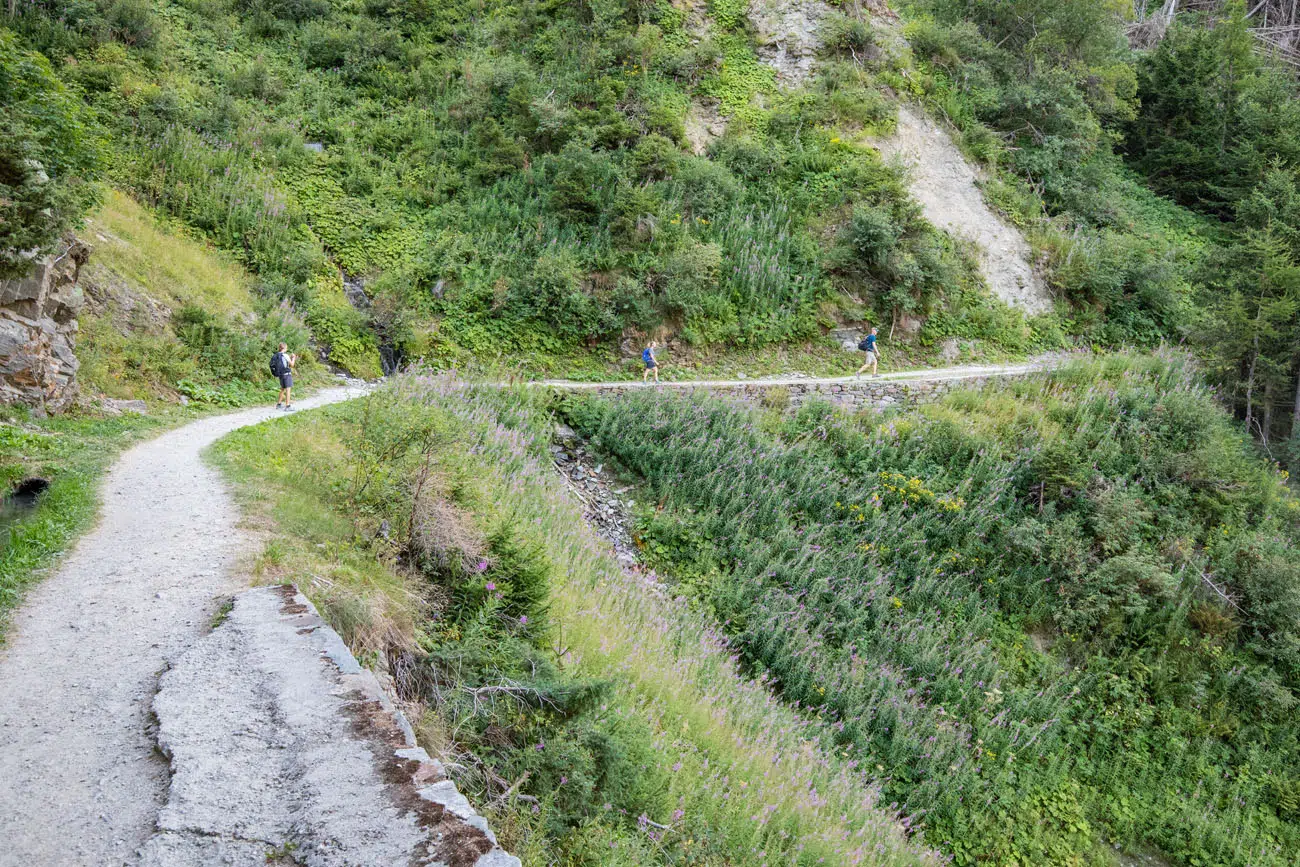
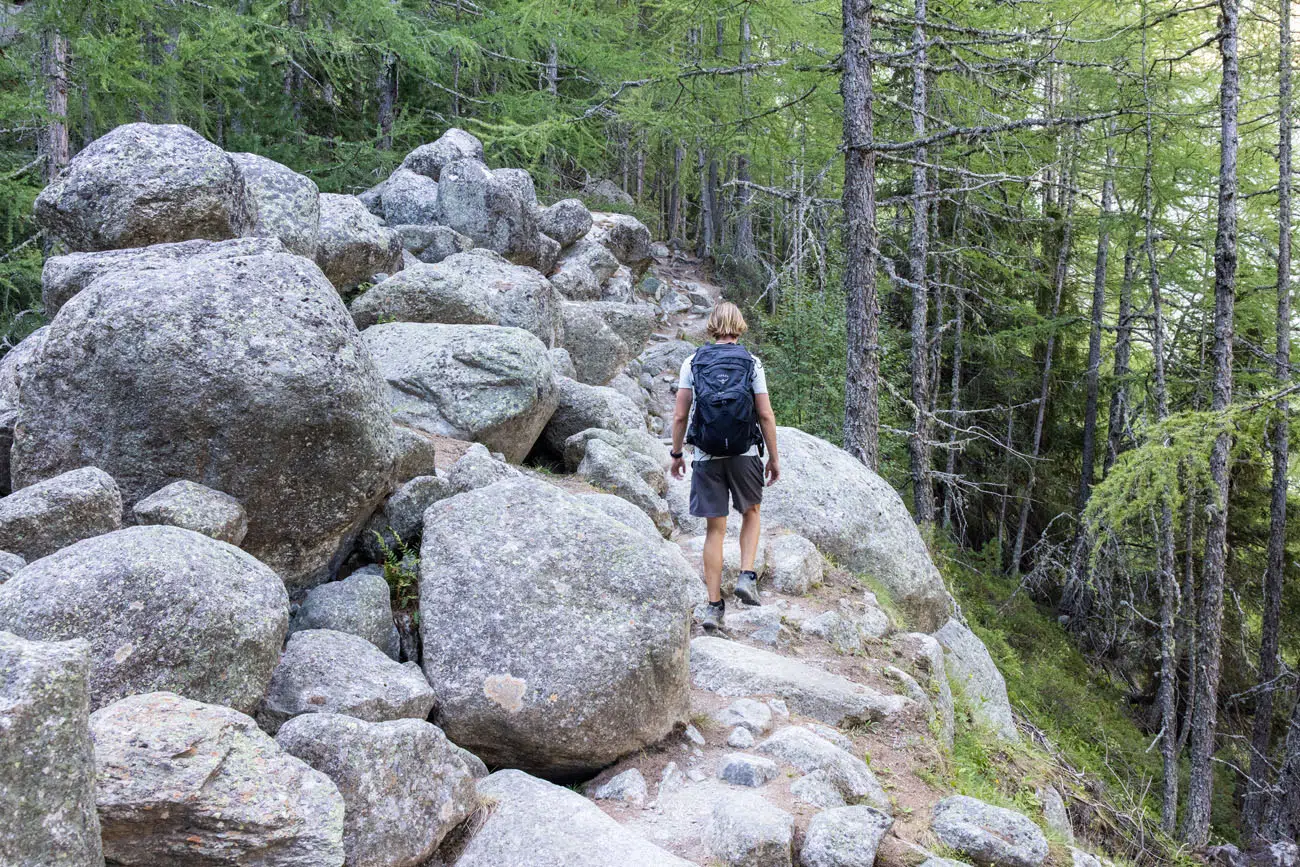
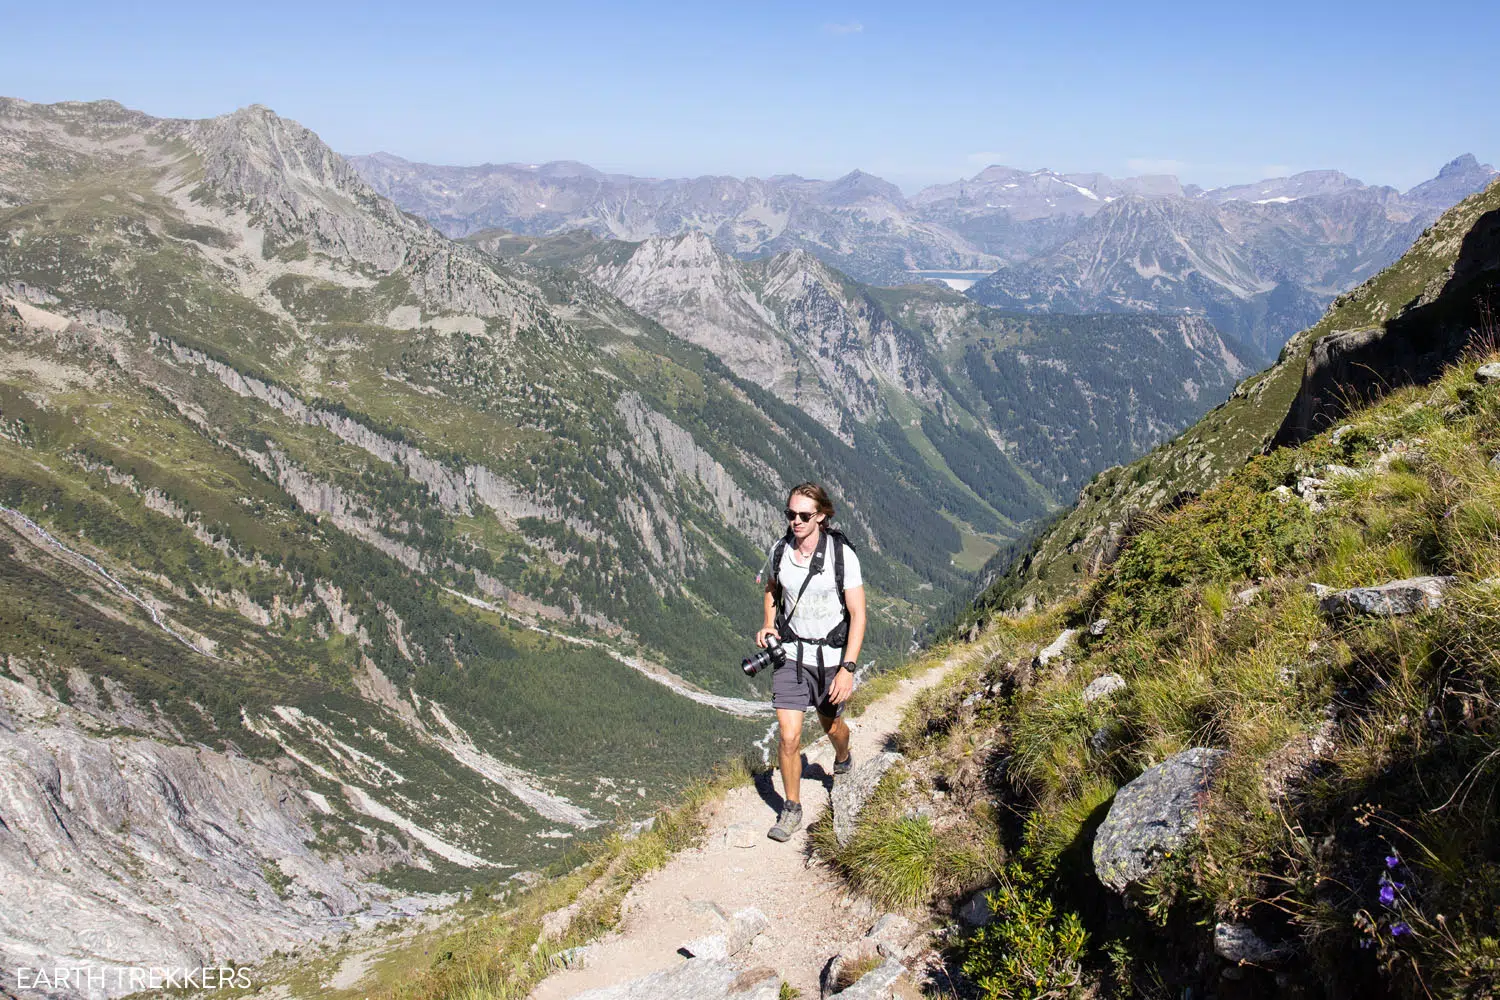
Say goodbye to the little town of Trient as you start Stage 3. The trail begins to head upwards immediately, but the ascent does not become steep until after you pass the chalet. For this beginning section, you will hike in the forest along a wide path. It is possible to keep a good pace here.
Leaving Trient
First climb of the day…this section is not too bad.
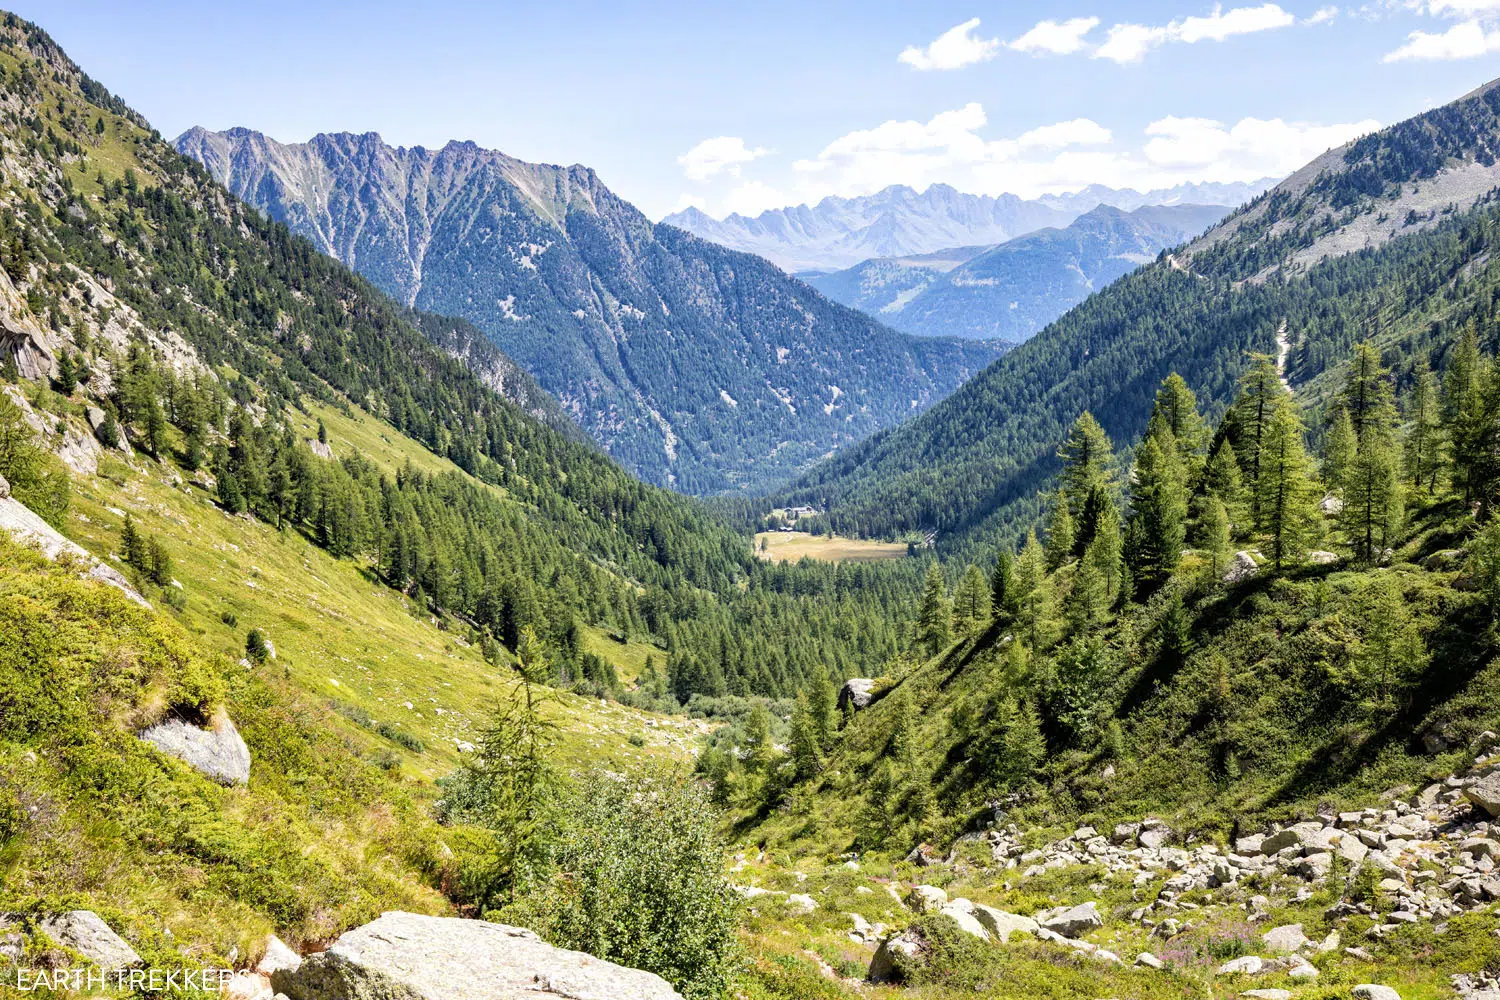
After roughly 230 meters (750 feet) of elevation gain, the trail will flatten out (photos below). It will stay like this for about 2 km (1.25 miles) until you reach the first small refuge (Chalet du Glacier). Enjoy the flat trail while it lasts, as you have a tough day ahead of you!
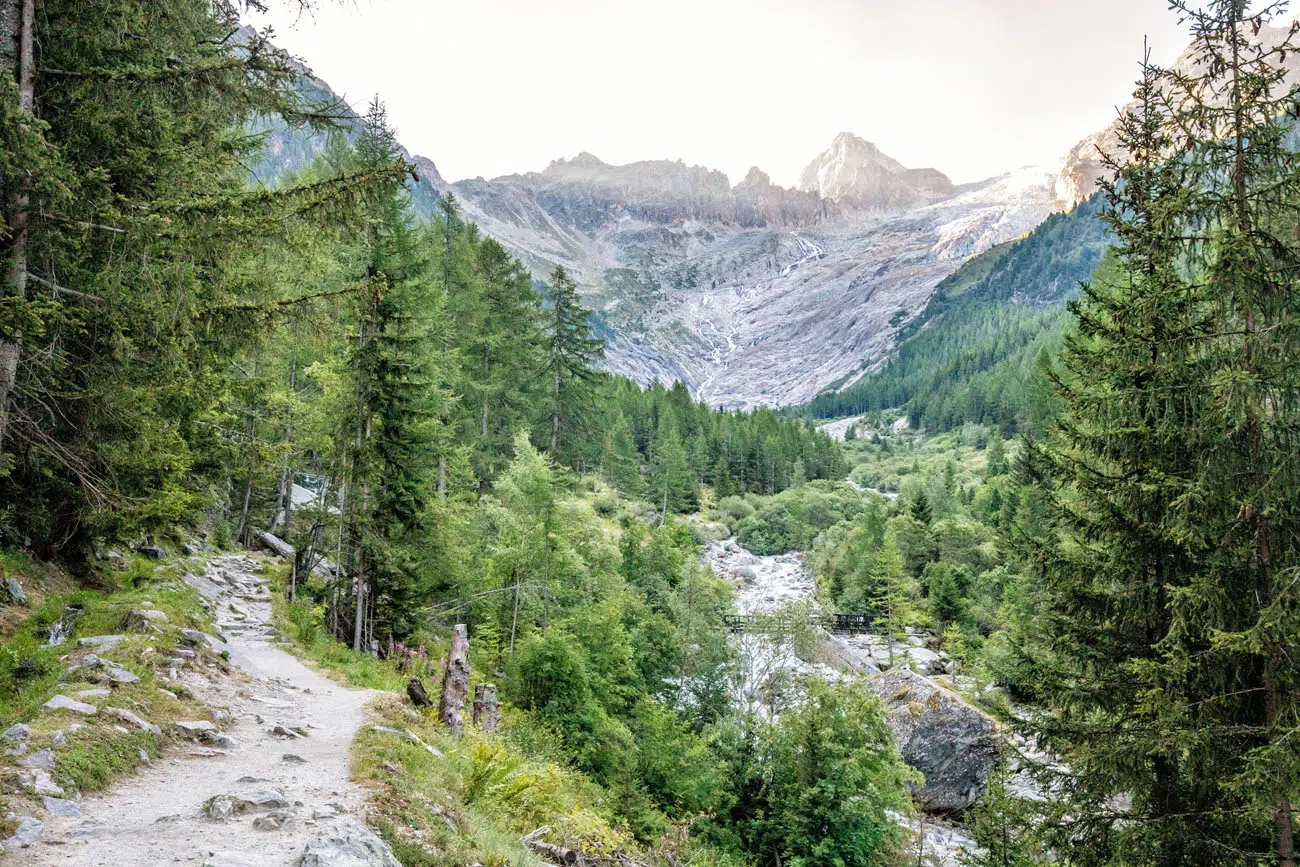
Trient Glacier comes into view just before you reach Chalet du Glacier.
Chalet du Glacier is a small restaurant and it is likely not serving meals until mid-morning or later, but you can buy a small snack and use the restroom here if you need to. We started the hike at 7 am and reached the refuge just past 8 am.
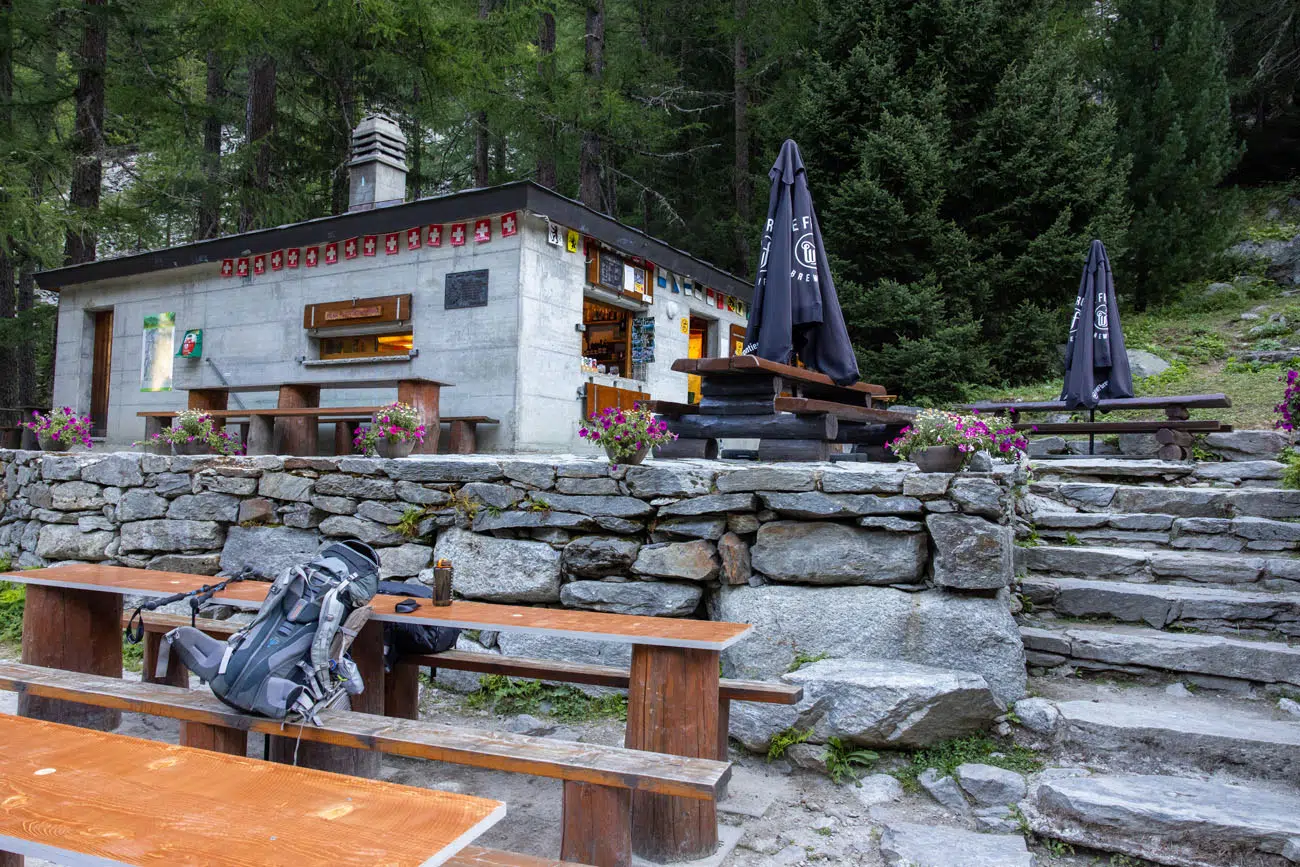
Chalet du Glacier
Chalet du Glacier to Fenêtre d’Arpette
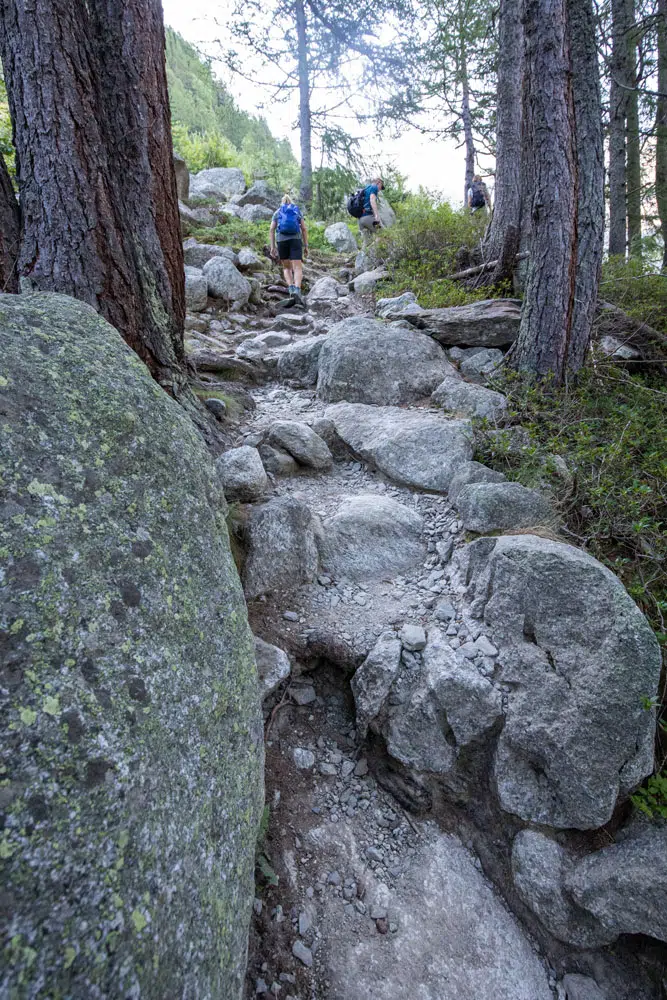
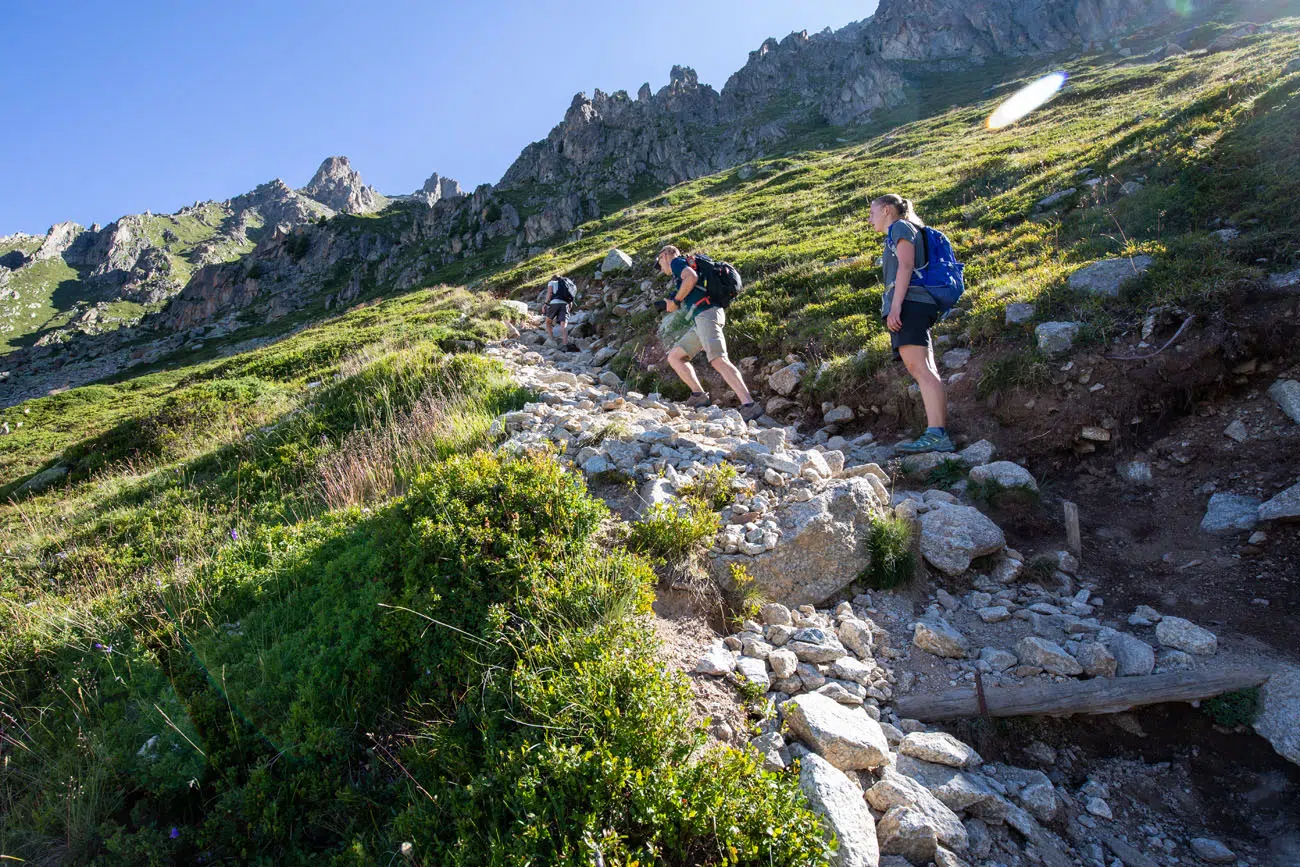
Here it comes, one of the steepest climbs of the Haute Route!
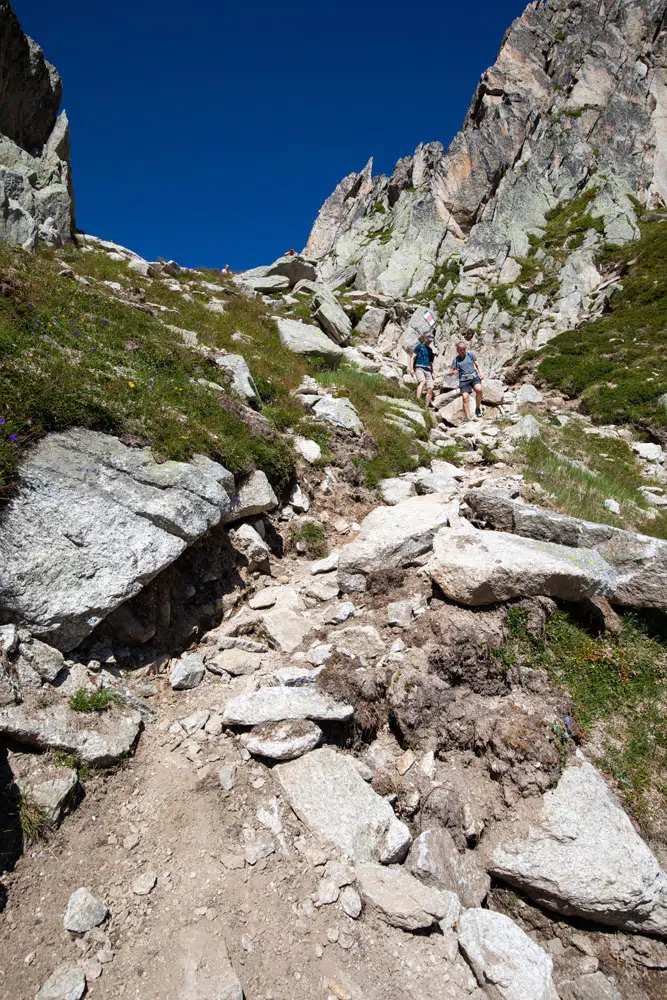
Beyond the refuge, the climb immediately begins its steep ascent and it remains this way the whole way up to Fenêtre de Arpette.
The trail alternates from steep, rocky climbs in the woods to steep ascents on gravelly slopes. At times, you will do some rock scrambling, climb a long series of very steep steps, or use ropes when the path narrows and gets slippery.
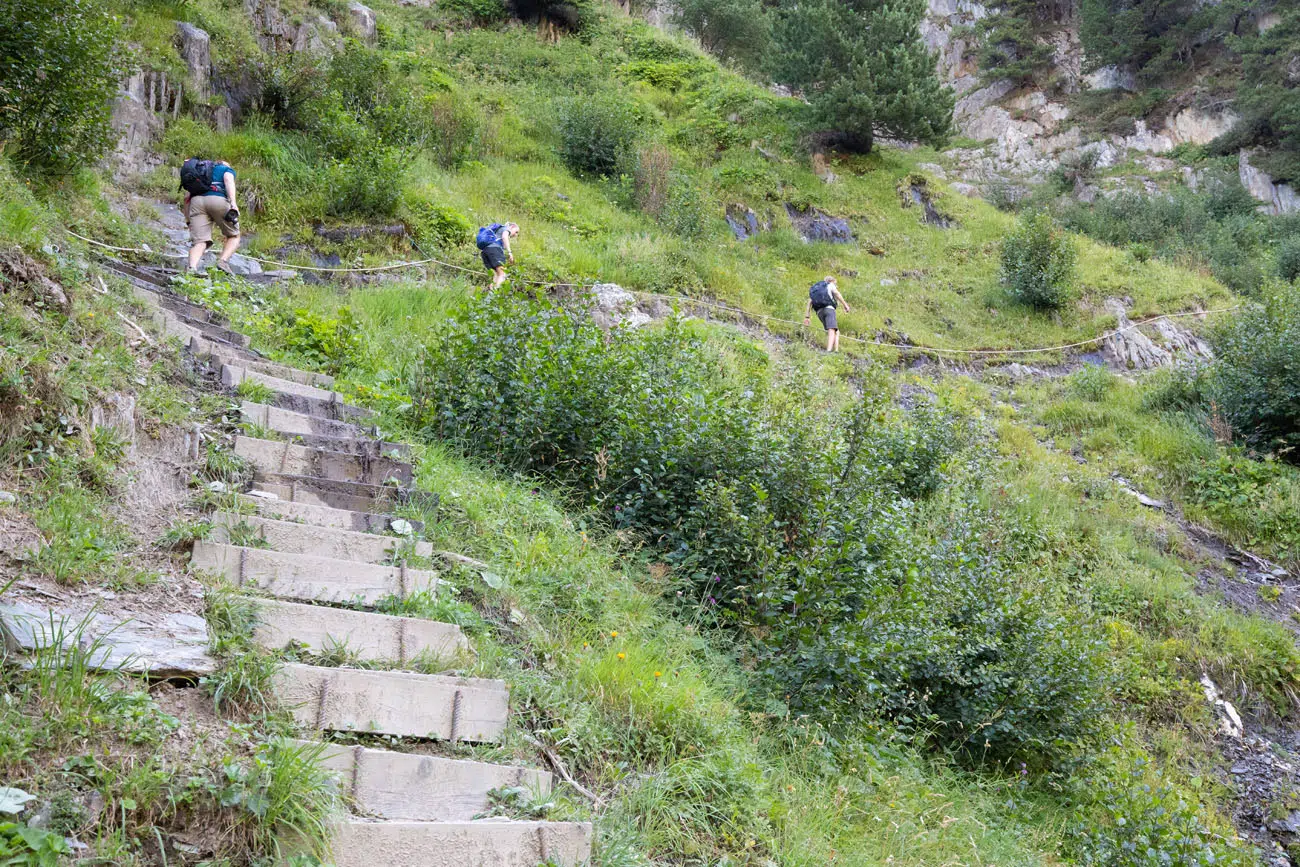
Stairs and ropes along the trail.
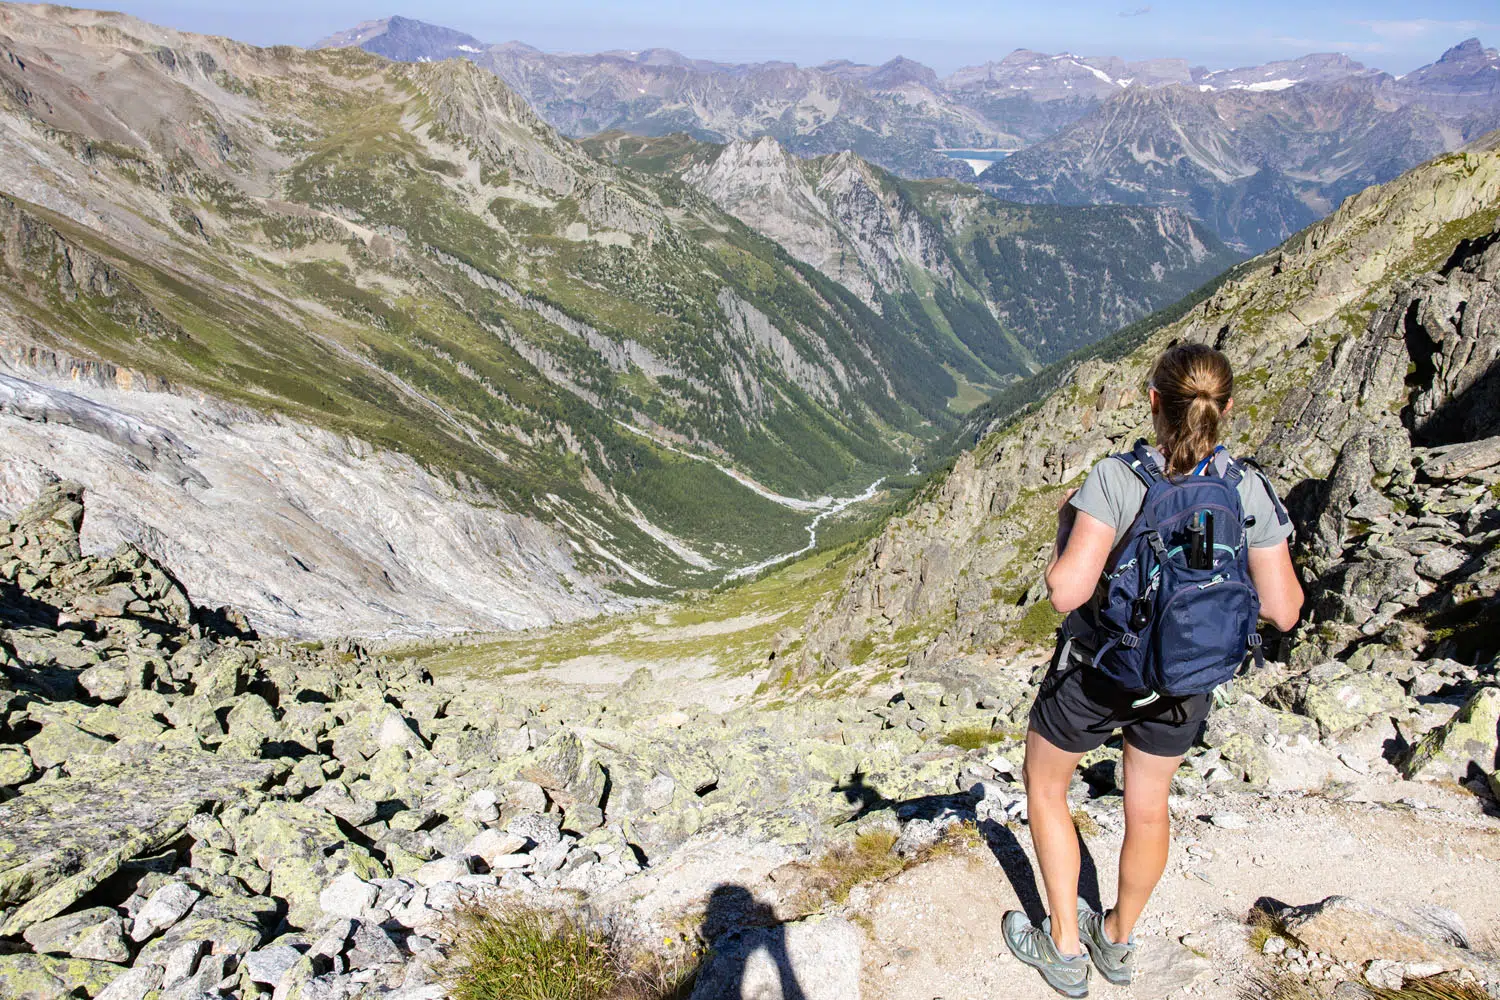
You will arrive at a very small cabin along the trail which makes a great stop to take a break and enjoy the view of the glacier.
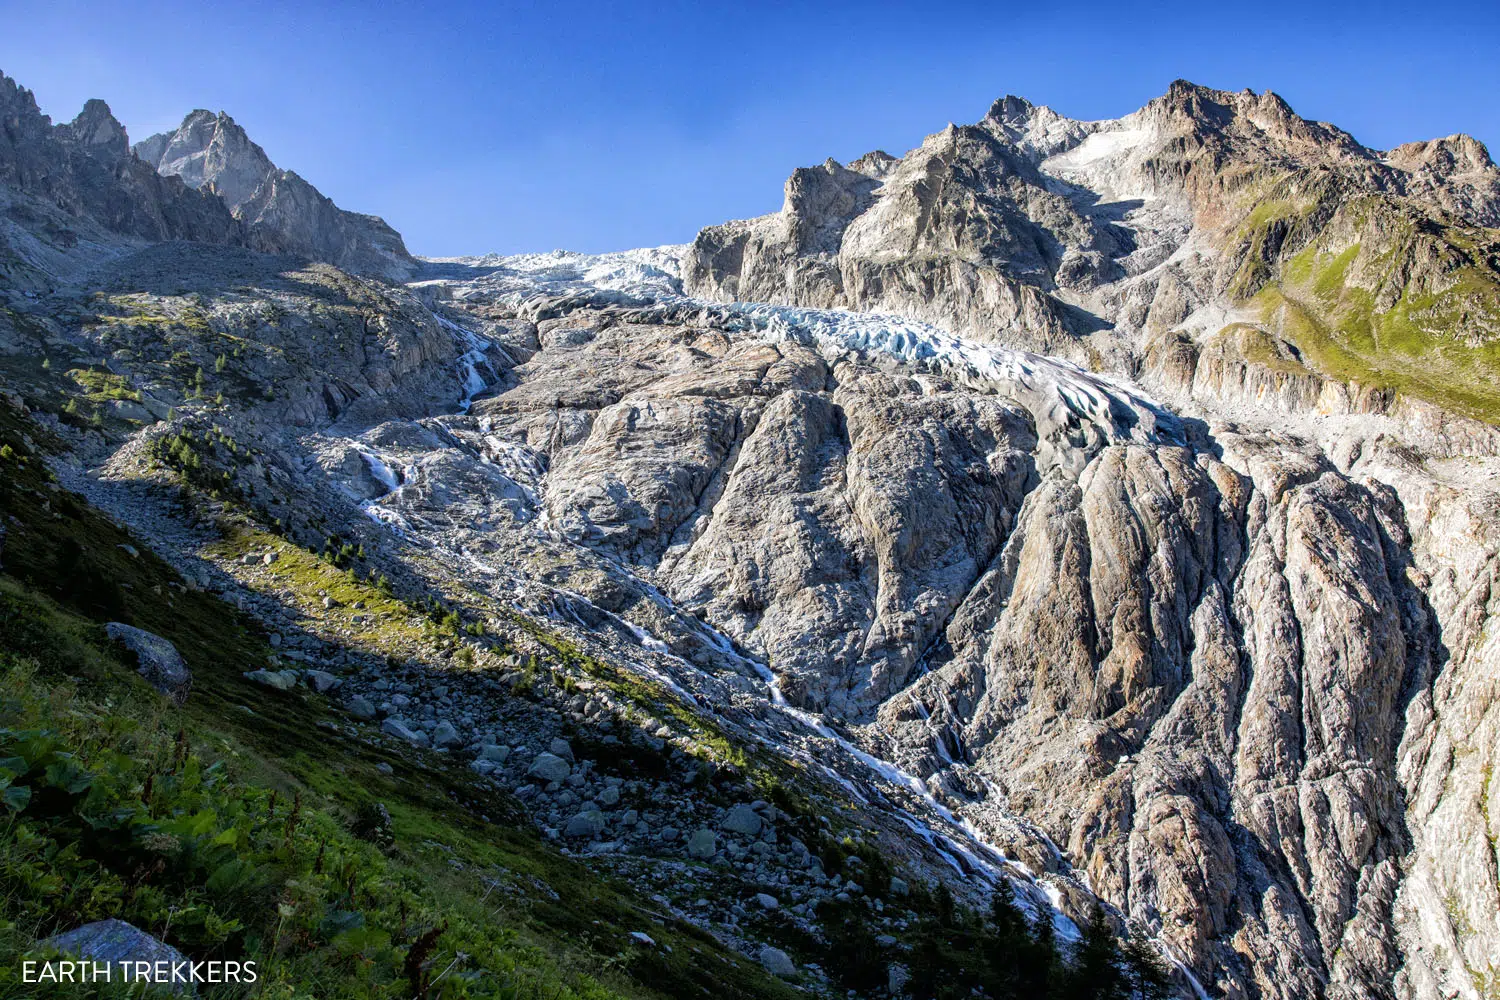
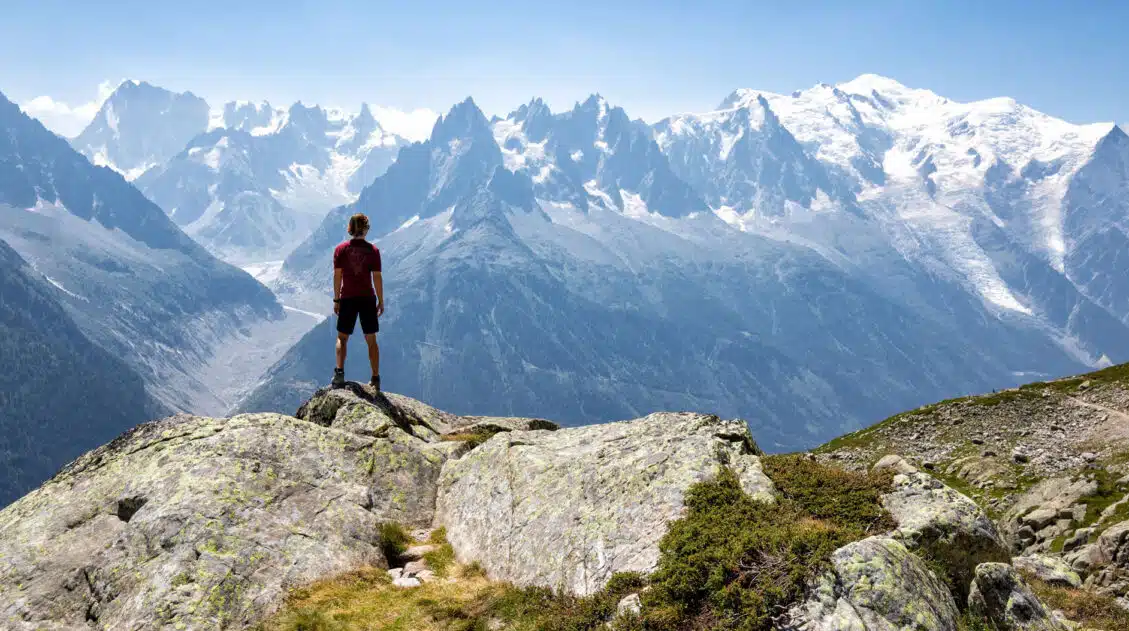
Trient Glacier
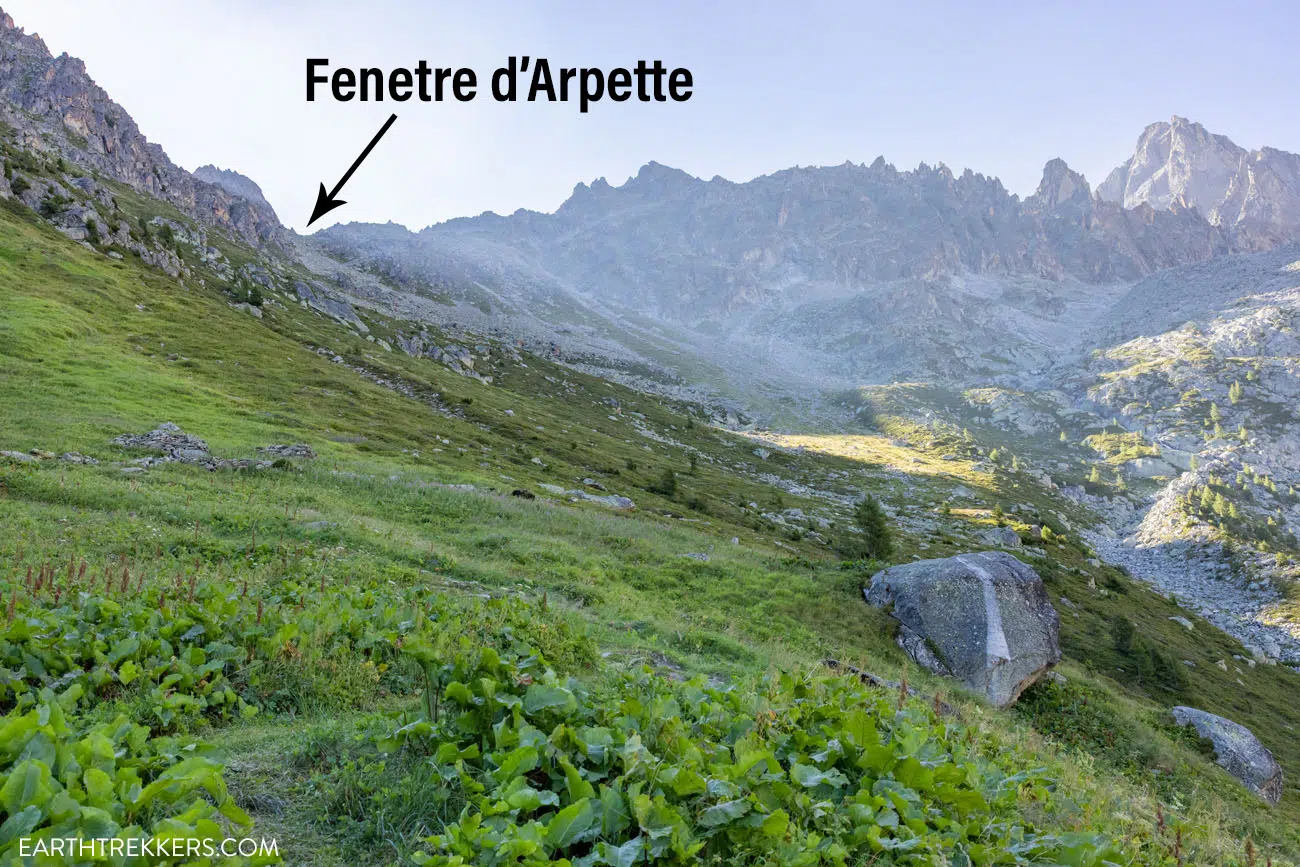
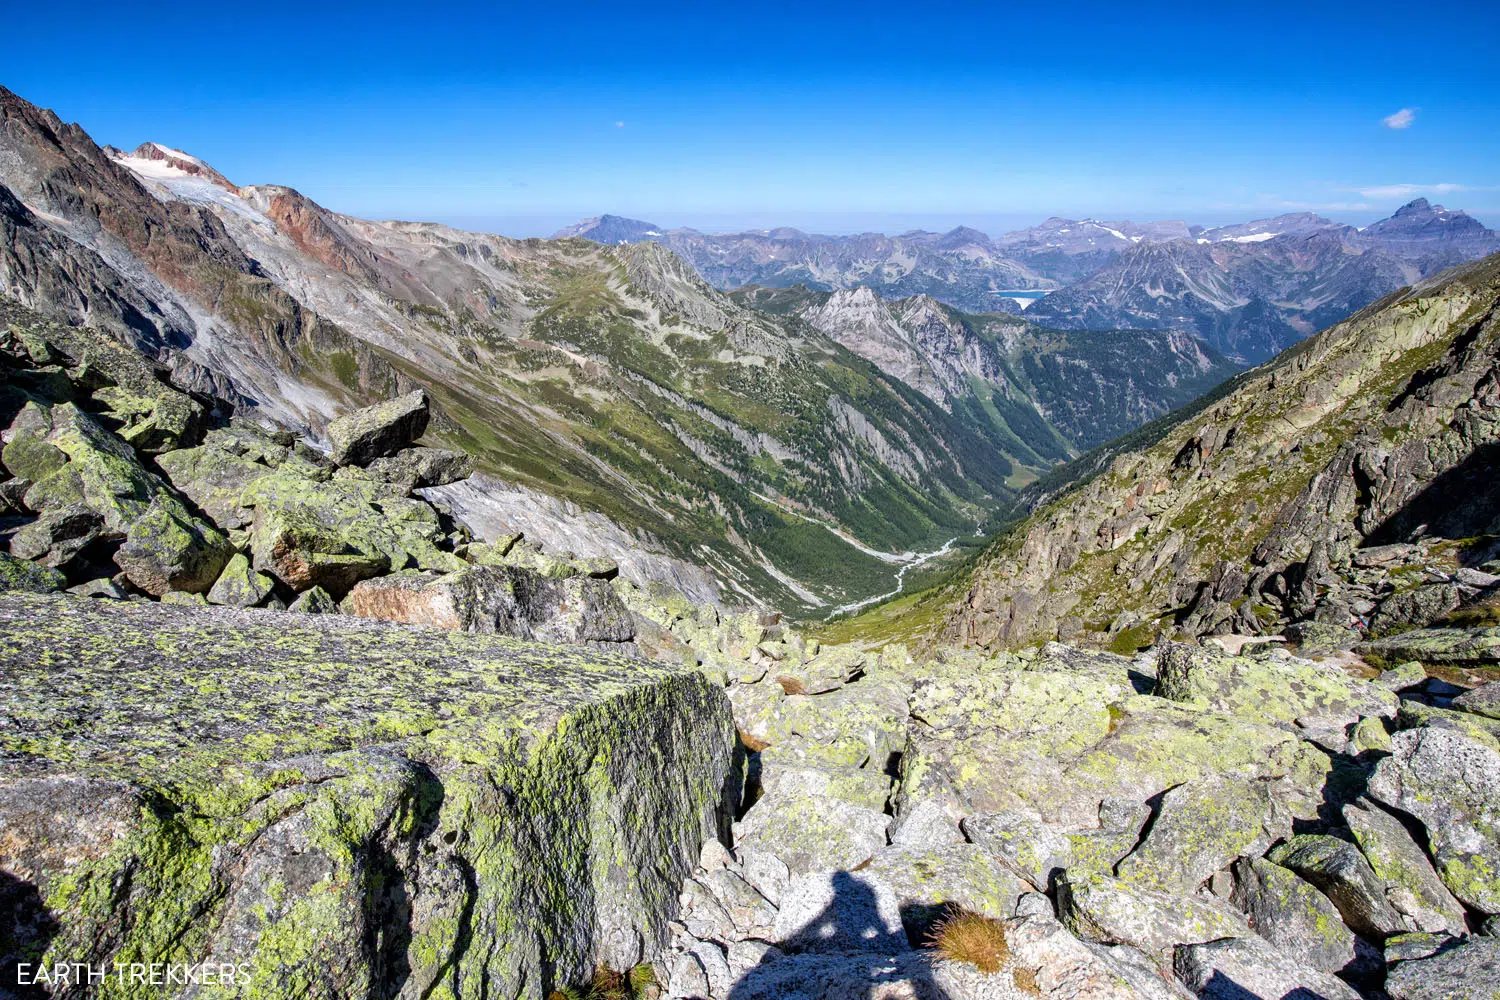
You can also see the location of Fenêtre d’Arpette.
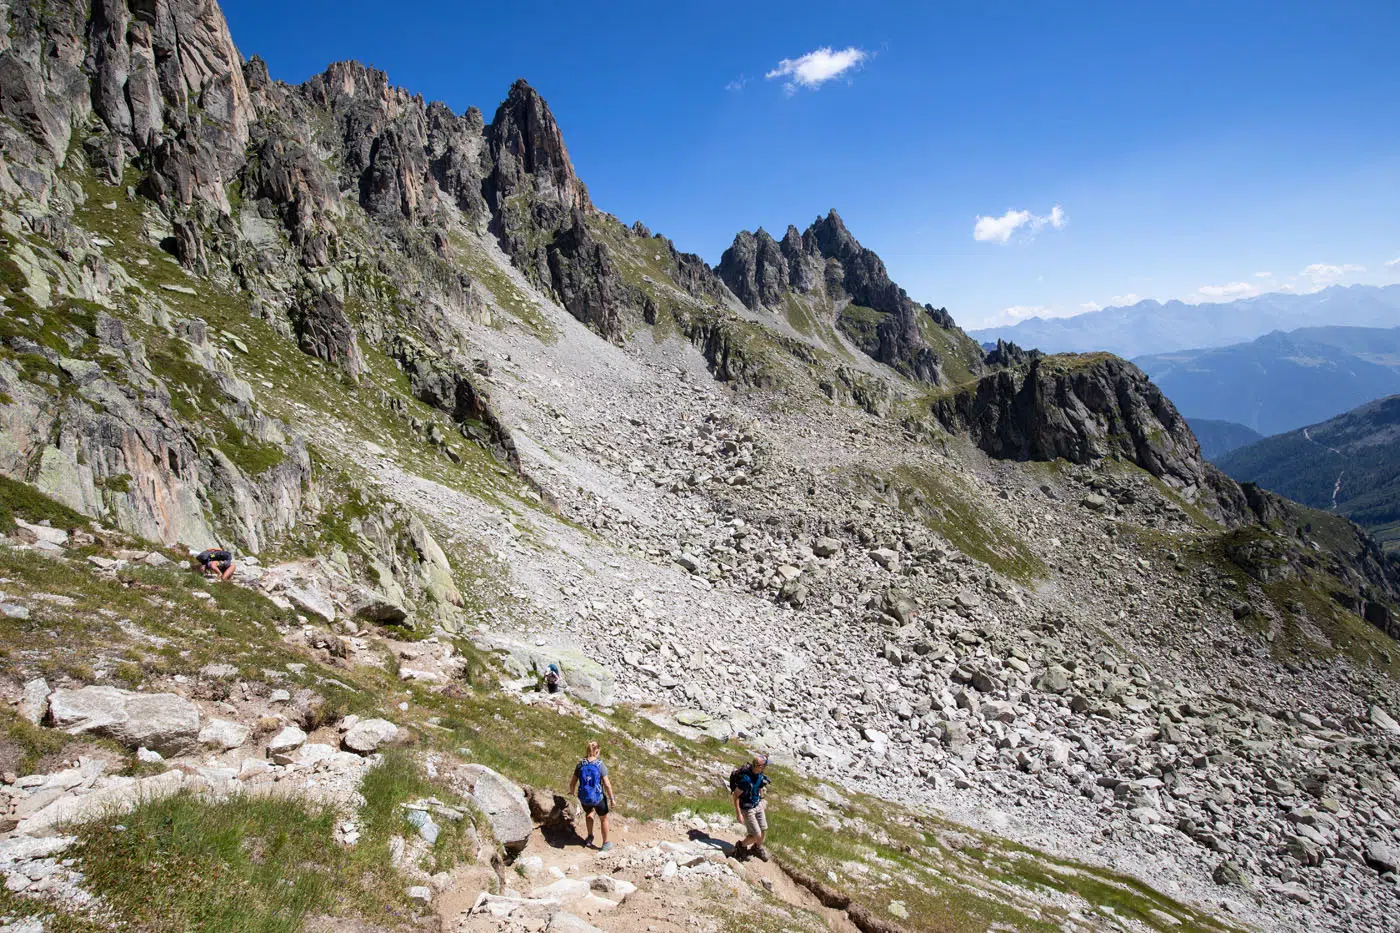
The trail heads uphill from the valley to wall of rocky pinnacles to the far left of the glacier. As you get higher on the trail, you will be able to see a small notch (the window or fenêtre) which you will reach at the high point of this stage.
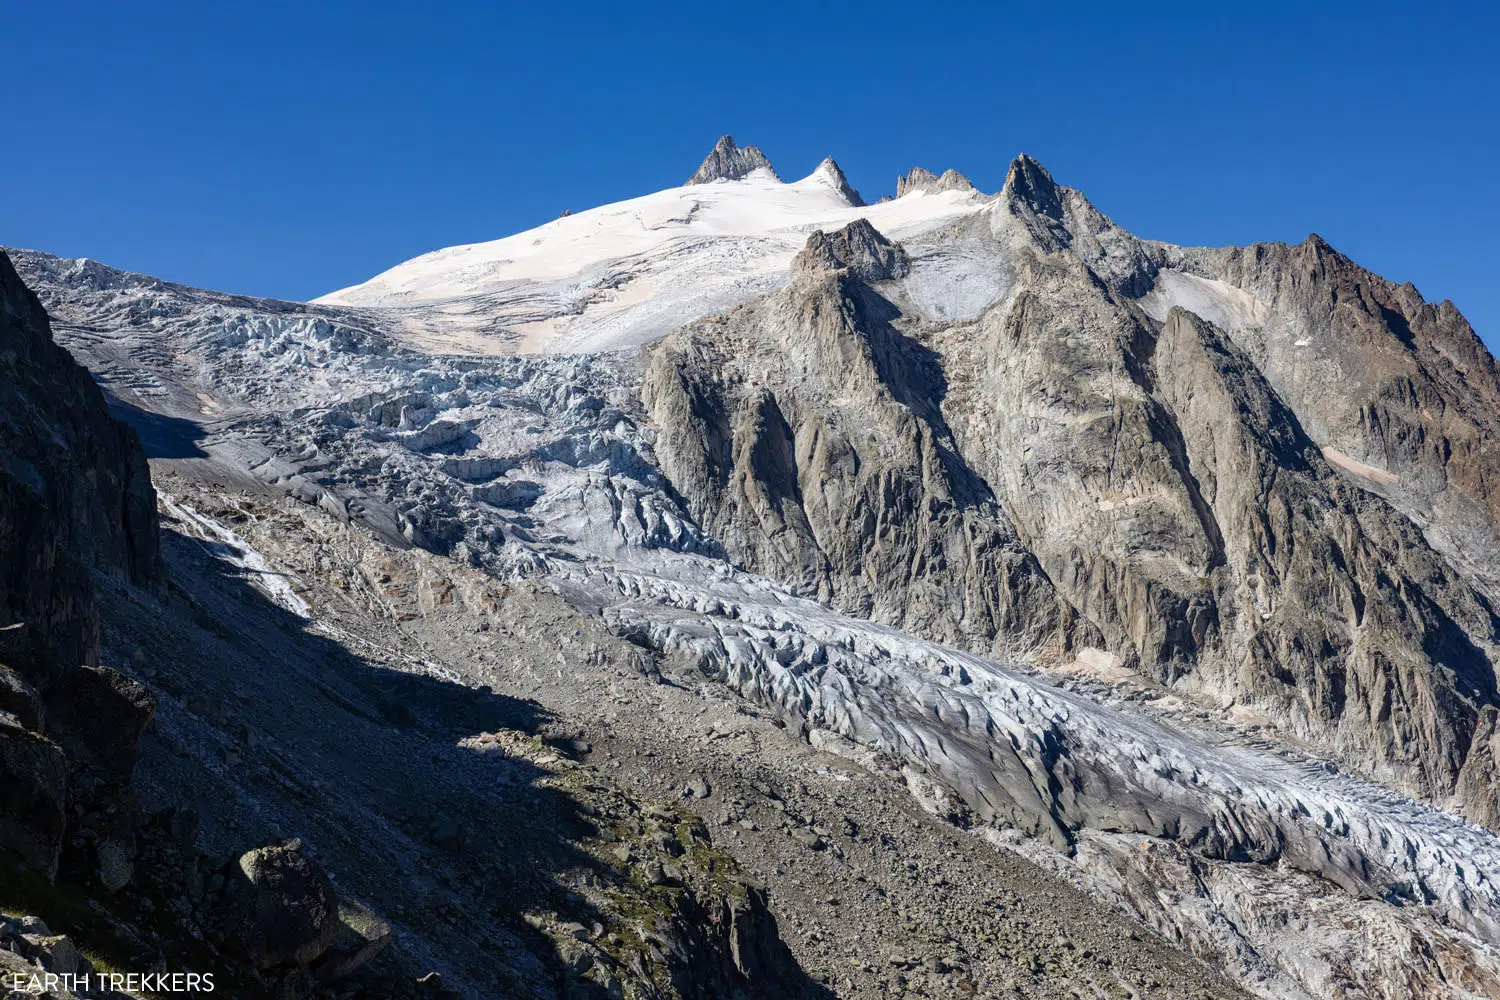
The climb may be tough, but it sure is pretty! Below is the beautiful valley that you had hiked from and off to the right is Trient Glacier. Beyond, large mountains fill the horizon.
The temperature is also very nice on this portion of the hike, especially if you are doing the climb in the morning. Cold air was blowing off of the glacier and the sun had not yet risen above the mountains, so the chilly breeze and the shade helped keep us cool, despite the fact that we were doing a very strenuous climb.
View looking back down through the valley.
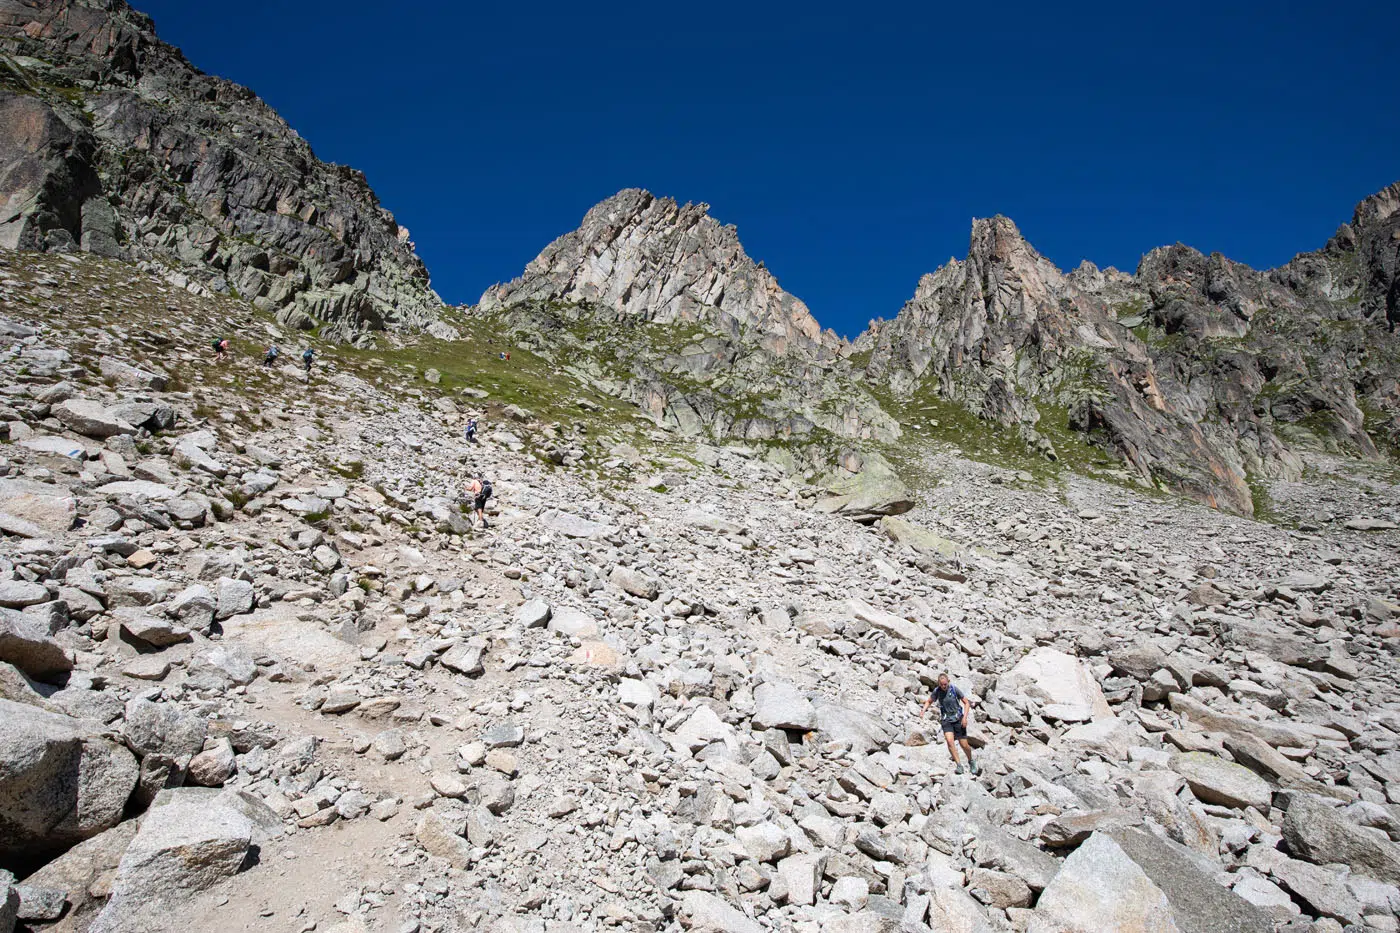
The final climb to the top is a rock scramble over small boulders. It looks menacing after the climb that you have just done, but it is truly just a short way to go.
Final climb to the top.
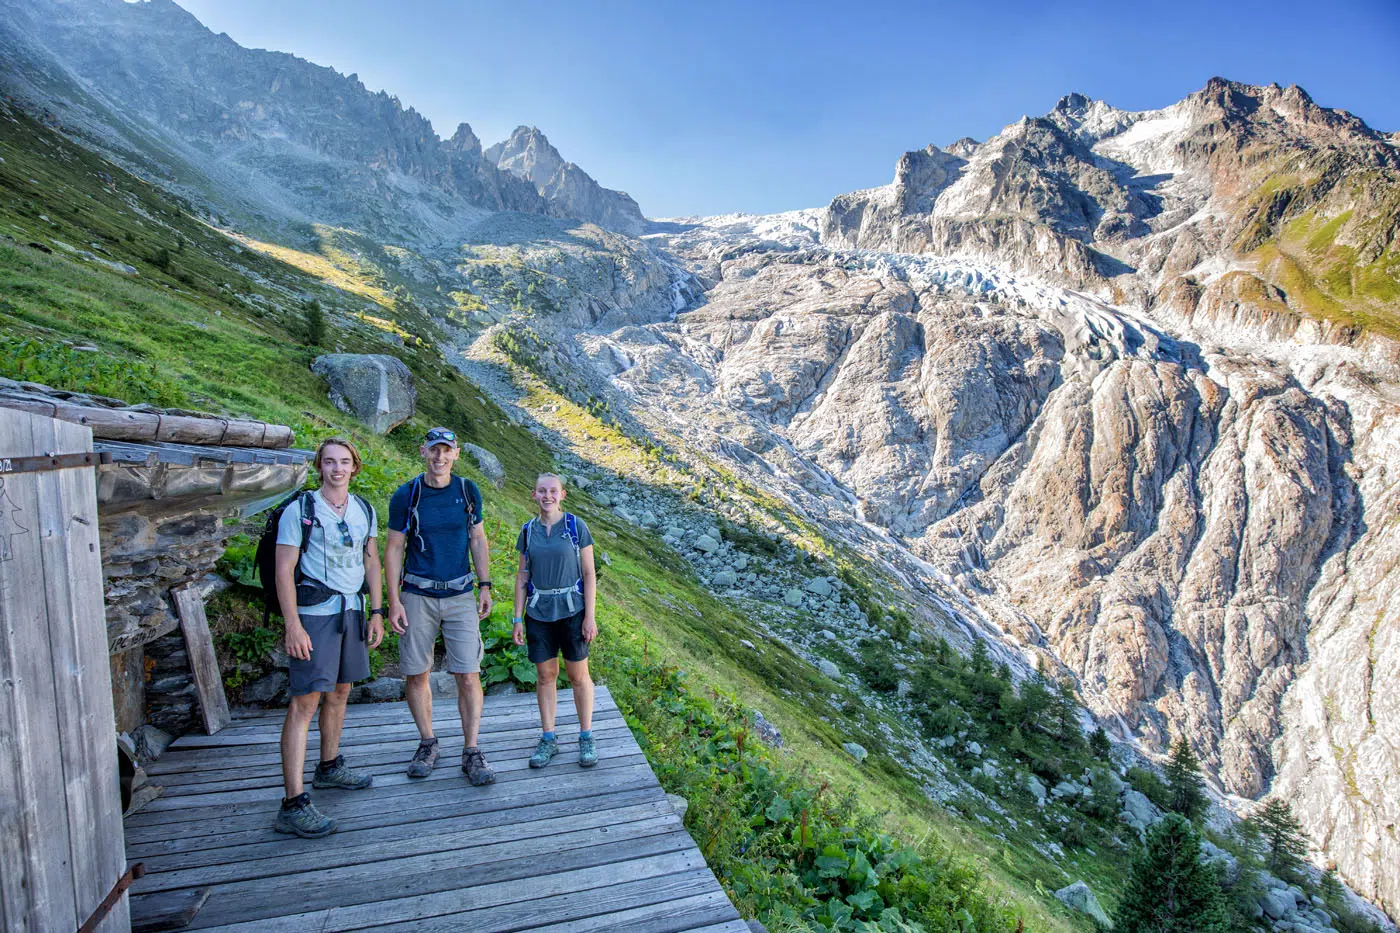
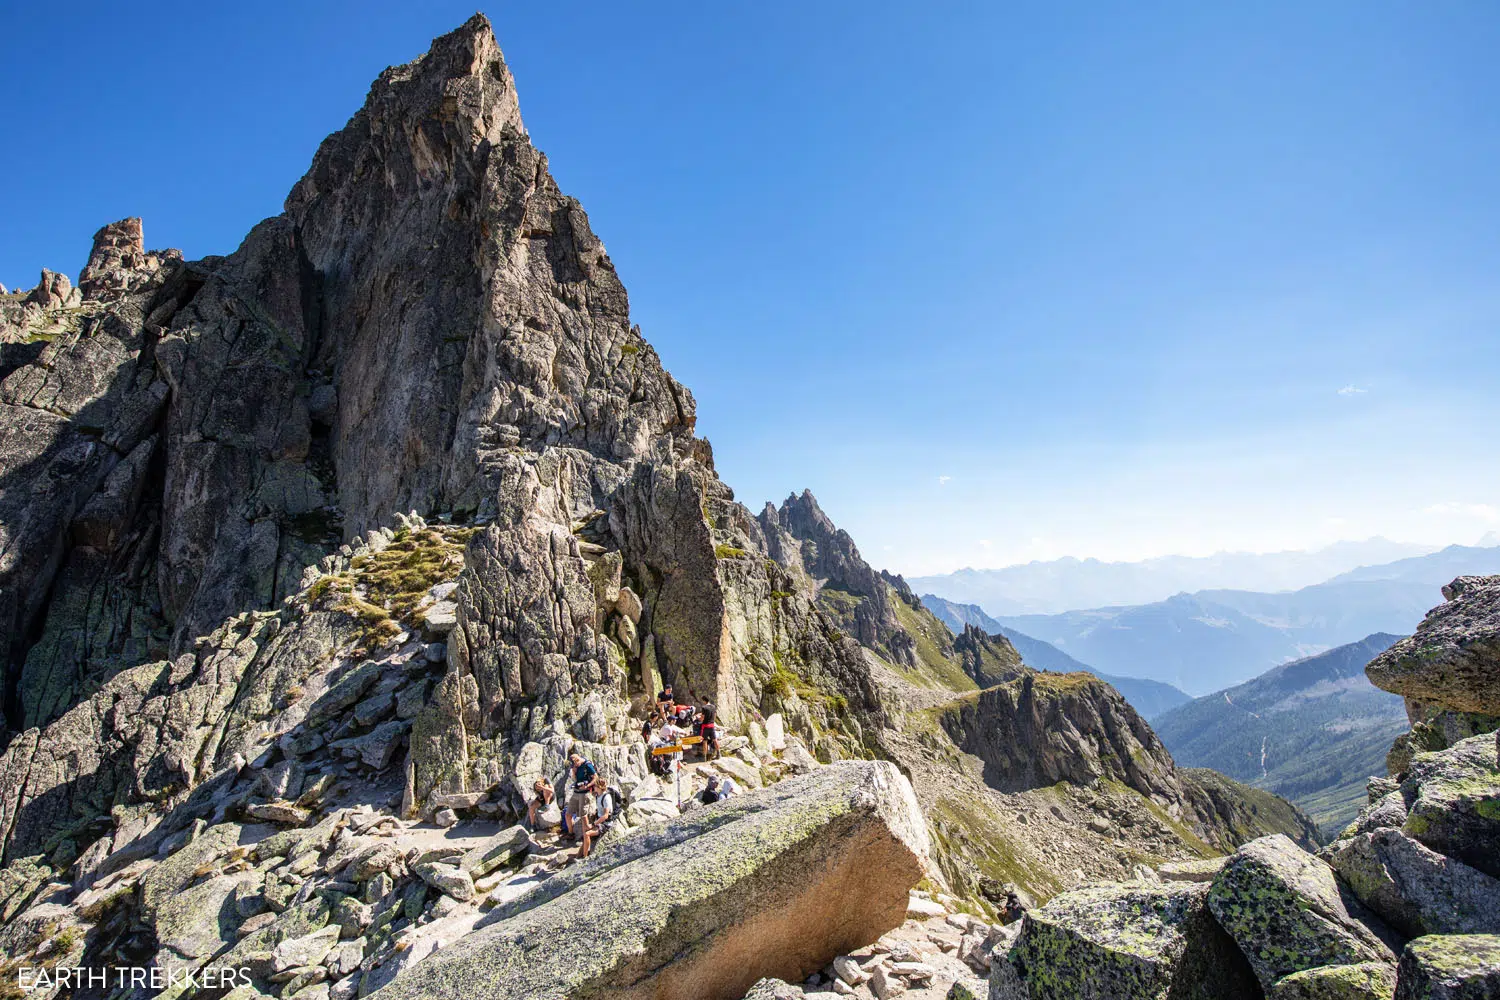
Once you reach the top, take a rest and enjoy the view! We ate lunch up here, although it was very windy. If you want to escape the wind, you can begin the descent (as it is warmer on the opposite side of the mountain) and find another spot to rest.
View from Fenêtre d’Arpette
Trient Glacier
Another view of the valley.
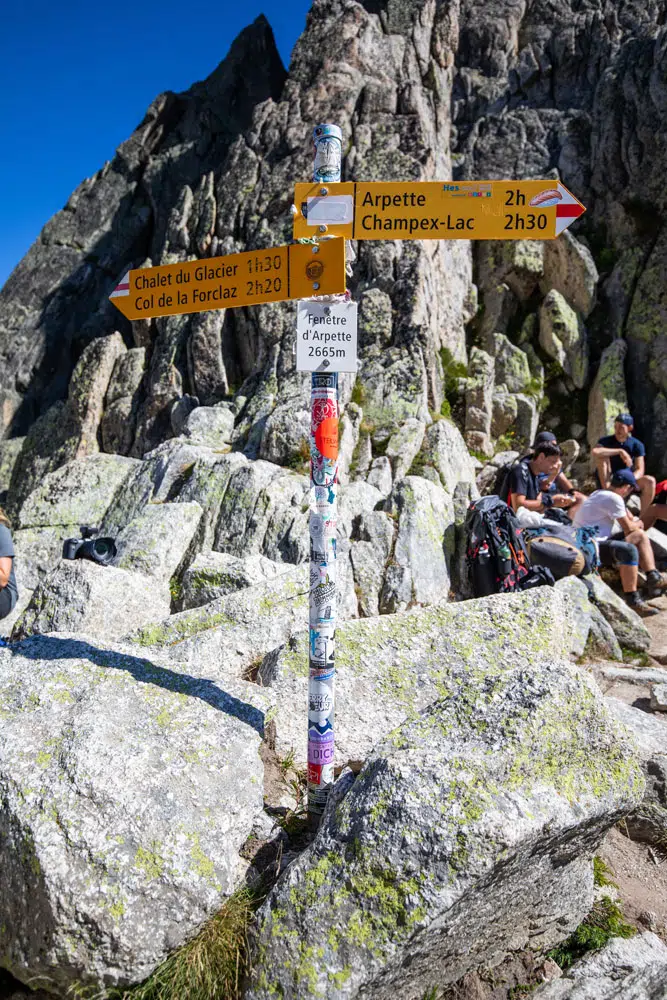
Fenêtre d’Arpette
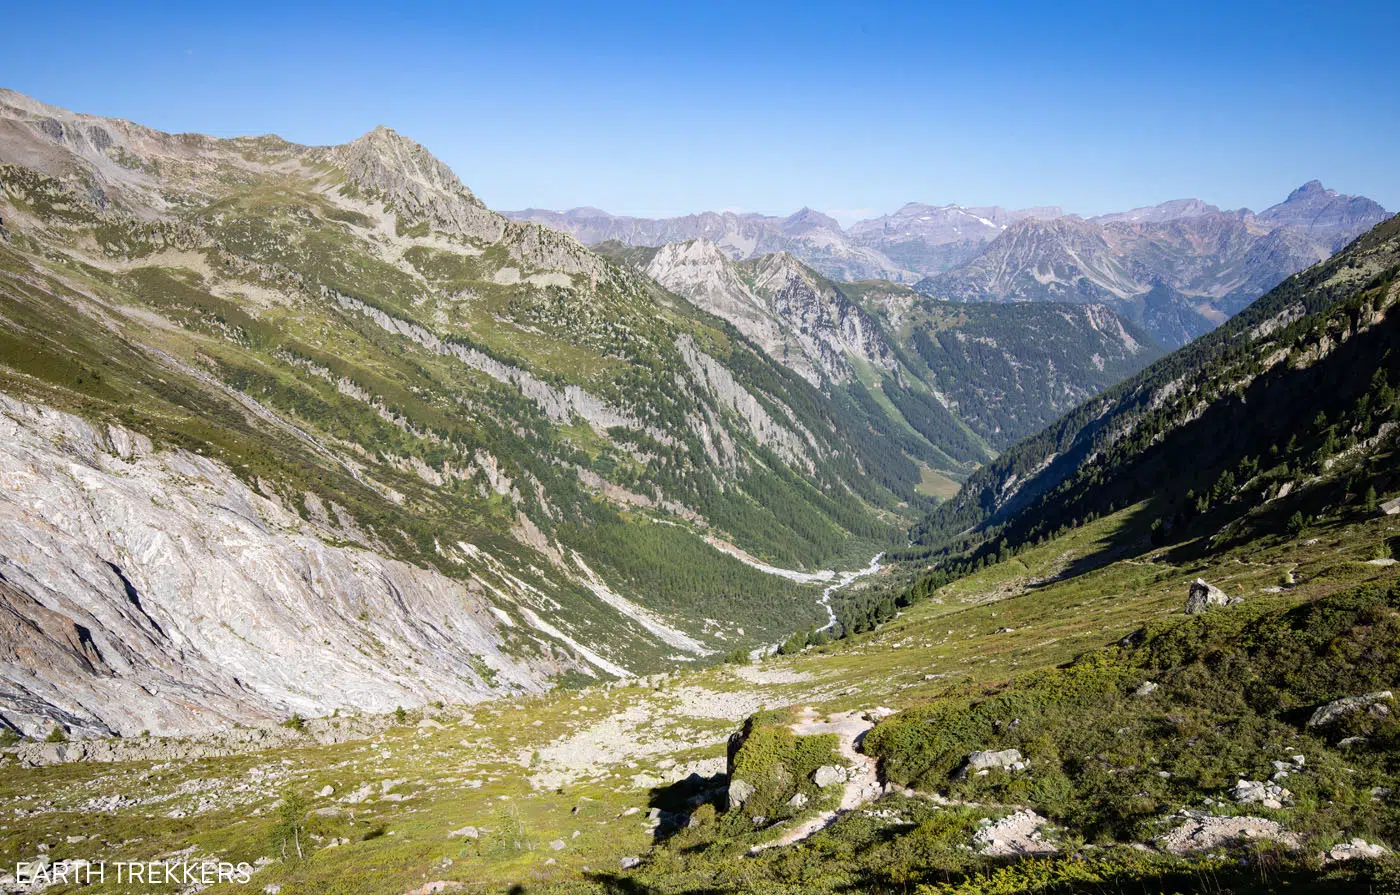
This is the view looking east and towards the descent.
Fenêtre d’Arpette to Relais d’Arpette
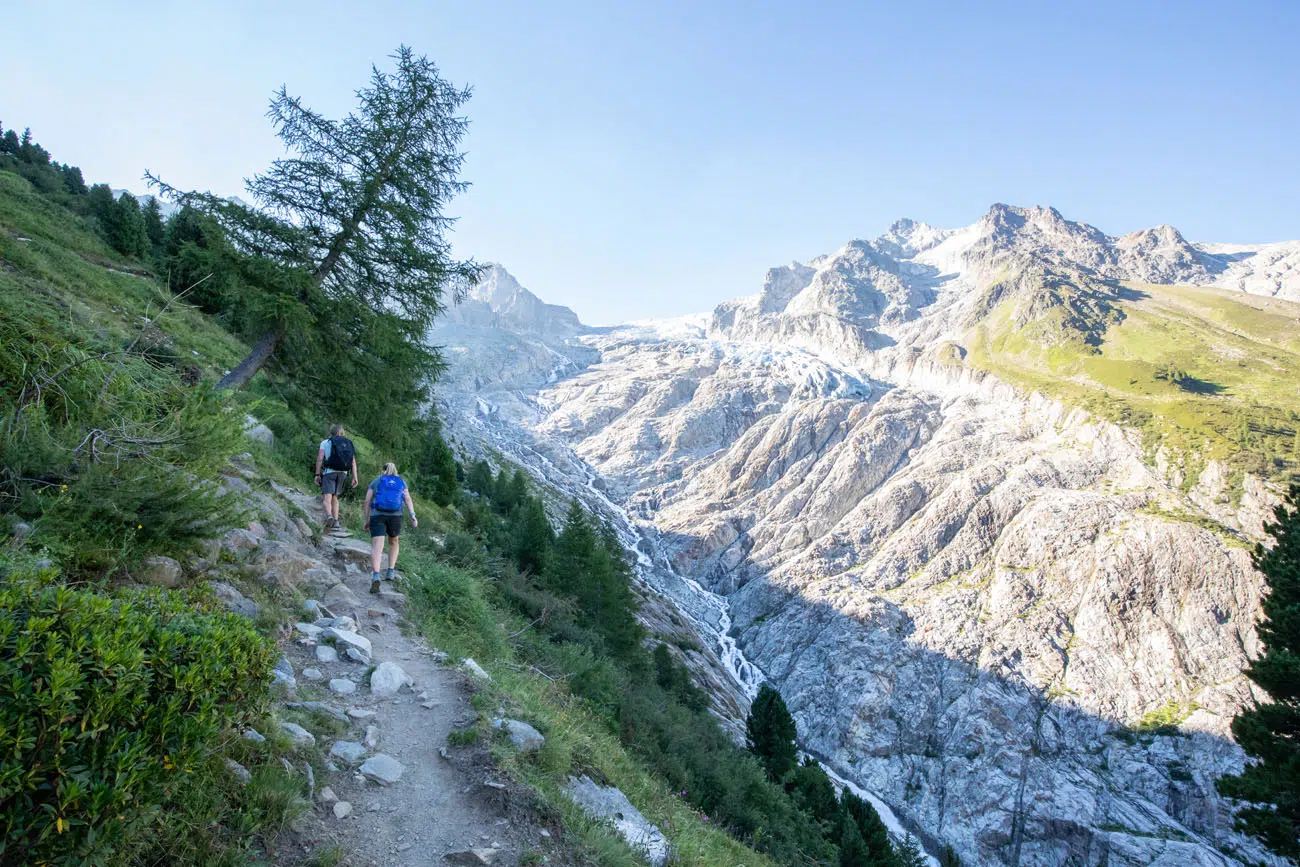
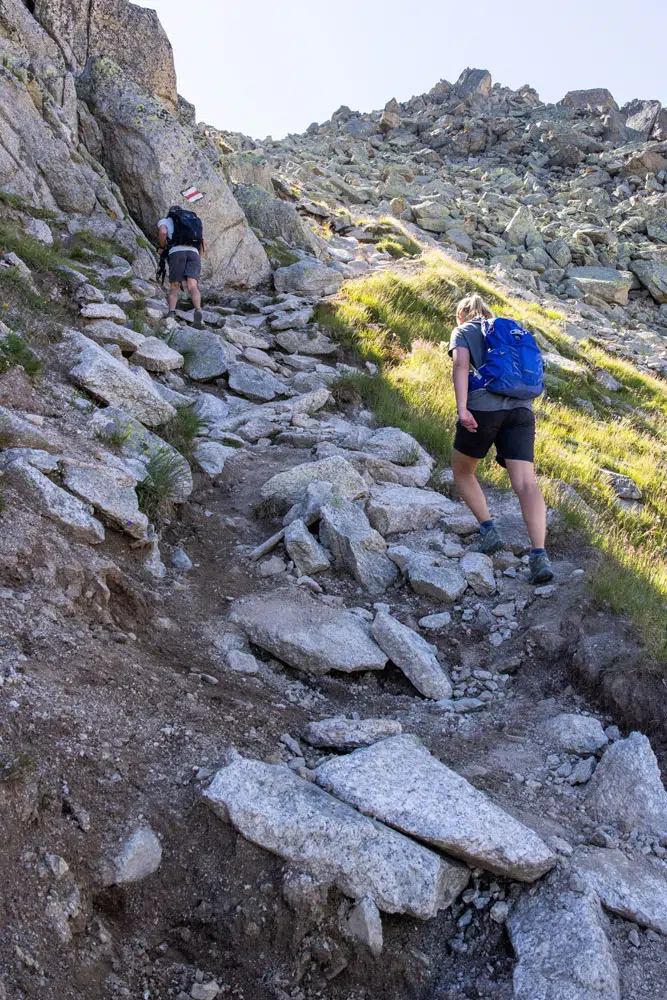
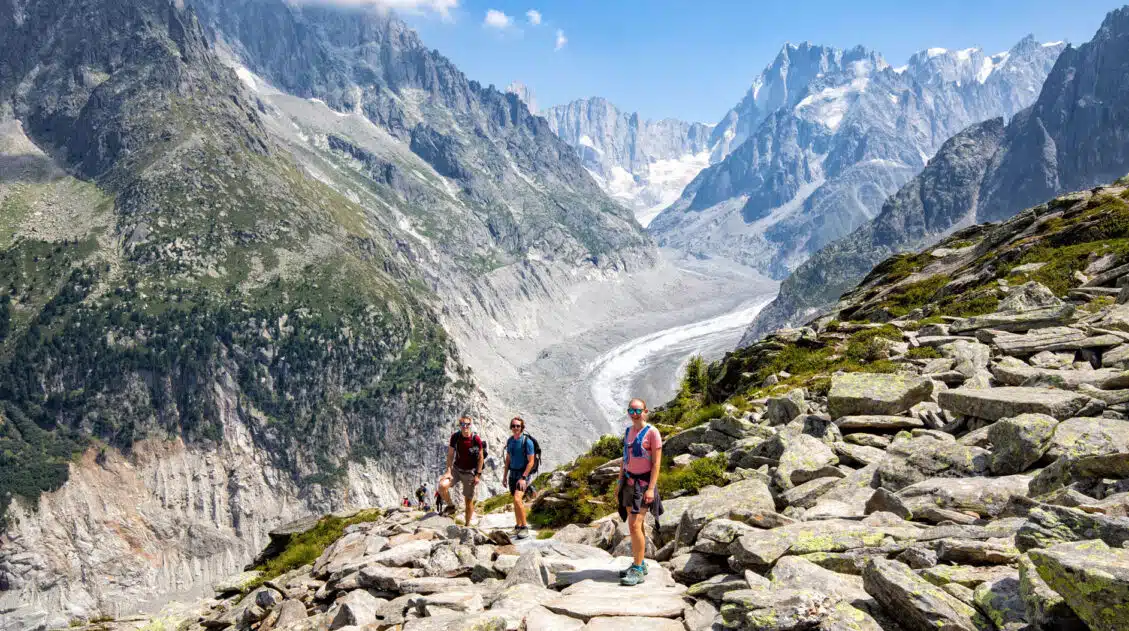
The descent begins very steep and rocky, making progress down the mountain very slow-going. The sun was also shining brightly on this side of the mountain which warmed us up very fast.
Have care here. The gravelly trail is very slippery and at times you will be hiking across fields of boulders. It’s easy to stumble and fall, especially with legs tired from the big ascent up to Fenêtre d’Arpette.
The beginning of the descent is the steepest part, although it will remain steep until you reach the valley.
Tim and Kara coming down the trail from Fenetre d’Arpette.
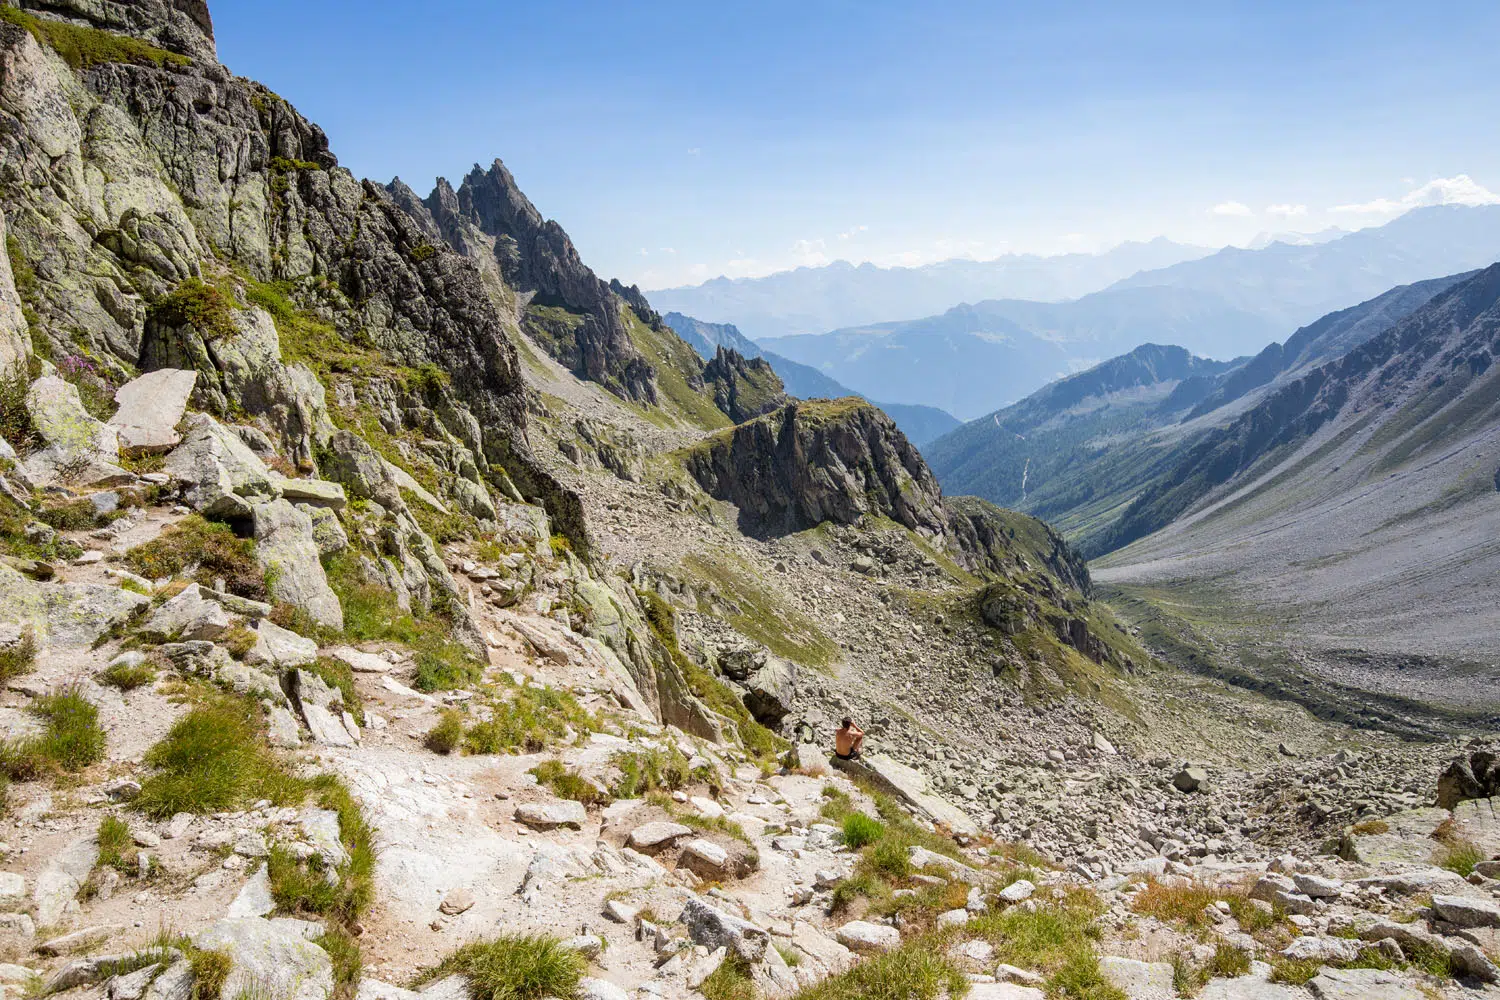
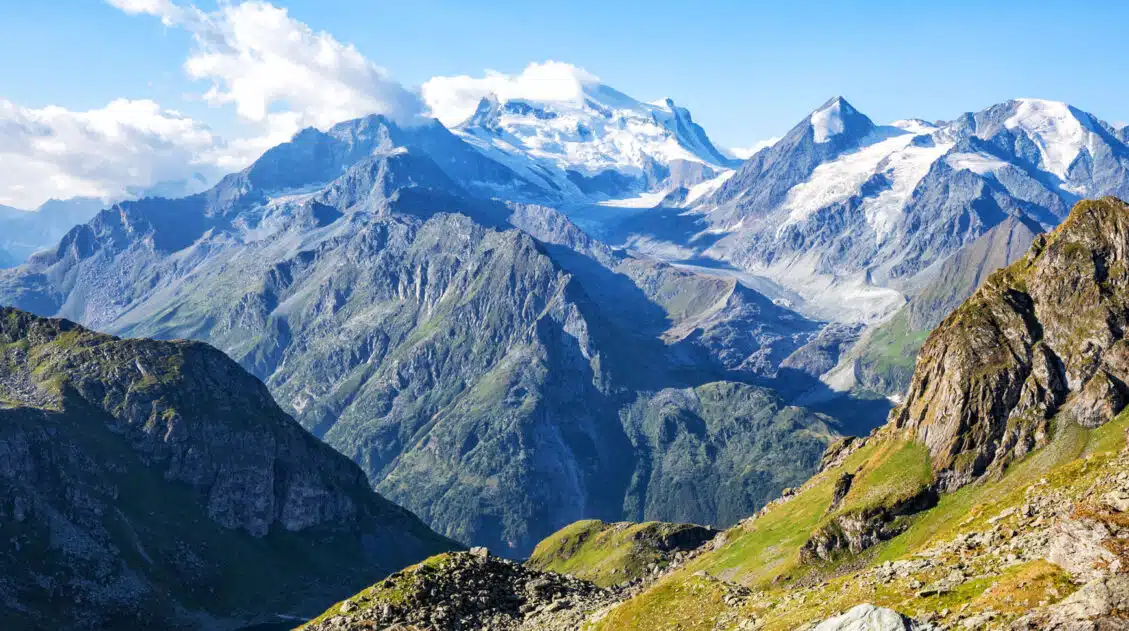
Looking around however you are treated to more epic views. Straight ahead you can see layers upon layers of the Swiss Alps. And behind you is the crazy steep trail switch-backing down from the saddle.
Another view looking back up the trail to Fenêtre d’Arpette.
Eventually the trail becomes less steep and easier to hike, but it’s always rocky so you always have to watch where you are putting your feet.
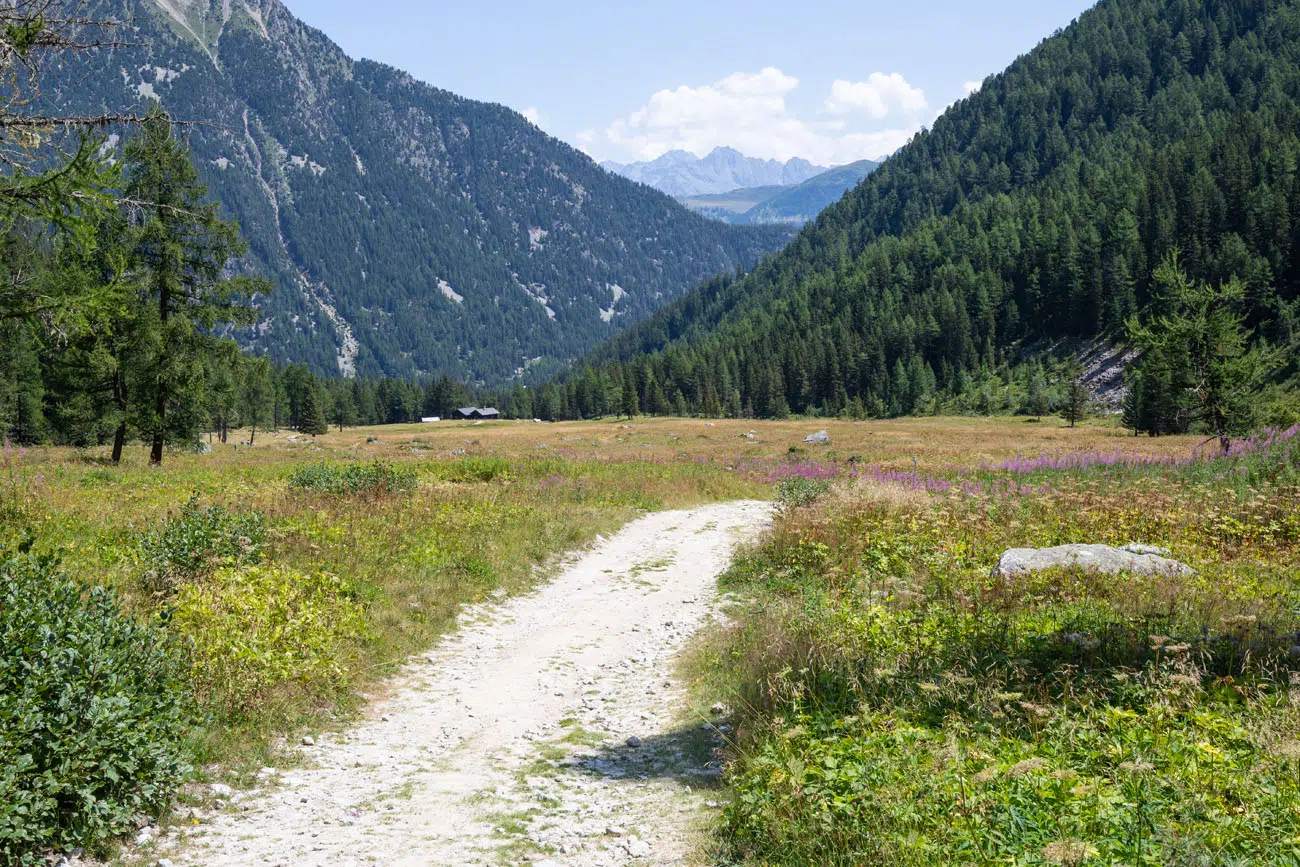
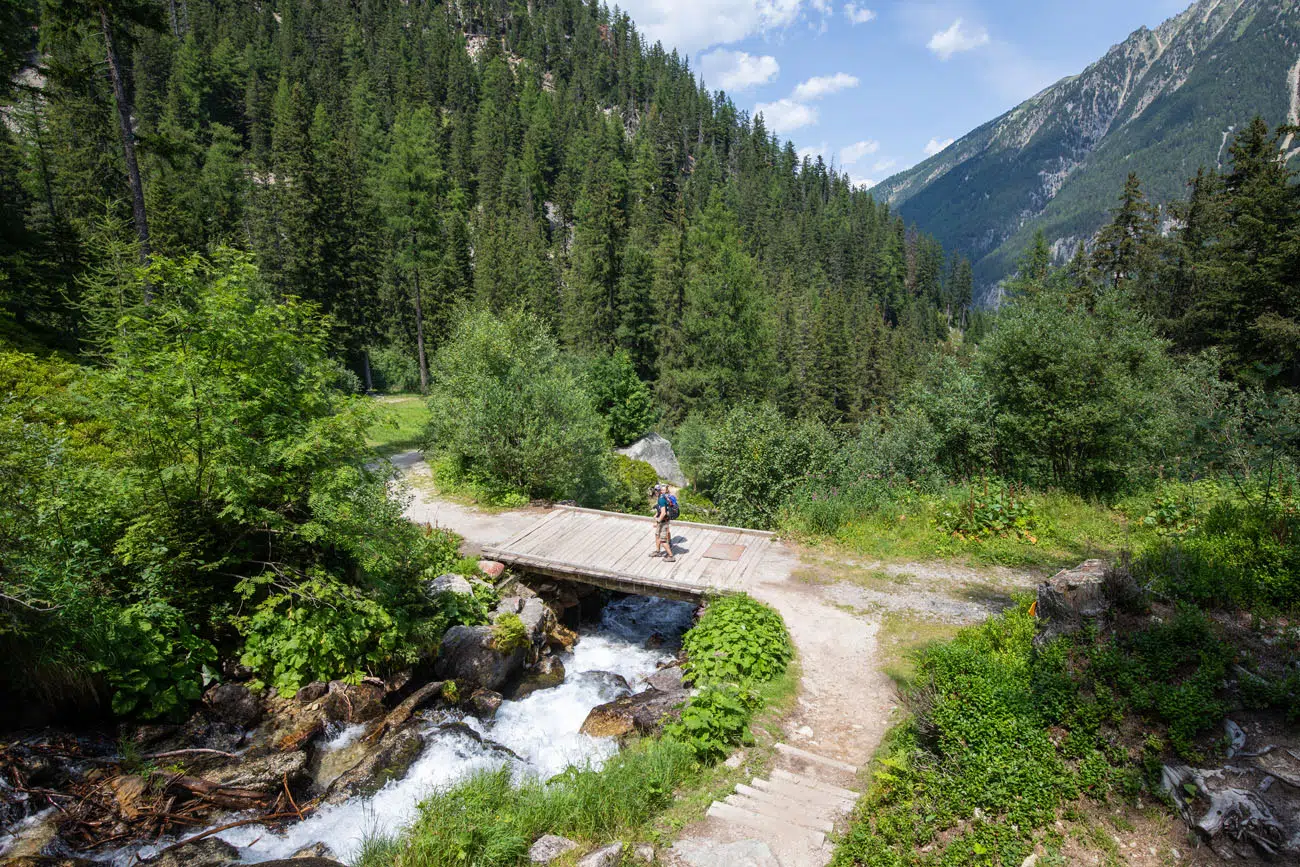
Eventually you will reach a wide gravel road. First two small farm buildings will come into view. Pass these buildings and the from there Relais d’Arpette is only a 5-minute walk away. We stopped at the restaurant to rest our tired feet and eat a delicious lunch.
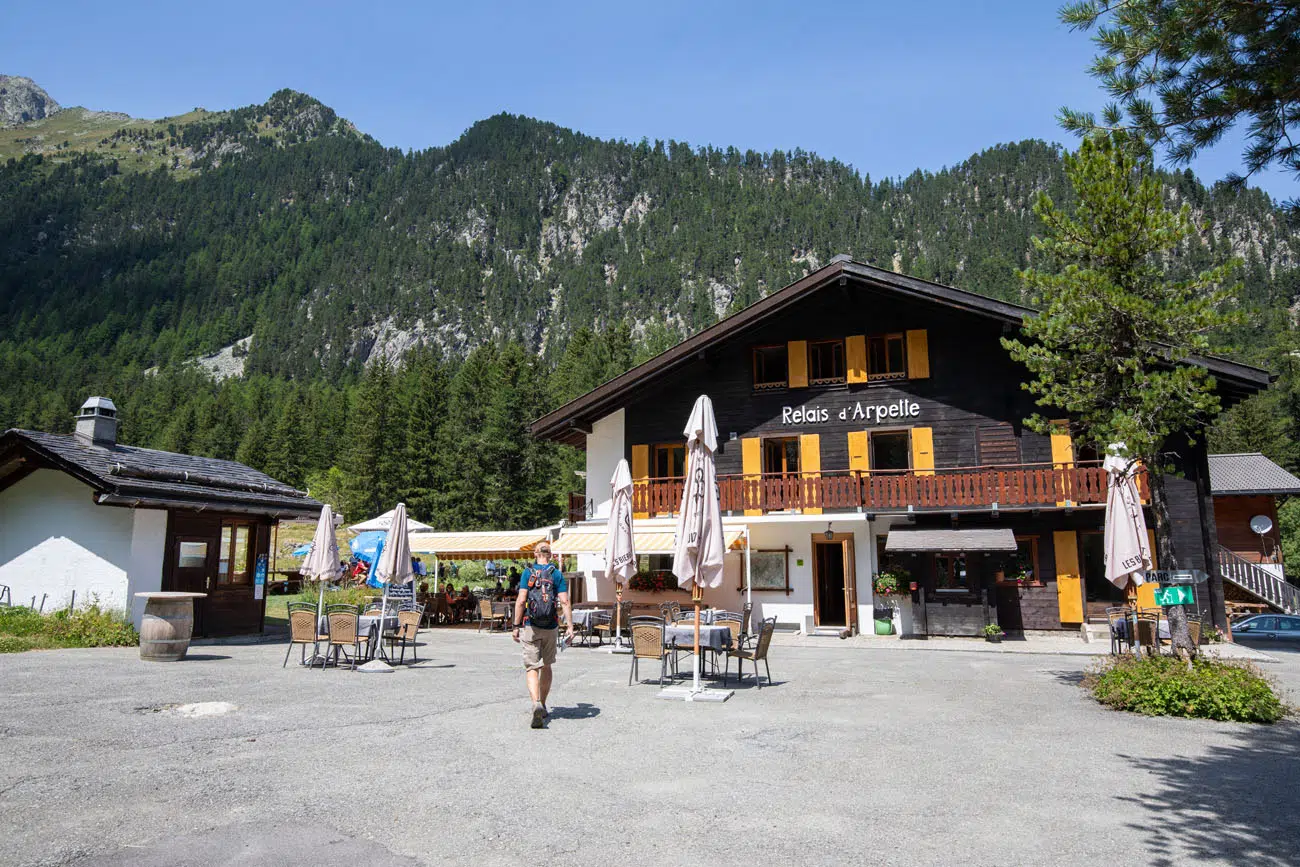
Relais d’Arpette
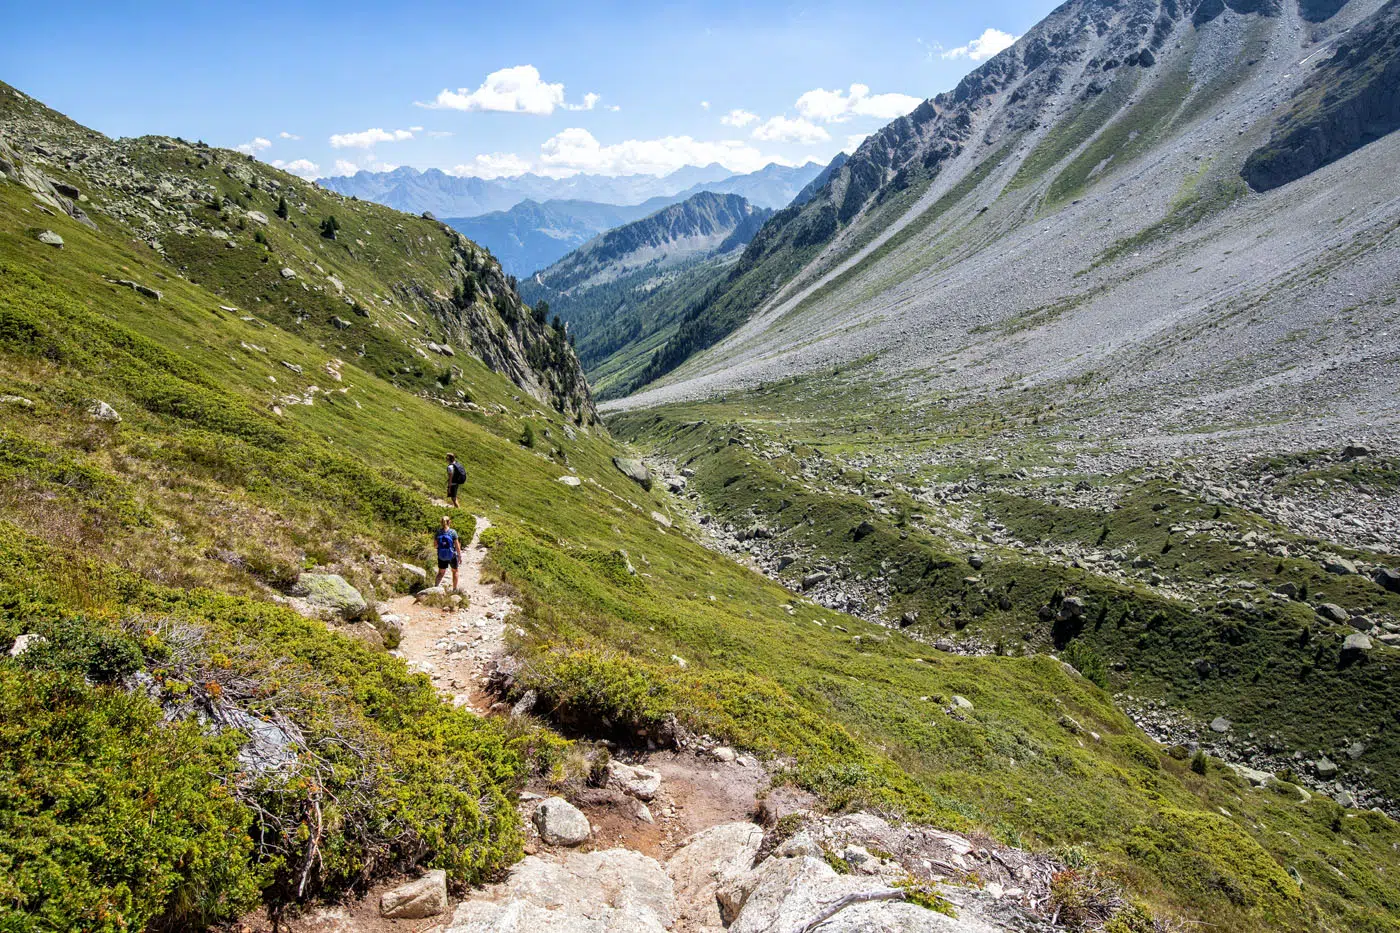
Relais d’Arpette to Lac Champex
From here you are nearly to Champex-Lac (about 30 minutes away) and the trail flattens out much more. You will mostly be hiking through a forest in the shade which is a great escape from the summer heat.
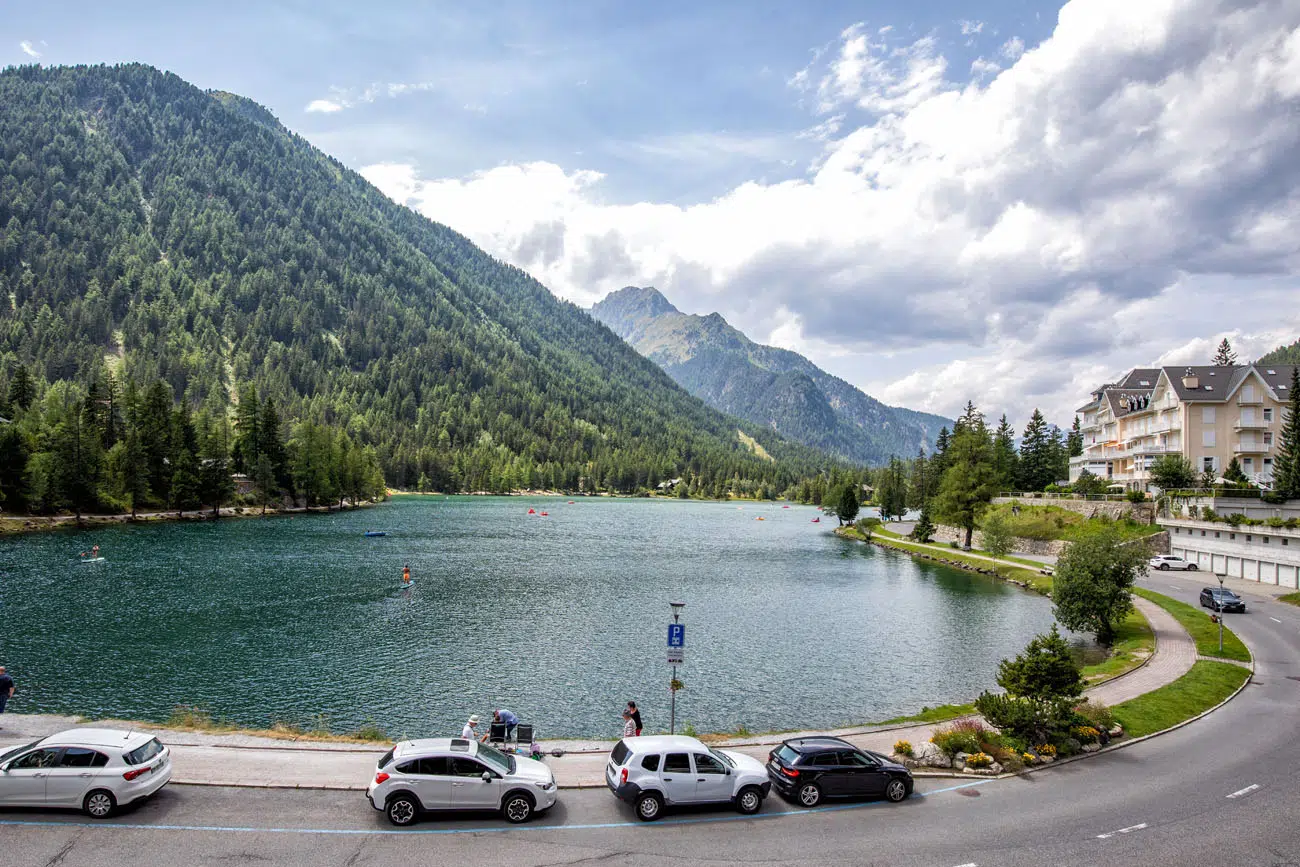
Once you make it to lovely Champex-Lac, check into your accommodations. If you still have energy left, you can go paddle boarding on the lake.
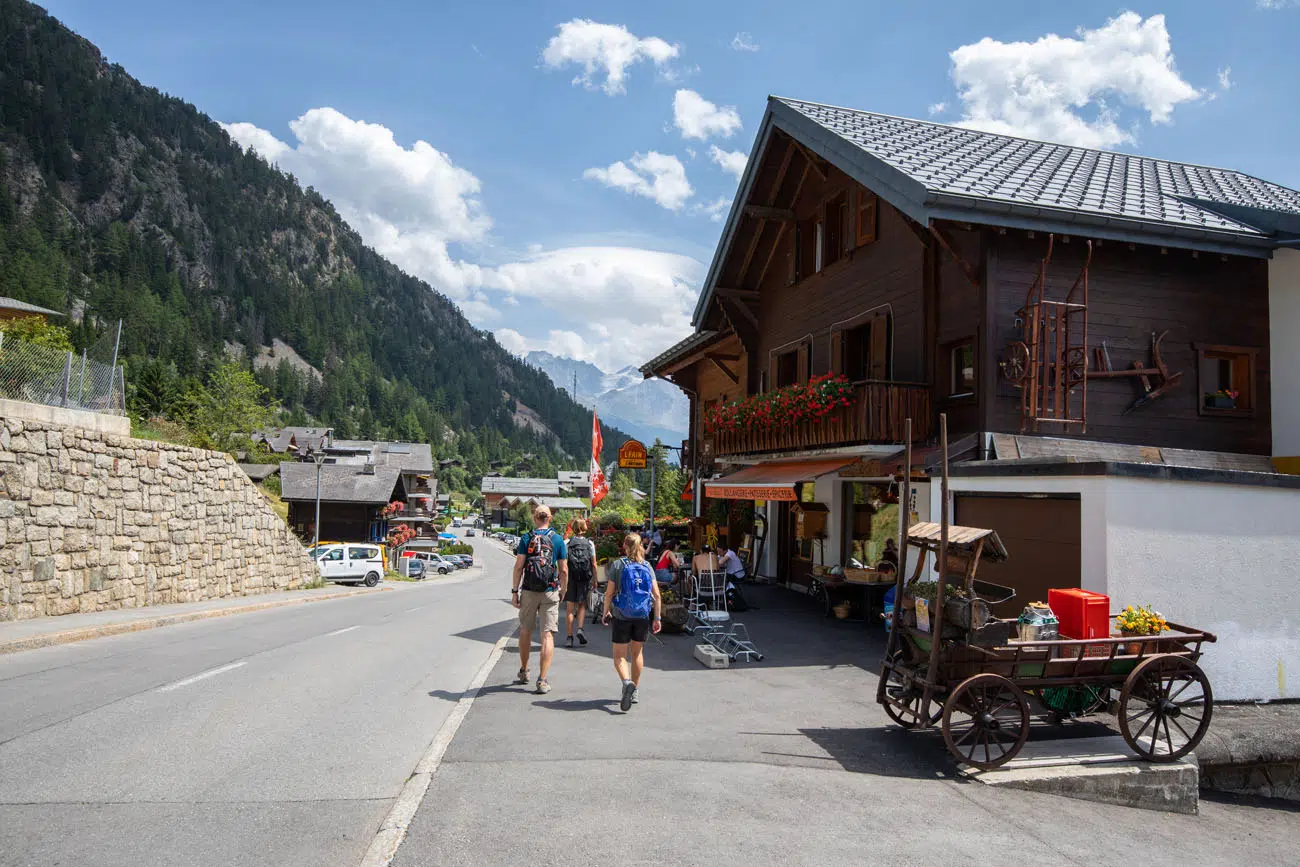
Entering Champex-Lac
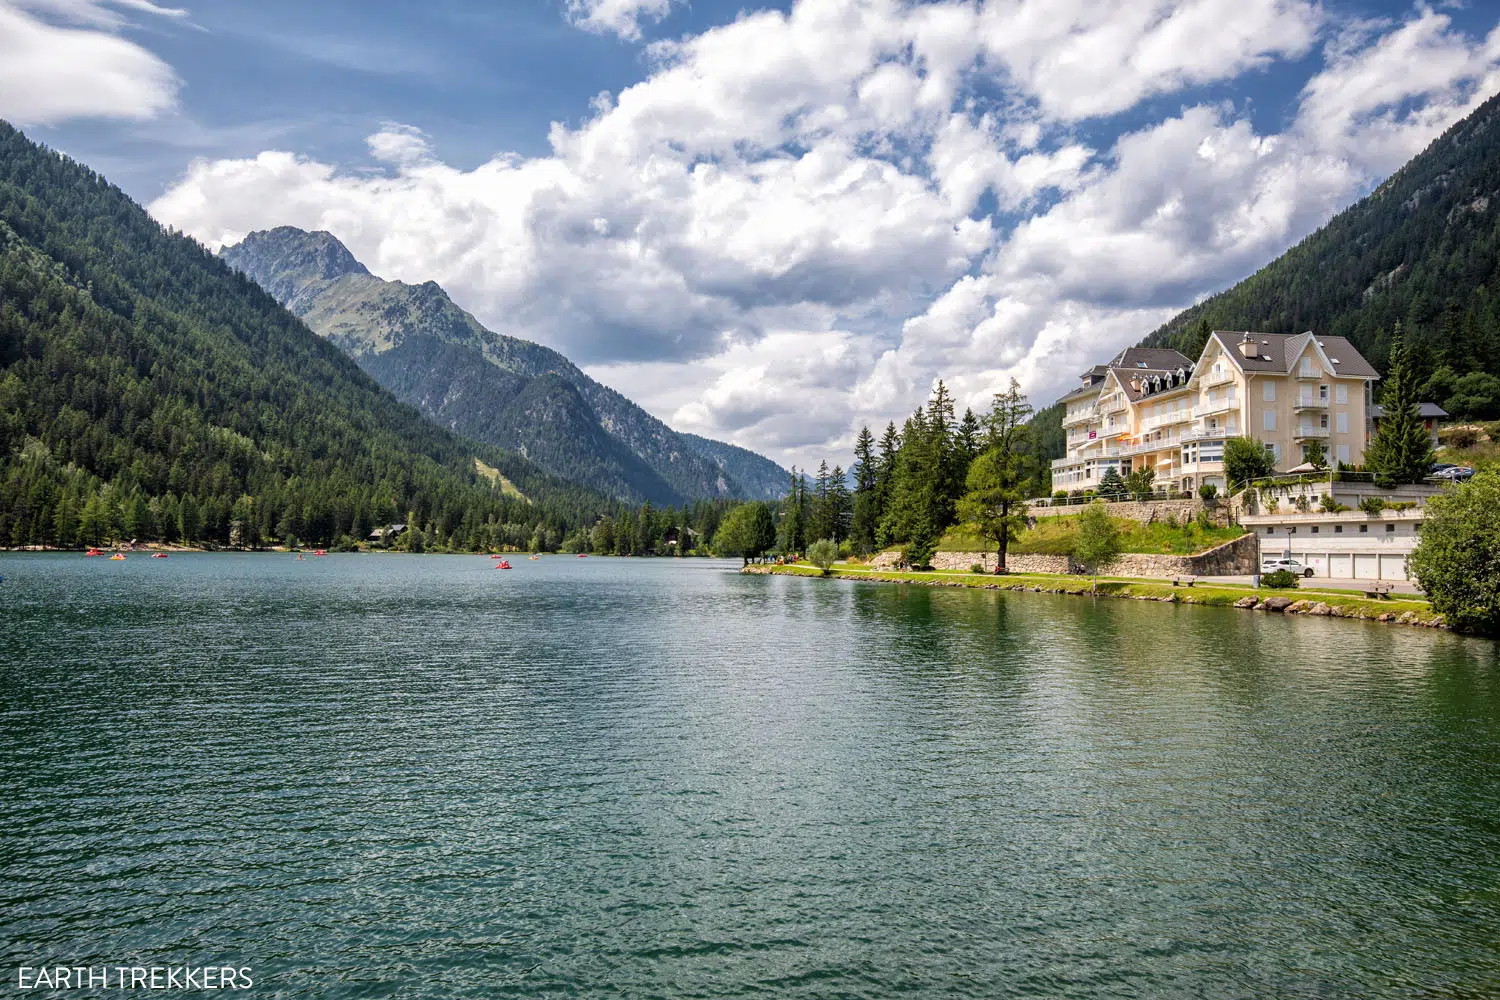
Champex-Lac
Where to Stay in Champex-Lac
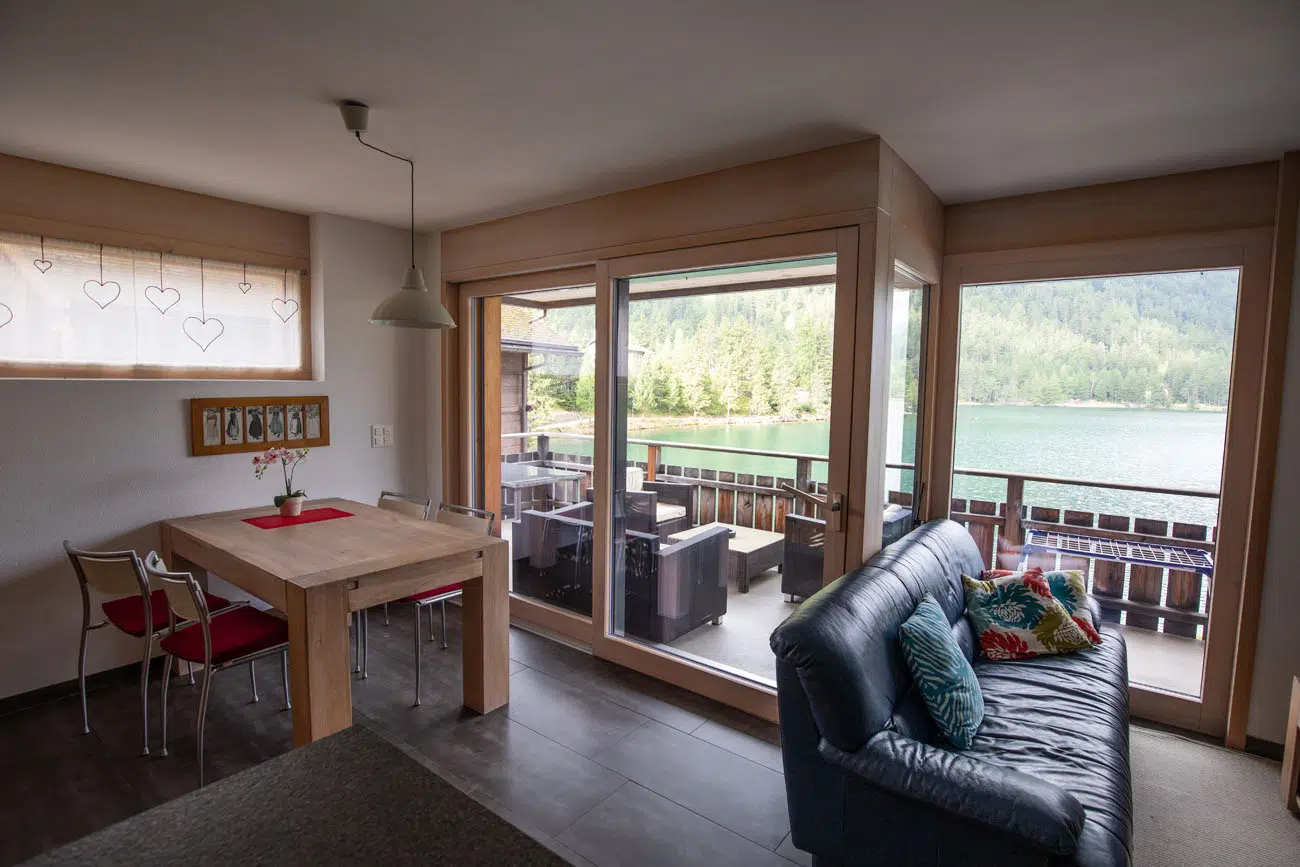
We stayed at Hotel Mont-Lac, a wonderful hotel that overlooked the lake. This was one of our favorite accommodations on the Haute Route.
We had a two-bedroom apartment with a living room, kitchen, and a bathroom. We also had a large balcony with a grand view of the lake. The washing machine was perfect for washing our clothes after several days of hiking.
The hotel serves breakfast and dinner. The dinner was delicious (salad, lasagna, and a lemon tart). Breakfast was a buffet of meat and cheese, yogurt and granola, fruit, croissants, and fresh bread.
Hotel Mont-Lac Champex
Our apartment
View from our apartment.
In Champex-Lac, there is a grocery store and ATM when you first walk into town.
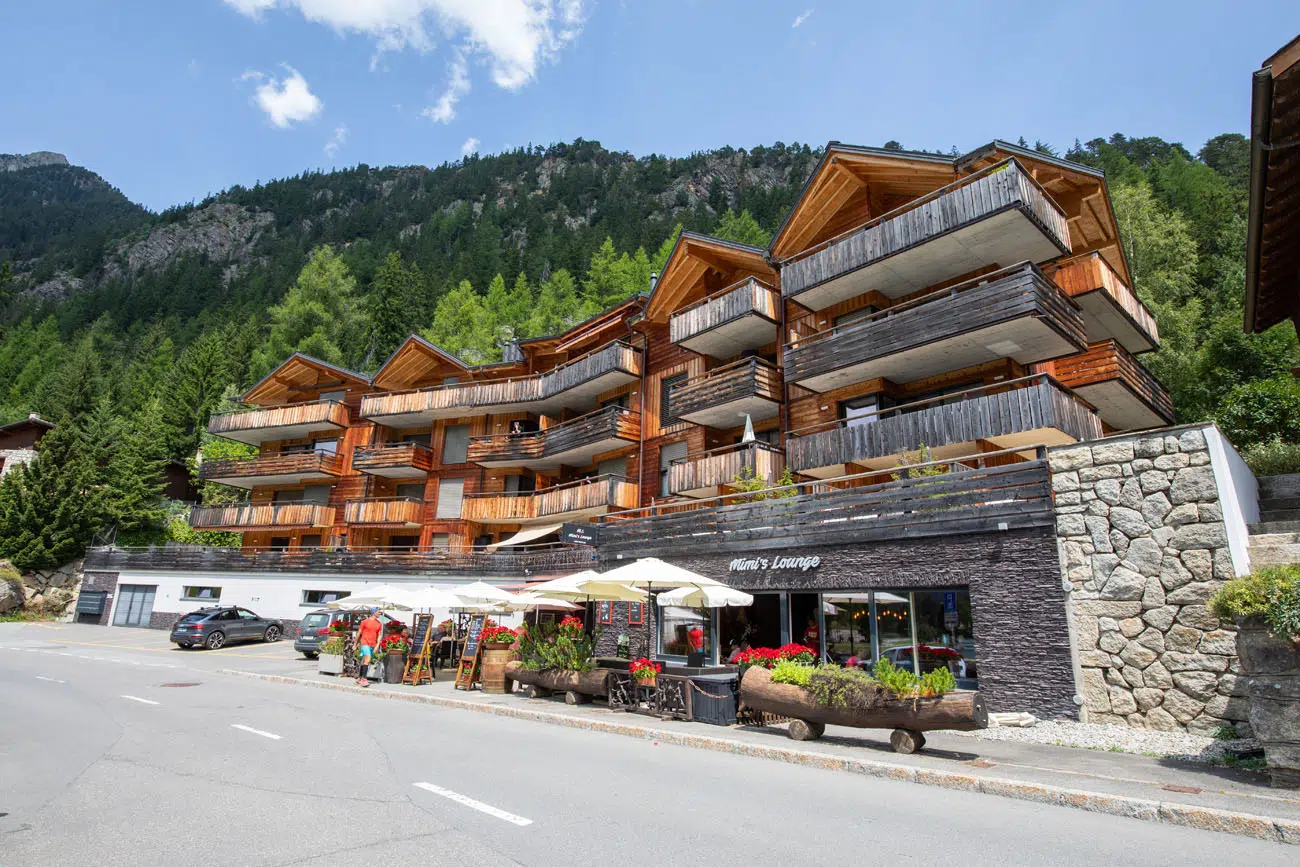
Other alternative hotels we considered were Hotel du Glacier, Hotel Splendide, Hotel Au Club Alpin, Hotel Belvedere, and Hotel Alpina. Hotels Splendide, Belvedere, and Alpina are located on the far eastern end of the lake, a little bit beyond where we stayed.
For a detailed list of accommodations for each stage, along with information on making your reservations, see our guide on How To Book Your Haute Route Accommodations.
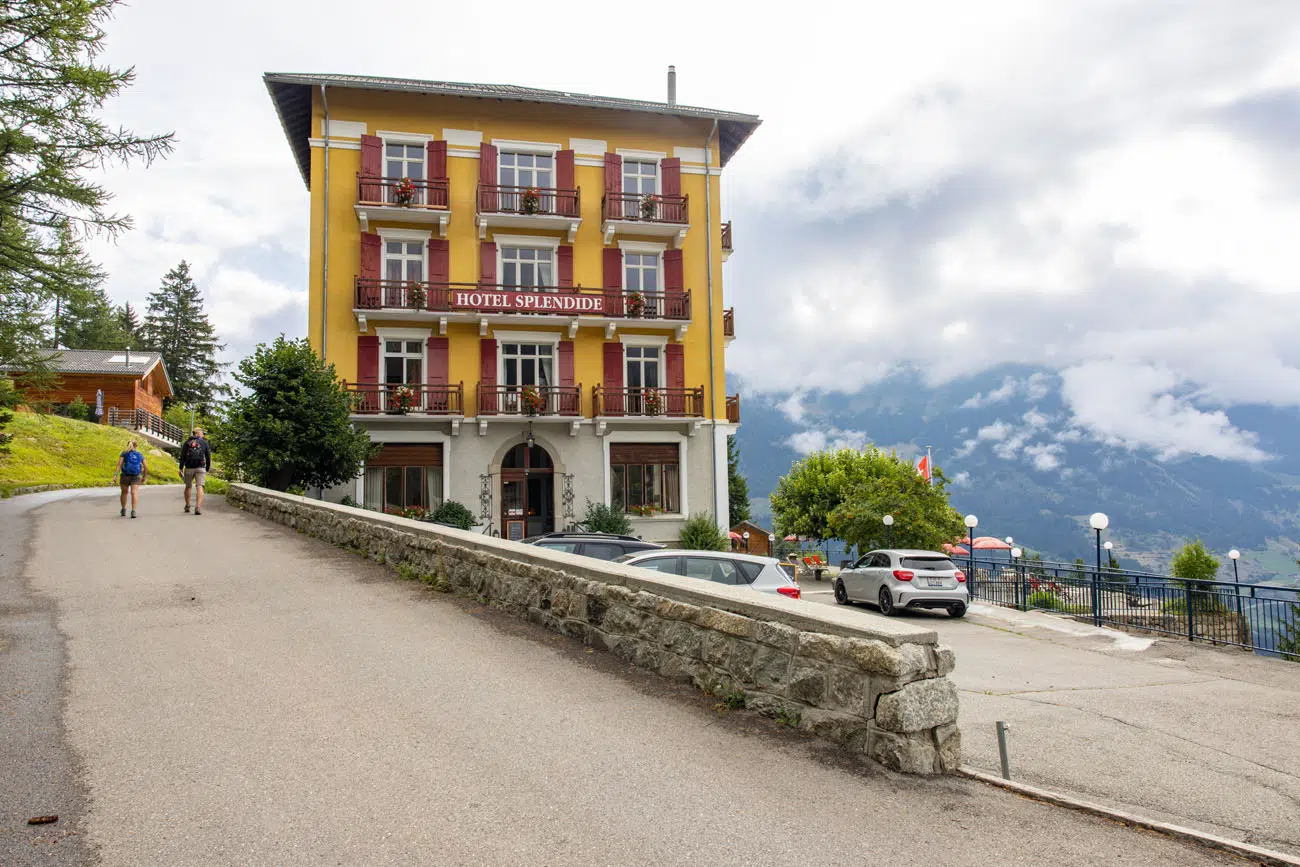
Hotel Splendide, photo taken at the beginning of Stage 4.
Clarifications for the Walkers Haute Route book
We were able to follow the Walker’s Haute Book by Kev Reynolds (the sixth edition from 2019; there is now an updated version) without any issues, meaning we never had to backtrack. But there were a few times during this stage we felt a little more clarification would have helped so we are providing that clarification here. These notes were taken related to following Stage 3 and not Stage 3A.
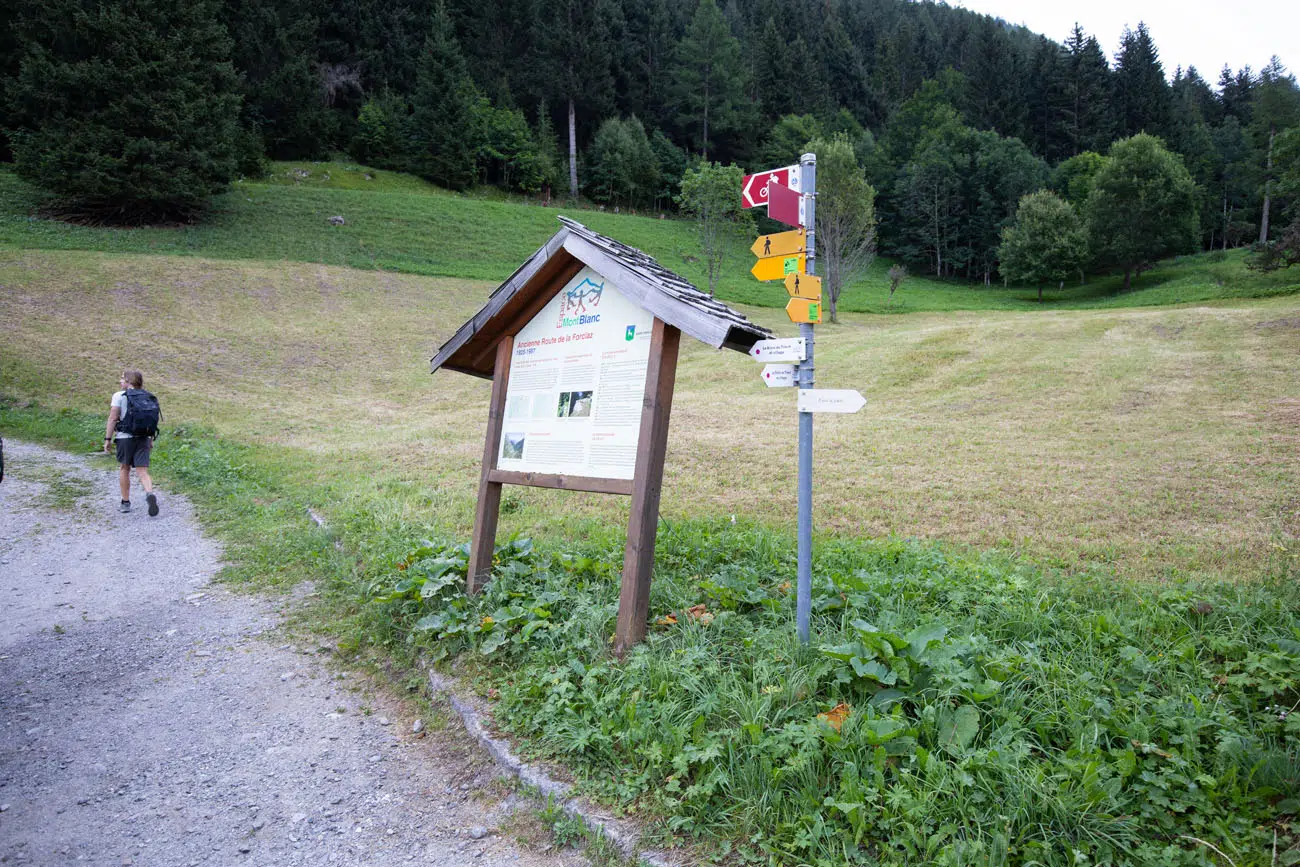
Finding the Trailhead in Trient: At the “Trient, Betty” bus stop (as labeled on Google Maps) there is a sign pointing to La Forclaz. We followed the direction of that sign which took us along the paved road Le Gilliod (as labeled on Google Maps). We passed the church, which was on our right, and it didn’t take long until this road ended at a main road. We turned right onto this main road and followed it until we came to a gravel road on our left. There is a signpost here indicating mountain biking trails and hiking trails. There is also a large sign board that reads “Ancienne Route de la Forclaz”. This is the trailhead and you want to follow the gravel road. Note that at the trailhead we did not see a sign pointing to “Sentier du Bisse-Glacier” as the book indicates and sadly the stone cross the book refers to was broken and lying on the ground. See the photo below.
Tyler is on the trail leaving Trient.
Starting the Hike: From the intersection of the main paved road and the gravel road, follow the gravel road a short distance until it splits. At the split turn right to stay on this gravel, rocky track up the hill. It will eventually turn into a grass track as you ascend. Keep following this until you reach a crossroads of trails with a trail signpost. The book refers to this as a “junction of tracks”. Continue straight here following the direction of Chalet de Glacier as indicated on the signpost.
Chalet du Glacier: As you approach this chalet and when you leave, you do not need to cross any of the bridges that go over the Trient River. As you continue on the trail from the chalet it will not take long until you come to a signpost pointing in two directions (Glacier du Trient and Fenêtre d’Arpettaz). Follow the direction towards Fenêtre d’Arpettaz.
Lower Valley: During the descent you will eventually reach the lower valley and be in the trees for a bit. You will come out of the trees onto a wide gravel track with a signpost. Turn left following the direction indicated for Champex-Lac. Following this gravel track downhill will take you past the farms mentioned in the book.
Relais d’Arpette: As you descend past Relais d’Arpette you will see a footpath on your left. It is marked with a signpost. Turn left onto the footpath following the direction indicated for Champex-Lac.
Chairlift: Once you get to the chairlift referenced in the book, Google Maps can be helpful to route you to your place of accommodation.
More Information about the Haute Route
In our Walker’s Haute Route Planning Guide, we have links to all of our articles about the Walker’s Haute Route, including information about each stage, how to plan your trek, what to expect, and more.
For an overview of all 14 stages of the Walker’s Haute Route, with overall hiking stats, map, elevation profile, and lists of the most difficult stages, easiest stages, and our personal favorites, check out our Guide to the Walker’s Haute Route Stages.
Stages of the Haute Route: Below are our guides to each stage of the Haute Route.
- Haute Route Stage 1: Chamonix to Argentière
- Haute Route Stage 2: Argentière to Col de Balme to Trient
- Haute Route Stage 4: Champex-Lac to Le Chable
- Haute Route Stage 5: Le Chable to Cabane du Mont Fort
- Haute Route Stage 6: Cabane du Mont Fort to Cabane de Prafleuri
- Haute Route Stage 7: Cabane de Prafleuri to Arolla
- Haute Route Stage 8: Arolla to Les Haudères
- Haute Route Stage 9: Les Haudères to Lac de Moiry
- Haute Route Stage 10: Lac de Moiry to Zinal
- Haute Route Stage 11: Zinal to Gruben
- Haute Route Stage 12: Gruben to St. Niklaus
- Haute Route Stage 13: St. Niklaus to the Europahütte
- Haute Route Stage 14: Europahütte to Zermatt
If you have any questions about how to hike the Haute Route Stage 3, or if you want to share your experience, let us know in the comment section below.
You Might Also Like
24 Best Things to Do in Chamonix, France in the Summer
Pinterest Facebook Flipboard Discover the best things to do in Chamonix, France in the summer. This guide covers the top cable cars, hiking trails, glaciers, and adventures in Chamonix, based on our firsthand experience hiking and exploring the area. Chamonix is one of the most spectacular mountain destinations in Europe, and in the summer, it’s […]
Grand Balcon Nord Hike: Best Direction, Hiking Stats & Tips
The Grand Balcon Nord is one of the best hikes in Chamonix. This trail runs above the valley, offering sweeping views of Mont Blanc at one end and Mer de Glace, France’s largest glacier, at the other. Tim, Tyler, Kara, and I hiked it in July as part of a five-day visit to Chamonix before […]
Aiguille du Midi + Panoramic Mont-Blanc: The Ultimate Guide
At 3,842 meters (12,605 feet), Aiguille du Midi is one of the highest places you can reach by cable car in the world and the closest most people will ever get to the summit of Mont Blanc without a rope and crampons. We’ve ridden cable cars across Europe from the Dolomites to Zermatt, and this […]
Chamonix Itinerary: How to Plan the Perfect Summer Trip
During the summer months, Chamonix, France is a spectacular outdoor destination in Europe. Visitors can ride the cable cars high into the mountains for breathtaking views of Mont Blanc, hikers can explore trails that lead to hidden lakes and massive glaciers, and families can explore ice caves and nature parks. Whether you are here for […]

How to Hike to Lac Blanc, Chamonix (Photos, Stats & Map)
There are several reasons why the hike to Lac Blanc is one of the best in Chamonix. For one thing, this alpine lake is beautiful. A series of gondolas and chair lifts lop off the first big climb, making this hike doable for most ages and ability levels. But one of the best reasons to […]

France Travel Guide: How to Plan a Trip to France
Travel information and advice for France. Best things to do in France with itineraries for Paris, the French Riviera, and the Alsace wine region.
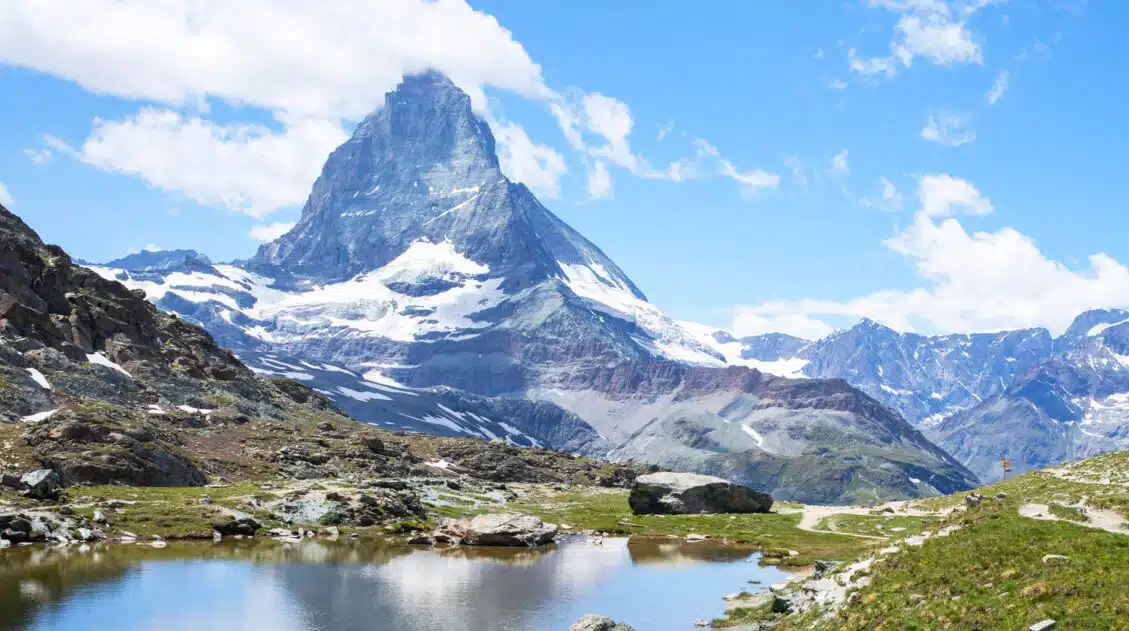
12 Epic Day Hikes in Zermatt (+ Trail Stats, Photos & Map)
One of the best ways to explore Zermatt is on foot. Hiking trails climb high into the mountains above Zermatt, past Swiss hamlets, through scenic valleys and rocky gorges, and to some of the best viewpoints of the Matterhorn. The network of cable cars and trains takes you up into the mountains, so for the […]
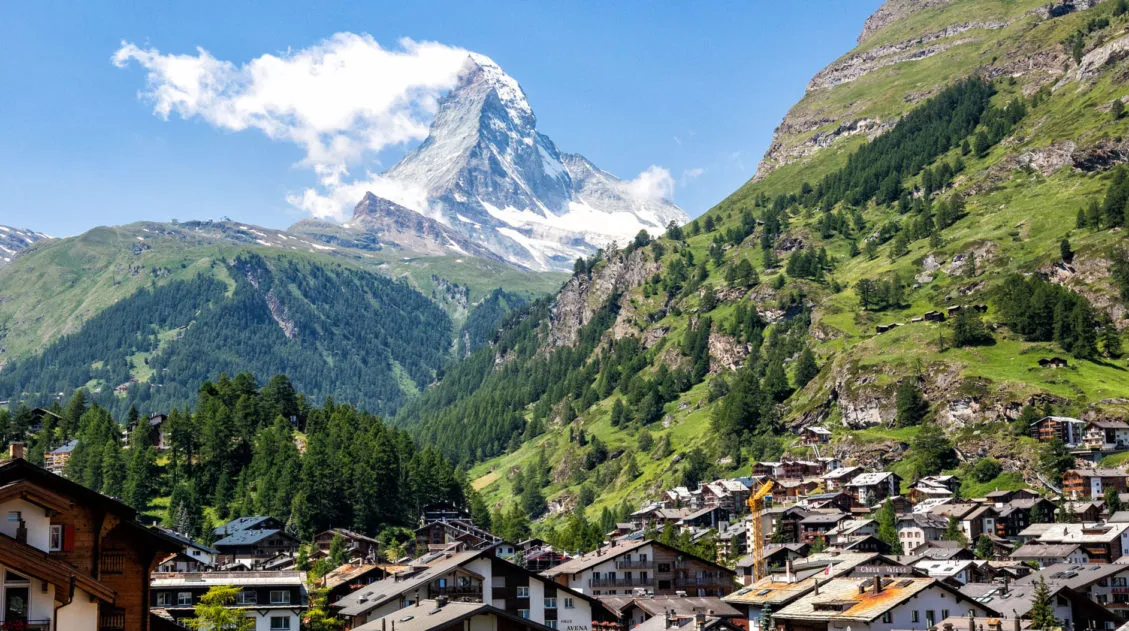
20 Amazing Things to Do in Zermatt, Switzerland
Zermatt is an idyllic mountain village tucked away in the Swiss Alps. The mighty Matterhorn dominates the skyline, creating one of the most unique alpine landscapes in Europe. Explore the hiking trails, journey up higher into the mountains by cable car and train, stroll the scenic streets of Zermatt, and go skiing all year long. […]
How to Climb the Breithorn: Photos, Trail Stats & What to Expect
Climbing to the summit of Breithorn is one of Zermatt’s most adventurous experiences. Standing at a height of 4,164 meters (13,660 feet), Breithorn is one of the highest peaks in the area and it is one of the easiest 4,000+ meter peaks to summit in the Alps. Thousands of hikers come to Zermatt to summit […]
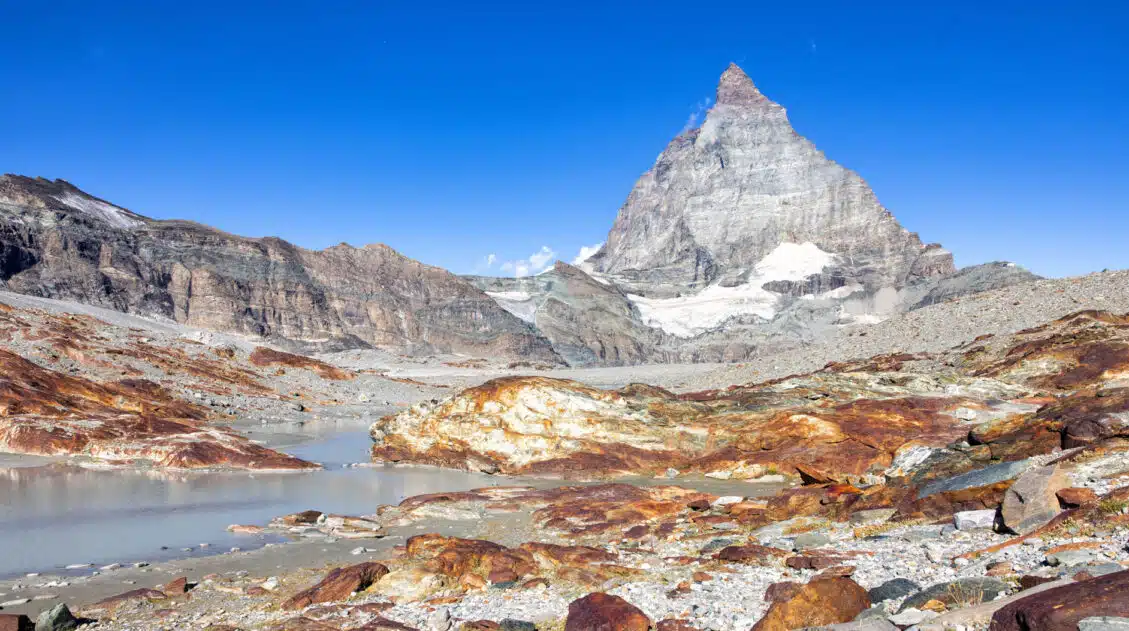
Matterhorn Glacier Trail: Ultimate Trail Guide (+ Map, Photos & HELPFUL Tips)
The Matterhorn Glacier Trail is one of the easiest and most scenic hikes to do in Zermatt. This point-to-point trail weaves its way between alpine lakes and along the way you get up close views of the Matterhorn. Since it is done one-way and is a mostly downhill hike, this is a great trail for […]
The Ultimate Zermatt Itinerary for 1 to 4 Days
How many days do you need in Zermatt? How do you plan the perfect Zermatt itinerary? The answer to these questions depends on several factors. How much time do you have? Do you want to get out and hike the trails or simply ride the cable cars to viewpoints of the Matterhorn? What time of […]
How to Visit Gornergrat and Hike to Riffelsee & Riffelberg
For one of the best views of Matterhorn, it’s hard to beat Gornergrat. A scenic, cogwheel train takes you from Zermatt to this alpine paradise. Once at the top station, you can simply enjoy the sweeping views of the Matterhorn and the Swiss Alps from the restaurant and terraces. Or, you can add on the […]
Switzerland Travel Guide: How to Plan a Trip to Switzerland
Switzerland Travel Guide Looking to hike some of the world’s most beautiful mountain landscapes, stroll through colorful old towns, and dine on some fondue? Then Switzerland is the perfect place for you! Visit the Bernese Oberland, a hikers paradise filled with towering mountains, alpine meadows, historic cogwheel trains, and quaint villages. Or, relax at Switzerland’s […]

Leave a Comment